

Grandmaster B
-
Posts
224 -
Joined
-
Last visited
Content Type
Forums
Calendar
Gallery
Everything posted by Grandmaster B
-
Thanks to you, I just discovered that you can now go directly from the voxel to the paint room, that's realy cool!!! Made a Hellboy like head for practice.
-
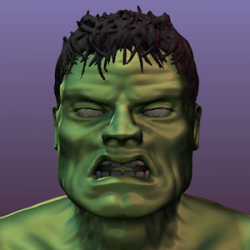
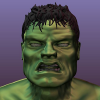
Two characters I've created a while back. Probably the most detailed models I've made with 3D-Coat so far. Now that I have a new, more powerful PC I hope to finish them.
-
Cool
-
No, not a pro.
-
Its good so far. With your topology you didn't take animation into account.
-
Damn, my phone doesnt support Flash. Game looks very cool, i like balancing games.
-
Agreed, this should be straightforward with 3D-Coat, much easier than in ZBrush. Although some microdetails should be painted on the texture, but they belong there anyway.
-
It is easier than it seems. Actually, i'm just a fan of "Married with Children"
-
About step 15.: Mark an edge as a seam with a left click and clear a seam with "Ctrl"+left click. Forgot to mention that. You may also mark and clear whole "Edge loops" when selecting it under "UV" on the left.
-
If you have several meshes that you want to join to one the voxel room is perfect for this. I cant promise that it all works but lets try: 1. Start 3D-Coat, in the start-up wizard under "Voxel Sculpting" pick the empty cross (second from the left). This is an empty voxel scene! 2. In the left toolbox under "Objects" click "Merge". An dialog opens, pick "Select mesh" and select the first mesh on your disk. 3. If you dont see the mesh on the screen, its too small. Press "Scale" and try "10.0" or something else. Depends! 4. Check if the mesh has visible flat faces, if they are pretty obvious, try the "Subdivide" button. This may take very long if the mesh is dense! 5. If you are satisfied click "Apply". Now its important to check if the voxel resolution is fine enough for your needs, if you feel like you loosed detail the voxel resolution needs to be increased. To increase the voxel resolution press "Res+" under "Commands" - BUT you have to do it before you "Merge" your mesh. So start over but now press "Res+" after Step 1. 6. Continue to "Merge" the other meshes the same way... all the meshes will be part of the same voxel object. 7. Save your work! 8. You probably have to sculpt and fix artifacts here and there. Hold the "Shift" key and paint the the left mouse button over artifacts. I recommend to Enable "Accurate Smoothing" found in the "Voxels" top-menu. 9. You may also create "hair" with sculpting, its not easy tho. 10. Save your work! 11. In the "VoxTree" right click on the "Volume1" and select "AUTOPO", change the "Approximate polycount" to something you like the output of the mesh to be. I assume 9000 should be enough. The other dialogs are not that imporant then. 12. After a while you are in the Retopo room, you have the option to get automatically created UV-seams. Lets start with that! 13. Again, left toolbox. "UV"->"Mark seams". 14. "Commands"->"Auto seams" 15. You now manually adjust the seams, be sure to create islands that can be easily unwrapped onto a 2D image. If possible avoid very small islands and seams that cross the face. 16. Hit "Unwrap". 17. In the top-menu. "Retopo"->"Merge with NM (per pixel)". You will be asked if you want "Ambient Occlusion", may be a good choice. You may delete the layer later anyway. 18. The next dialog asks about "Initial subdivision" and "UV-mapping type". You can choose the first subdivision number and "Keep UV". Also choose the texture width and height to your liking. 19. Save! 20. Go into the "Paint" Room. On the right bottom are your painting layers, there is "BakedOcclusion", "Normalmap", "Volume1" and "Layer 0". Create another one by clicking the first symbol on the bottom (looks like a piece of paper). Double click on the name and rename the layer to "Color" or something. 21. There is another tab named "Materials" with a few small images, here you need to load your textures to project them manually on the model. Click the "+" and in the dialog select a texture for the "Color texture". Hit "Ok" then, you dont need the other channels. In fact, lets deactivate them: 22. In the topmost toolbar is a tiny green sphere, a purple sphere and a black sphere. Deactivate the purple and the black. The green must be activated to paint only on the color channel. 23. From step 21. the "Preview options" dialog has opened, try the icons on the right to place onto the model. Place both, the image and the model to a good angle to draw the image onto the model. 24. Pick white as your drawing color and 100% opacity by pressing "C" on the keyboard and selecting the options. 25. Now with the left mouse button start to paint the image onto the model. 26. Repeat the steps 21-25 for different angles with different textures until your model is fully painted. 27. Dont forget to save often. 28. When done "File"->"Export Model". On the dialog choose "Export mid-poly mesh", "Export color", "Create padding". Leave the other options unchecked. Done! (?)
-
Don't worry, like Blender, Cycles will always be free under the terms of the GPL. If there will be commercial products that are based on Cycles is another question. Like there are commercial, rebranded versions of Blender... I guess that Cycles will be modified and made available in other CG packages, i heard something like that. Doesnt change things for Cycles or the GPL tho. I dont saw any chaos or unfinished algorithms but like 3D-Coat, Blender is a moving target that lives and dies from its community and contributors. Maybe a little chaos is not a bad thing there.
-
Sorry to interrupt, but that is not true for the current version of Blender. Please try Blender and, like any complex software, give yourself enough time with it, i promise it will grow on you. I believe you'll see its not chaotic nor unfinished but very complete and stable. Also the Blender Foundation will never make Blender or Cycles commercial, legally its nearly impossible. As a sidenote, the GSoC "Onion" branch is currently improving the sculpting and painting in Blender. May be of interest too.
-
What if, you Merge all meshes into one voxel object then create a retopo mesh of the voxel object with textures and then project the textures on it. Aren't the textures you mentioned just like photos? Should be easy then.
-
 Hi, interesting contest, count me in! I've tried the auto-rigger a while back with a model were the legs were bent a bit, this was a problem because i could not fix that in the auto-rigger (i knew that the binding pose was not correct but tried anyway). Besides that it worked exceptionally well, the vertex weighting is very good. I can rig and animated for myself but its the most tedious and unrewarding task ever! Is 'T' the prefered binding pose? Do other poses work?
 -
Brilliant. I envy your ability to model perfect hands and feets.
-
With the "Texture Baking Tool" you can bake textures from one mesh object to another with different UV sets. Is that what you need? The workflow in your case is a little complicated tho.
-
If you have a voxel object visible the mesh vertices are snapped to the surface of the voxel object. You may use that if the mesh has a different shape than the voxel object you like to match.
-
How well does 3DC work if I use a mouse?
Grandmaster B replied to lmayfield's topic in General 3DCoat
Mouse acceleration may be turned off, then it works very nice. -
From my experience, your hardware should be more than sufficient to run and use 3D-Coat. I dont consider a Intel Core 2 Duo old and 4GB is enough for everything. I also introduced 3D-Coat at my work after some evaluation, to be honest, the biggest problem were small/random bugs and some inconsistencies. My coworkers said the same but are in general happy with the software, when it works it gets the job done nicely! However, in a company it is more important to have stable, reliable software. What i still do not understand is that there are new features introduced regulary and while there are bugs fixed there are new bugs appearing and some old bugs remain. That makes you never know what version to use and you'll probably up- and downgrade, there seems to be no "stable" branch of the software, just a "beta" branch with some builds considered more stable. Eventually you get used to not use some tools like you want or do workarounds to get it working. Most of the time, there are no serious problems but it can get annoying sometimes. However, it works here. You'll need the five to ten minutes to deal with problems here and there and the willing to do so. Hope you get it working so you can try it!
-
My favorite! -> http://developer.amd.com/archive/gpu/MeshMapper/pages/default.aspx Very good quality baking with the right options to tweak visual issues, if any. The AO baking also is much better than 3DC.
-
By all means
-
Looks awesome, may i ask, have you studied art, are you working from references? Within 3D-Coat you increase the resolution of the voxels. You can then detail your model in the new voxel resolution and use the proxy mode for shape adjustments. But you may not get as much details like in ZBrush. When using 3D-Coat, something like skin details is usually done with texture painting. But it very much depends on your hardware and preferences.
-
The sculpture is very good, i like the details and the ant like shapes. Its also very clean and polished. The mouth may be too hidden, it could give the alien more character. I also have to say that the skin painting is to basic.
-
I like the models in the scene but the lighting seems very mixed up.
-
It's a personalised advertisement service, with chat.