


Psionic
-
Posts
82 -
Joined
-
Last visited
Content Type
Forums
Calendar
Gallery
Everything posted by Psionic
-
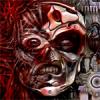
Here's a few pics of the scientist in a hazmat suit - general enemy charcter
- 25 replies
-
- 2
-

-
- psionic
- sketchbook
- (and 7 more)
-
Thanks...Here's a couple more basic items
- 25 replies
-
- 2
-
-
- psionic
- sketchbook
- (and 7 more)
-
Lol thanks, he certainly does but there are worse things to come...well maybe ;-)
-
A couple more bits, some crates and a specimen...
- 25 replies
-
- 1
-
-
- psionic
- sketchbook
- (and 7 more)
-
Thanks, yeah I am hoping to do a few new tutorials very soon featuring the new PBR stuff - just need to get a little more comfortable with it ;-)
-
A few models for Being One - Episode 6 (in the making)
- 25 replies
-
- 1
-
-
- psionic
- sketchbook
- (and 7 more)
-
All posted in-line for easier viewing ;-) Plus I added a couple more
- 25 replies
-
- 2
-
-
- psionic
- sketchbook
- (and 7 more)
-
Just thought I'd upload some pics of some models from a small game for Android (unity) I'm making called Cashcade - A simple but addictive coin dozer game and these will be some of the prizes ;-) cashcade free (with no prizes) is online already here:- https://play.google.com/store/apps/details?id=com.PsionicGames.cashcadefree&hl=en_GB
- 25 replies
-
- 4
-
-
- psionic
- sketchbook
- (and 7 more)
-
 WOW radial symmetry looks great, very useful!!
 -
Love the triple headed design, great folds and anatomy sculpting, looking forward to more updates...
-
Looks great so far, nice scary atmosphere!!
-
Psionic's 3D Coat youTube tutorials
Psionic replied to Psionic's topic in Tutorials and new feature demos
PAINTING NORMAL MAP FINE DETAILS http://www.youtube.com/watch?v=5Tds8Ku3YtE -
Psionic's 3D Coat youTube tutorials
Psionic replied to Psionic's topic in Tutorials and new feature demos
PART 2 - TEXTURING A HEAD USING REFERENCE IMAGES http://www.youtube.com/watch?v=Da8sheHAesg Quick tutorial showing how to texture the model made previously, also here's a photoshop tutorial for creating texture like the ones I use in these tutorials:- http://www.youtube.com/watch?v=4-n5k6nE-gE -
Psionic's 3D Coat youTube tutorials
Psionic replied to Psionic's topic in Tutorials and new feature demos
Thanks to AbnRanger for this tip:- Go to Camera Menu - Background - Edit Image Placement option and press 'END' key to assign a Hot key - something like 'R' as this allows you to bring up the 'edit image placement' menu much quicker to show/hide the refs. -
Psionic's 3D Coat youTube tutorials
Psionic replied to Psionic's topic in Tutorials and new feature demos
MODELLING A HEAD WITH REFERENCE PICS PART 1 http://www.youtube.com/watch?v=RvCgenXIHJk Using the background reference in 3D Coat you rotate the model to face forwards and 'choose' the front view image, then rotate it to the side and 'choose' the side view image. Scale, position and set the opacity, close it and you're all set follow the ref pics! Part 2 coming tomorrow... -
Psionic's 3D Coat youTube tutorials
Psionic replied to Psionic's topic in Tutorials and new feature demos
I am using the latest beta 4.0.09 from here, not sure if that makes any difference? http://3d-coat.com/forum/index.php?showtopic=10395 -
Yeah that's standard on any brush you use but that takes two strokes to create a raised line and a lowered line! The slash tool in Zbrush and the Draw tool in surface mode in 3D Coat work by raising and lowering based on the Alpha in the same single brush stroke.
-
It actually works with the DRAW tool in surface mode (Click the little V next to the layer to make it an S = surface) and try the DRAW tool with the above alpha and settings, still needs a bit of smoothing but it kinda works!! note: Also tick 'Remove stretching'
-
Could you export OBJ from 3D Coat (which would include the UV's so far) and fix it in max, save as OBJ from max and re-open in 3D Coat? (Make sure export/import settings are set to Keep UV's) Go to File>UV Map model? and open your fixed OBJ and carry on UV mapping.
-
Also creating the brush alpha vertically means you don't need to rotate the brush 90 degrees ;-)
-
I had a little attempt with the voxel>airbrush but it seems 3D Coat can only raise the surface, not push and pull (i.e. grey is middle, white is raise, black is lower surface)??? You have to set depth pretty high then smooth over afterwards but it's quite good... Brush alpha attached.
-
Psionic's 3D Coat youTube tutorials
Psionic replied to Psionic's topic in Tutorials and new feature demos
AbnRanger: Agreed, the pose tool is quite awesome and very unknown/underrated, I only just discovered its power recently - Tip for using the Spline stroke E-mode is great, will definitely include that in a future video!! HALLOWEEN SPECIAL - SLENDERMAN TUTORIAL VIDEO https://www.youtube.com/watch?v=WjGAmmpxGGA -
Psionic's 3D Coat youTube tutorials
Psionic replied to Psionic's topic in Tutorials and new feature demos
Thanks to all for your support, appreciate it!! Quick note: Using the pose tool I could have used the LINE selection mode to select the lines around the pumpkin in a fraction of the time and much neater...Still learning myself ;-) -
Denis: When you create the spline object by dragging an layer in you get a dialog box popup with X,Y,Z period (spacing). It shows you several splines cloned/looped if you like, you usually need to tweak the Y Period setting to set the spacing how you want it. Not sure if this spline spacing can be edited afterwards??
-
If I'm understanding you correctly here's one way using the curves tool. See attached pic 1. Create a cube, press ENTER to create it. 2. Drag the cube/layer by the little arrow that appears just to the left of the PLUS sign on the layer when you hover over the layer..... 3. up into the SPLINES area to create a new spline object. Set the Y period (spacing) so that the cubes overlap a bit and create a new spline object. 4. Select the CURVES tool. 5. Select the new CUBE SPLINE OBJECT you just created 6. Draw some curve points, position, scale, rotate etc and press ENTER to make the form, possibly on a new layer if you want to work on seperately before merging it.