


The Candy-floss Kid
-
Posts
698 -
Joined
-
Last visited
Content Type
Forums
Calendar
Gallery
Posts posted by The Candy-floss Kid
-
-
Grzegorz, a good idea may be to experiment with the voxel menu >decimate option when in surface mode.
This will show you how far you can decimate geometry whilst maintaining details such as sharp edges.
If however you are vertex painting the amount of tris that you need or do not need will depend on the resolution of the vertex painting you require.
If you working with voxels you can cache the layers to save on system demand if things slow down.
Avoid attempting to capture high resolution details with voxels - use surface or move to bump/displacement mapping.
Not sure whether this still applies with surface sculpting but pressing enter to apply your changes certainly used to help speed up flow.
I've found in the past that meshes too large can behave strangely with rendering and brush sculpting - so avoid meshes that are very large in physical dimensions in relation to the grid.
Also, always pay attention to the lowest required polygon amount you can get away with. This is a good habit to adopt as it avoids slow downs as any project build in size. If your using 3dcoat to quickly create meshes to export to other applications you can simplify your 3dcoat files to contain only that which is needed for each element of a larger scene that you intend to recombine and render elsewhere. Similarly if you choose to render in a 3dcoat scene you could import all 3dcoat components created in smaller files back to the final scene for the final render only.
-
Big thank you for a great update and another big thank you for all the great videos posted to help keep us updated with the pace of change.
Tapering in Bas Relief is a great new feature. Always great to see existing tools developed further as well as all the new features.
Would dearly love to see arrays in voxel mode developed more in the future too allow to tile around forms and follow angles.
-
The Raw Subdivision addition is a great feature for extra control when required.
-
I think I'm heading in the right direction
You are most certainly.
I should/ shall pop up a video I did a few days ago with regard brush size in 3DC.
It's a seemingly small but very important factor for new users to realize.
Sometimes I feel we get so lost in the technical that the seemingly simple facts are often omitted.
The ability for new users to develop a mental mind map of working methodology is something that takes a few years for any software to establish by repetition. I'm happy to see for new users that the hard work on the 3DC youtube channel as well as the generosity of so many other 3DC users have made this a quicker journey.
Best of fortune in your 3DC journey - look forward to seeing more posts.
-
If the final output is for a main character/ a close to camera polygonal model outwith 3DC I would be inclined to manually retopo all the elements for tidier uv's and keep the high rez surface mode for baking back the details. Good quality decimations that allows a degree of reposing of character elements can also be very useful other than using autopo.
Voxels over surface ?
No rules for best method other than than a general consensus favoring voxels for blocking out and reliable boolean operations.
Surface mode for finer brush control, detailing and finessing. Similarly the inverse i.e using selective area decimation for allowing easy moving of the bigger masses in surface mode is worth building in to your design for speed. I'm a big fan of proxy mode for that - a method for which it is always best to save beforehand.
When it comes to working with speed in 3DC ensuring you have the most effective brush size and falloff in relation to the zoomed scale of your object holds the key to fluidity.
-
Until today I never realized that 2D-Paint tool in voxel mode opens defaulted to sampling off the normal of the surface.
Doing so has made it a really cool tool and works with the alpha in a way far better than I remember from earlier versions.
I'd remembered it historically as always requiring to be set by right mouse clicking with no option to sample normals?
Anyway......
My question is , If you've used the right click method how do you toggle back to the normal sampling method?
Also is there now a means to switch on and off a sample to normal modes across the various tools in 3DCoat?
Out of interest it was this video by Manuel Angel Piñeiro on youtube where he paints on the lovely details of the flowers on the sides of the ring.
I wondered what he was using? Wondering perhaps if it was the merge on surface tool and was surprised to see that he was using the 2d-paint tool with such great results - it seems far improved to how I remembered it.
-
Hi Stu,
getting glass in ZBrush is more akin to a transparency effect tinged with graphical reflections.
Illustratively though it can work effectively for glass details on characters such as spectacle lenses or spaceman helmets :-)That'll be why you your refraction question remained unanswered I'm guessing.
For transparency you must turn on the BPR Transparent Shading switch in the Tool > Display Properties sub-palette. The Transparent option must also be turned on in the Render > Render Properties. Reflections: Render Settings: increase details slider to 2 if your reflections are jaggy
Lighting wise you can add gobos to lightcaps to give you a graphic kind of lighting reflection.
To create a gobo mask for the light >lightcap>alpha - to make a window effect use a square and change hdivide. Lights can shine both a texture and an alpha as a gobo
Lights >Background (image) - inserts a reflection image controlled by a materials slider Env Reflections - you may need to retouch the Env Reflections if you have adjusted the lights background image.
HDR images (imported first as a texture) lights >background image to turn this to a reflection image for a lightcap turn on Reflect.
Out of interest Lightcaps can also be turned in to Matcaps.
Good use of Lightcaps can really enhance your ZBrush lighting and renders particularly with multi pass render. Avoid lightcaps for fiber / hair renders for the most part. I would use reflection and specular material passes to blend in photoshop for best control rather than trying to set it all up in one render with ZBrush. In many respects good BPR renders using Multi Passes in ZBrush may suit your style better than KeyShot.
I've attached two videos that may help in general.
.
ZBrush 4R6 Standard Material Creation by Eric Keller"Everything in ZBrush is a kind of a fake to make things look good "
ZBrush Lightcaps
https://www.youtube.com/watch?v=aMM7yV-dbBc
With regard rendering your vertex color in Carrara why not decimate copy of your vertex painted mesh in 3DC - import this lower rez decimated mesh back in as a retopo mesh and bake a texture map with a uv'ed mesh to use as an import in to Carrara? It's adding one more step.
It would be easy to do this in Blender too but if nodes give you the jitters I can see why you are attracted to going the KeyShot route as the Carrara rendering engine is looking somewhat tired. For the most part I guess you are using diffuse materials in Carrara? The node set-ups for these in Blender Cycles are far easier than you might imagine - the node in the video is at it's most basic is merely the vertex color plugged in to a diffuse for that material. I felt the same way about nodes when I first saw them :-) Sent me in to flat spin and panic they did .
Setting up Blender to a 3 button mouse emulation mouse mode with left click makes it far easier to work with.
I've created a video for that with a neat addition as well as a video for setting up the camera easily just as you might in Carrara. I've not uploaded but if you interested to poke some more in Blender I'd upload it especially for you .
.From what you've eluded to your one stop shop may be Blender with the proviso of relearning some stuff - hair etc and basic nodes.
If Carrara would update the quality of it's rendering engine + allow vertex color imports then all would be well and you would be at peace.
All the best Sir. -
I was using the Keyshot demo last week,I am sure 3dcoat has the potential to do what that can do.
It would be fab if the render room got the update it's long been needing to allow 3DCoat to become a more complete system.
In the meantime why not export out to Blender Cycles which plays very well with 3DC?
I've just created a video on getting your color vertex maps out from 3DCoat or Zbrush to Blender here:
You'd get your glass effect in Blender an instant and could select what you wish it to reflect.
See here under HDRI Maps
The trick is about using the map not as a replacement of the existing lighting environment, but as a source of reflections for our objects.
http://www.chocofur.com/2-environment.html
Keyshot is fantastic for getting fast results as long as your computer has enough poke to handle what it needs to work fluidly.
-
Hi Richard, as far as I'm aware your cloth mesh will need to be imported as a retopo mesh.
The mesh you wish to drape over will have to be merged/imported in voxel mode.
The Cloth tool is under Objects in voxel mode. Not sure if it's been added in Surface mode yet?
In the Cloth options 'pick from retopo' you select the retopo mesh you wish to drape over the voxel form
After you have run the operation you click the "to retopo" option to send it back as a retopo mesh.
From there you could export out the altered mesh to use as a morph.
As the retopo cloth begins it's simulation you can increase the size of your brush with the bracket keys
to further pull and adjust the cloth as it transforms. It's a little hit and miss.
Not sure whether the cloth simulator will give you all the subtle control you may require for pinning.
I've only ever used it to drop over forms to create such things as bat's wings etc.
With regard cloth sculpting I know you can also merge your retopo to surface mode and use the option 'conform with retopo mesh' which can be set from the transform tool in surface mode. I'm sure therefore you could use this to further fine tune your results in surface mode whilst it updated your retopo mesh.
Hope that is of some help and do please post back what you find out.
-
You could try using carbon copy cloner and clone your OS + what you need over to a new Hardrive without all the other stuff that's filling your current hard drive and see if things work better for you when you boot in to your cloned OS?
Or clone all the stuff that's currently filling your computer that you don't need to an external HD without having to boot in to a cloned external HD?
-
Raul your situation has been in our thoughts and wishes. So delighted to read that you have finally through perseverance and good faith come through your hardships. Best wishes for your new beginning.
-
Technology solutions like intelligence are convergent.
With regard diversity and choice , would that we only drink one drink, eat only one basic food, listen to the music of only one musician , enjoy the art of only one artist, argue over who painted the first ever vase of flowers and thereby deride all subsequent painters of vases of flowers as plagiarists.Would that we hold ourselves as creatively accountable for originality as we presume to do so of others by want of good grace.
-
The old style materials usage had an upfront and easy charm like the masks.
You right clicked to paint with material color or left clicked to paint as a stencil using your chosen color.
One thing I liked about it was you could quickly drag and drop images from your desktop in to your old style materials folder.
Maybe you still can? I used it often for reference purpose too.
I've not really spent much time yet with 4.5 so do not know whether the tiling facility of the old material like the masks system is still available?
Since reinvention we have this method of projection.
-
 1
1
-
-
Ajz3d and Digman,
much obliged to both of you for your kind assistance on this matter. Your responses has been of great help as truly much has changed about 3DC in such a short time span. A whole lot of new tricks to learn methinks. In consideration I shall wait now for the 4.5 Beta14 for the mac to be released before delving in further with testing renders.
-
Many thanks ajz3d, I have taken a note of your settings (added as a quote on this thread below) and will try them out.
Are these settings only required for rendering in the beta prior to 13 or are these settings still pertinent to rendering pbr materials?Andrew Shpagin: Finished updating render room, now it renders lights derived from panorama correctly.
If you're rendering a vertex painted model, make sure to set the shader to one of the two available PBR shaders
Are these two available shaders in my default shaders list or somewhere else?
All I could see was the standard list of shaders.
--------------------
It is already possible to render out lighting almost identical to what is displayed in the viewport. Sort of. Although it requires a little bit of tweaking and it doesn't allow for using additional lights.
The workaround I'm using:- Set primary light intensity to 100.
- Set ambient light to 0.
- Lightness to 500*.
- AO percentage to 25*.
- Delete all custom lights.
- Black out the remaining light by setting its colour to (0,0,0) and intensity to 0.
* - The relation of AO percentage and lightness seems to be an exponential function. I only looked up some samples that work good.
lightness ao_percentage
Few pairs that return almost identical results on the rendered images:
1355 10
500 25
262 50
174 75
130 100I mostly use pair 262/50.
The pairs return subtly brighter lighting than the viewport as I like it this way, but you can always darken it to almost perfectly match the viewport by slightly lowering the lightness parameter of each pair.
-
My apologies Digman I should have said , I'm trying to render in 3DC itself - version Mac OS X [4.5.BETA12B].
-
Hi Folks,
Whilst the pbr shaders look great in the paint room. I'm having great trouble with getting a good render using the pbr materials.
Are there recommended shaders to use in tandem with pbr materials to achieve good results? Do lights need adjusted differently for PBR materials?
Any do's and don't's with regard rendering pbr materials would be much appreciated. -
Thanks for posting this - stunning :-)
-
A neat way to do this is to use the cloth tool.
allexr shows this to great effect in the video below (See from about 13mins in)
It's a highspeed video but if you watch it frame by frame you'll see how it's done.
3D-Coat Forum: 8th Challenge - Flying boat sculpting and texturing
Video by:
Sándor Veres alias: allexr -
I really like this workflow for setting up planar rock forms using 3DC. See what you think?Master Class Rock Sculpting Tutorial - Workflow for 3D Modeling in 3DCoat Voxels, ZBrush and Modo for Gaming and Film VFX
from Indie Dungeon
-
1
-
-
Squeaky Wheel wants to know what's the ETA of the PBR Mac version coming out?!!
Squeak, squeak, Mac version, squeak,squeak,squeak,squeaks,squeak,squeak, Mac version,squeak,squeak.
Some guys have all the luck
Some guys have all the fun.-
1
-
-
“All human wisdom is contained in these two words - Wait and Hope”
― Alexandre Dumas, The Count of Monte Cristo.
Topic quelled, isolated and contained in the Château d'If .
For the present Andrew is best reached by prayer.
-
Zbrush interface is a b****
For fluidity and flow the interface and access to function is best custom made with custom menus and saved hot keys to suit your own liking and needs.
Custom interfaces are essential for quick access to relevant functionality per task and in that sense then become more like the rooms approach in 3DC.
There's some good ready made custom UI's out there to modify to your own needs.
Accessing the myriad of menu drop downs is a fevered experience best avoided and reserved for less frequently required functionality.
If anyone has trouble doing the fingers and toes, let me know; I've figured out just what he did there, even though he doesn't say exactly how he does that in the video.
Sharing techniques is always welcomed.
-
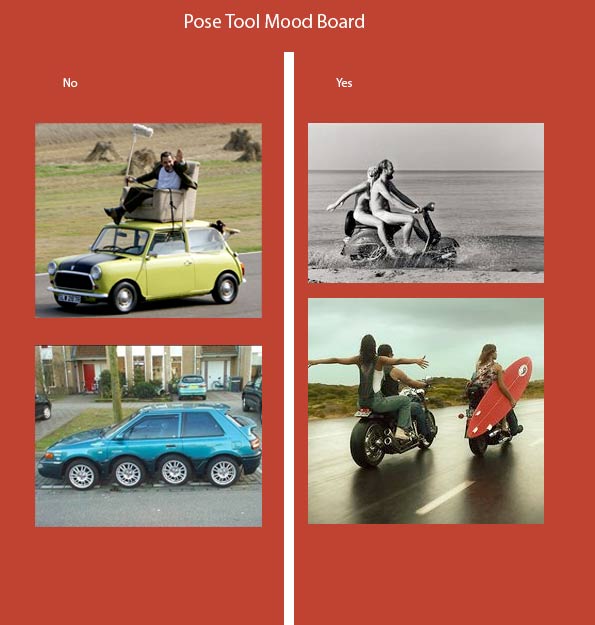
Future direction for pose tool: a mood board.
Features request priorities - share ideas for improving the program
in General 3DCoat
Posted
Nope.
I have read that it is on the to do list once pbr has been fully passed with a complete bill of health.
3DC I am sure will undergo a directional reevaluation and expansion with regard polygonal editing options.