Chip_M
-
Posts
24 -
Joined
-
Last visited
Chip_M's Achievements
Neophyte (2/11)
2
Reputation
-
This problem seems to be limited to exporting as TIF. Exporting as TGA worked as it should. When I get a chance I'll see if it's reporducable on another file and if so I'll report it to Mantis.
-
Same result in V4_014B
-
Don't think it would be scan depth. This is from the layers menu (export depth) and also from the textures menu (export displacement current layer) in the paint room. I'm using black normalized because it's not actually going to be used as a displacement map. It will end up being a layer mask in photoshop and then be repurposed as a spec map. The depth is all painted, not baked. Additionally when I merged from the retopo room for per pixel painting the normal map and AO both baked and saved fine. The baking scan settings in retopo are min/max both at 10. The texture baking tool is set to in/out depth of 1, but I'm not using it for this since it's just painted depth information I'm trying to save.
-
V4_014A
-
This is really baffling and I don't have a clue what's going on here or how to fix it. I'm trying to export a displacement map from a retopo model I've UV'd and painted. The image below is what I'm getting. The displacement map appears to be flipped vertically and is underneath the shape of the correct UV layout which is occluding it so I'm ending up with some weird boolean combination of the two. How the @#$! did that happen? There's only one UV set on the mesh. Anyone have any theories, or more importantly, know how I can fix it? For reference, here's what the UV layout looks like
-
Yeah, it's a lot faster working on the retopo mesh too and ultimately it's giving me exactly what I was after with the added bonus of it being completely nondestructive.
-
I finished doing retopo and UV layout and tried making a custom strip and using it to paint depth in the paint room instead. It's working perfectly so far and giving me the same ability to switch between applying the brush along a spline and then freezing the same stroke. Thanks a bunch for the help.
-
I should have also mentioned that I'm running the 64bit CUDA version, Win 8.1, 32GB RAM, and a GTX 780. It's possible I could be running into a RAM or drive issue but I've not had issues previously. When I first started having holes appear I tried the fill holes tool and 3DC didn't find them even though they're clearly visible in wireframe. There may just be something funky with this model too. I built the base forms in Max using splines with cross section and surface modifiers then shelling them and adding a turbosmooth. I merged those pieces into a voxel layer in 3DC, closed invisibe hulls and filled voids, then finished off the base form with a lot of smoothing, and laying down curves and blending them in, I didn't have any problems at all until switching to surface mode to do strand detailing.
-
I was using the latest beta build. I reverted back to the current release build to see if that made a difference but I encountered the same problems there as well. Random holes appearing in the mesh and out of memory errors. The bottom line seems to be that I just can't work in sufficient resolution to do what I want to do. I'm currently working on retopo and will try getting the effect in the paint room instead. One thing I can't seem to figure out is how to get a brush with a mask to behave the same way the scratches tool does. I thought maybe I could use a brush alpha that's just a few dots and have it follow along a spline path and achieve basically the same thing, allowing me to do several strands at once. Is something like that possible? If not I'm not going to be able to do it in the paint room either. Having to do one strand at a time would take days. Because of the length of the strands and needing the look of finely combed hair, being able to use the stroke along spline is really what I need. It's not something I can freehand and get the look I'm after.
-
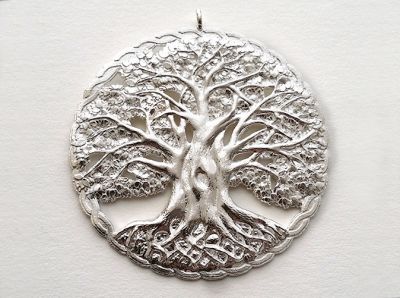
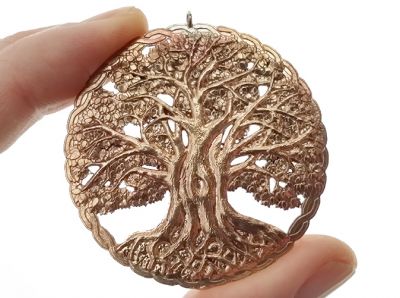 These were printed in wax which is then used to make a plaster mold for casting the metal. They were done by Shapeways.
 -
So I switched back to voxel mode to repair a couple of holes, then switched back to surface and got this - even more holes. I'm about to give up. This is ridiculous.
-
The first hole appears. This is in the middle of a spline stroke and it should only be moving vertices. Notice how the freeze is darker around it as if it applied the stroke twice at that control point? Am I hitting a bug in the spline tool? When I brought the exported obj into Max to check scale it was huge so I scaled it down to a realistic size in real world units, reset its xform, and reexported to 3DC to see if that would make a difference. It had been 67 million polys at 16X previously, and is 44 million at 16X now. I can understand scale making a big difference in voxel mode, but what difference does it make in surface mode beyond floating point precision?
-
Here's what it looks like trying to do it at 8X.
-
In polygon density you mean? If it's less dense it won't resolve the scratches tool cleanly. Since the end result of the scratches ends up being a specular map I could do it outside of 3DC but being able to work directly on the form rather than on the UV template makes it much easier. I've exported the finished base as a new obj and am going to experiment with changing it's scale before brining it back into 3DC for another try. I'm really at a loss as to why I was able to do this without issue before and this time can't get more than a few strokes in before a crash. If memory serves I was at 8X last time, but was hoping to achieve a finer, cleaner result this time. Can 3DC just not handle that kind of poly density?
-
I sculpted this in 3DC and had it printed by Shapeways in raw silver and raw brass using lost wax casting.
-