Rkhane
-
Posts
49 -
Joined
-
Last visited
Content Type
Forums
Calendar
Gallery
Everything posted by Rkhane
-
Awesome, thanks for your help! I will definitely check out Blender, I've never used it before. I'm just happy I can open the model now!
-
It's for sculpting. I tried to import the OBJ but it crashes (says it is out of memory) and shuts the program down before it can get to the tool options window Even though I figured it out with Zbrush, I would still like to know a way around it in 3d Coat. Maybe too many polys or too big for a OBJ file?
-
Okay, downloaded full trial of Zbrush, loaded the ZTL file, imported as a tool, pre processed the image (took 14 minutes), then decimated it to 2mil polys, exported as a obj and imported into 3d coat, no problems Thanks for the help, that was crazy!
-
Tried opening it in NetFabb, didn't work. That's the only other app I have. It came with a ZTL file but I don't have Zbrush either.
-
Hi! I purchased a 3d model and went to open it, but it would not open. It said not enough memory but I have plenty of RAM(32gigs). I even adjusted the virtual memory in windows 8 and it gave me the same error. The file is a OBJ format and is 995 megs large. I have included a link to the file in my Drop Box if you wanted to give it a shot at importing it. https://www.dropbox.com/s/gfi89zsxrz4gjj2/Generic%20Male.OBJ?dl=0 I'm not sure what the problem is, i've imported tons of OBJ's without issue. Maybe it's the size?
-
Installed GPU Z today, GPU stayed at 99% load during the entire render for 28mil poly file. Before the render GPU was much lower, 3-4% load. I then loaded a 4mil poly model that the graphics card handles with ease. When rendering GPU load stayed at 99% again, sometimes dropping to 98%. Both renders were at 15360x8224 pixels. During both renders, 1 CPU core and its second thread stayed at 100% the entire time. Memory controller stayed at 44% while moving, manipulating and later rendering the 28mil poly model. (128bit bus, GDDR5). The 28mil poly file used 1400 megs of ram out of 2000. The 28mil poly model rendered in 19+ minutes. The 4mil poly model rendered in 4+minutes. So from this I would possibly conclude: 3d Coat Render Room relies mostly on GPU as opposed to CPU. Does not use Cuda Cores to render faster. Well thanks for listening to me work through this Just shocked me that 3d coat renders with GPU as opposed to CPU. When doing research, you always here about rendering with CPU. I guess 3d Coat renders out like a video game engine would, pretty cool, good to know, lol
- 1 reply
-
- 2
-

-
Hey guys, recently upgraded from a 2.66 core 2 duo 8gigs ram to a i7-4790 4GHz 16gigs ram. Expected some performance gains, ran some test renders against my old machine for rendering out a massive image in the render room. Both machines used my Nvidia 750ti, 2 gigs ram Test: 28million poly render to PNG at 15360x8224 pixels. (For printing art for a 16x20in poster at 300dpi...) All tests were done in 3dCoat 4.1.17 2.66 core 2 duo - Rendered the PNG in 18:07min - 3dCoat64BitCuda - OpenGL i7-4790 4GHz - Rendered the PNG in 19:37min - 3dCoat64BitCuda - OpenGL i7-4790 4GHz - Rendered the PNG in 31:19min - 3dCoat64BitCuda - DirectX - What, LOL! i7-4790 4GHz - Rendered the PNG in 19:32min - 3dCoat64BitOpenGL - No Cuda Also noticed some interesting results. - The OpenGL version taxed 1 thread at 100% and used another thread here and there, 25% at the most. 3dCoat64BitCudaOpenGL - The DirectX version taxed two threads evenly at about 10% total load as opposed to one thread heavily. 3dCoat64BitCudaDirectX - Neither render used more than 2 threads out of 8 available. So things I learned possibly: 1. 3d Coat Render Room is heavily GPU reliant and not CPU reliant as my new CPU had no positive effect on the render time? After doing a lot of research into 3d rendering, I thought this was mostly CPU based? 2. Open GL Rendering seems to run DRASTICALLY faster. That was a shock... 3. The Render Room seems to only take advantage of 1-2 cores at best. 4. CUDA does not seem to affect render times as the Cuda and non-Cuda renders were very close. I do a LOT of rendering in the Render Room for my work and would like to figure out how to speed up my render times drastically in 3d Coat. Hoping for some help and understanding in this, thank you!
-

HR Ranger PreviewPic 014 ColonelCrayStatue 008 Hell Rangers RKE
Rkhane commented on Rkhane's gallery image in Finished Works
 Thanks guys for the comments! The original Quake rocked Great style!
 -
Yeah, big muscles, was going for the Arnold in Predator style look with a little Gears of War but more lean. The normal (non-characters) will have toned down muscles a bit, though one more special character will have slightly bigger muscles (think Captain Stone-Liam Sharp). Yeah for shaders I choose carefully, each object/mesh gets its own shader so it will look good. I actually paint with specularity quite a bit. You can also kill the specularity by going negative with it in the layer options. So if you went Spec and didn't mean to you can put like -1 for that specific layer option and it kills it. Or if you forgot to paint it you can go +1 and it will put it in, very cool. I have played with multiple lights and you can do highlighting and stuff pretty decently actually, I guess I was thinking more along the lines of rigging a scene with terrain etc you know? Choose how close the light is, how far away, or move it so the light itself is focused on just one area of the model/scene. Fun stuff, used to play with that years and years ago in Poser/Bryce. Was very nice and very easy to learn and set up.
-
I dig the concept art made by Jane, you and those in the studio are very talented!
-
What are the specs my computer needs to run 3D Coat?
Rkhane replied to Raybrite's topic in General 3DCoat
No, both my former (now dead) evga 8800 gts and evga GTX 460 worked the same. GL responded the best for me. Makes me think its my system config or something... At first I thought maybe DX wasn't up] to date but that's not it either. I'm happy though, no complaints here, runs great in GL, just odd that it does so better! -
What are the specs my computer needs to run 3D Coat?
Rkhane replied to Raybrite's topic in General 3DCoat
Hmmm... I don't mind the rendering speed at 1920x1080 in the render room, it only takes a couple seconds to render it and make it look nice at 30 mil polys with Realtime Render turned on. However when I render out a large file for print and choose a folder to save it in as BMP/PNG, yeah, a 9000x5000 takes maybe 6-7 minutes to render the file. However if I am not mistaken rendering to file (not for preview) is largely processor based correct? When my last video card died just over a month ago I was forced to use my old 512meg asus card, like really old, about 9 years old, and while it had a huge and slow impact at looking at anything in the renderoom with Realtime Render turned on, it really didn't seem to have an impact for rendering a 3d turnaround to BMP's VS my card that died which was much faster and had CUDA. The old ASUS card kind of choked a bit on the first few renders because it initially tries to display them when you are rendering out to file, then it just steamed along and rendered the BMP's for a turnaround pretty much at previous speeds. For DX, I'll just post something from another thread with ABNRanger: (My reply) That's bizzare, I have the opposite experience. I'm on Win 7 pro 64 bit, Service Pack 1, Direct X 11 installed, 2.66 Core 2 duo, 8 gigs system ram, GTX 750ti 2gb (Was using a EVGA GTX 460/768meg version but it died, humorouosly speaking the 750ti is about 3x faster for displaying renders especially with large poly counts 20mil+ despite the 750ti having a lower memory bus, 128 VS 192bit, I think the higher ram amount made the difference). As you said but with Direct X, easily noticeably slower when moving the camera around while working, it just drags in DX but is substantially faster in OGL. Just checked it again with a 28mil triangle model, the GL version displays way smoother and flies when moving the camera around. The DX version displays okay but the camera has very noticable lag and stutters when moving around. I would say the GL version is twice as smooth/fast for me. I can't figure that out but eh, It's great to have the options! Kind of trippy for everyone else to have better performance with DX than me, kind of making me wonder what's up on my side of things -
3d turnaround on the YouToobs, 1080p
-
Very nice. Great model's as well, that looks like it took quite some time. I've used Shapeways a lot for printing/prototyping, good experience as long as you understand the materials ins/outs.
-
Aye, thanks! Here's base model of the Colonel, no paint:
-
What are the specs my computer needs to run 3D Coat?
Rkhane replied to Raybrite's topic in General 3DCoat
Very cool, used the program on my work file here: 30.5 million tris, fully painted i.e. direct paint on high poly mesh, lots of paint layers: GTX 750ti, 2gig VRAM in old 2.66ghz Core 2 Duo, 8 gigs ram. Sculpt Room Memory Used: 1349 megs of VRAM GPU Load: When moving model around, 99% Memory Controller Load: 51% Render Room Memory Used: 1489 megs of VRAM. GPU Load: When moving model around, 99% Memory Controller Load: 51% Power Consumption was about 51% highest for anything. CPU Temp never exceeded 42c Fan speed never went above 29% When turning the base of the statue off, reducing the model to 21.3 mil tris, video card GPU load never went above 74% and bounced between 36-48-54-66%, 74% was the highest. Memory controller load at 21 mil tris never exceeded 38% and was often in the mid 20's on average. The longer 3d Coat was open, VRAM comsumption eventually peaked at 1719 megs, almost topping out. Pretty cool, I've never tested my work this way before. Good to know the Processor isn't bottlenecking the video card so to speak. However the processor definitely lags in switching rooms, painting heavier sculpt strokes and undo's. But it is not unbearable by any means. Pretty amazed I can run such a heavy model on such a low end PC (mid range PC I bought 7 years ago). Clean program to say the least (3d Coat). Interesting data for myself concerning what I do, what I need etc. Very cool to know. Definetly stuff you don't find in your average video card reviews... -
What are the specs my computer needs to run 3D Coat?
Rkhane replied to Raybrite's topic in General 3DCoat
Thanks for the mention of GPU-Z Gian, I'm going to download and give it a shot just to see how much VRAM I am eating in my heavier work. Should be interesting and help calculate what my needs in the future will be. I never thought of checking VRAM usage. I just upgraded from an old 768meg card to a new but low end 2 gig card. I know it definitely helped but it would be great to see how much is being used before I hit that ceiling or what it might take to hit that ceiling. -
Awesome, was just looking for this, Carlosan pointed me here, thanks a bunch ajz3d! The script folder wasn't created so I made it myself, works great!
-
I hate you this much (------) Thanks!
-
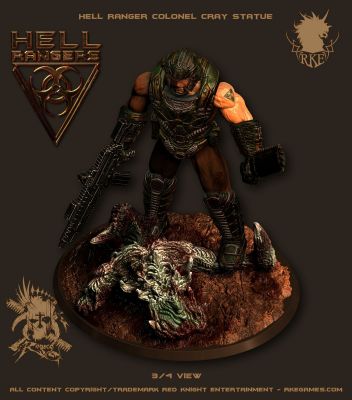
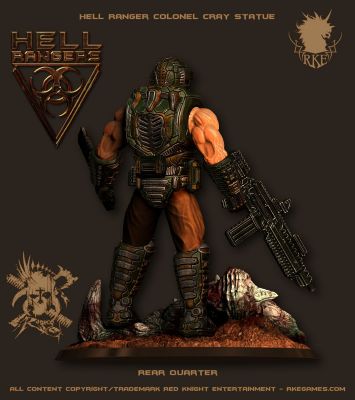
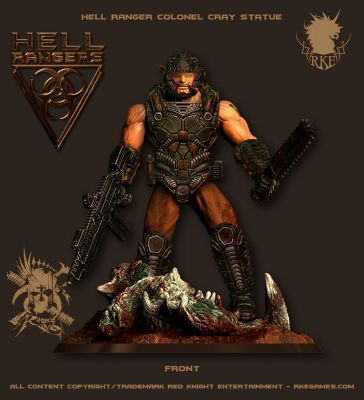
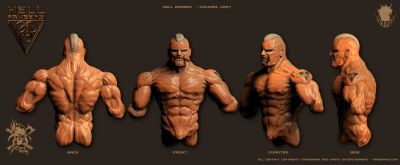
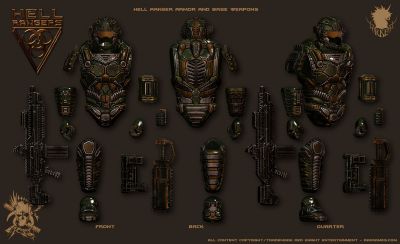
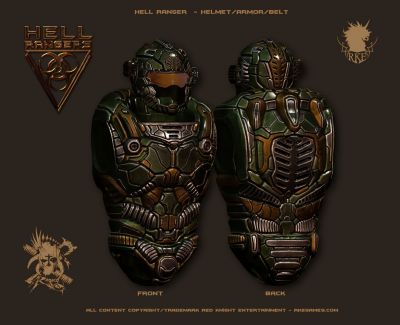
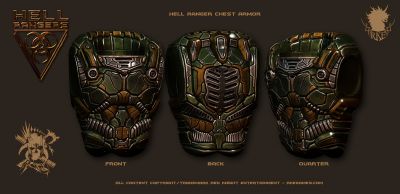
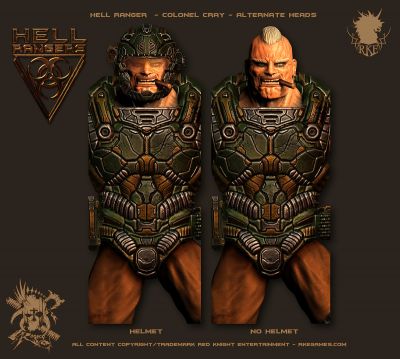
Hey folks, I am Rkhane / Red Rogers. I want to make miniatures/board games. I started off sculpting using Sculptris (Nov 2010), then after a couple years I needed something to edit and add joints to my sculpts to make miniatures, tried the 3d Coat demo, figured out what I needed fairly fast and purchased it to better compose my work and also do some hard surface work like guns. After about a year of using 3d Coat I began to tire of some of Sculptris's limitations, namely no 64 bit support i.e. more polys, so I started to use 3d coat for sculpting all around. Great app! For my first post I am working on a board game that will eventually be Kickstarted. It is called Hell Rangers. Nothing super original, Kind of like the video game Doom but on earth. Demons invade through ancient artifacts being ignited/turned on. Apocalypse ensues and the result is humanity bands together to create a forward operational military command known as Hell Rangers to go and take the fight to the enemy. Sorry for all the branding on the images, I mean this to be a product eventually and will be posting these images elsewhere like my deviant art gallery First up is The Colonel known as Colonel Cray. He is a special character for the game. He also uses the base armor/weapons used by the majority of Hell Rangers. So this work will be used on all the good guys in the game. Process: Base shapes/meshes blocked/roughed out in Sculptris for the armor and the Colonel himself, then base sculpting, detail sculpting, painting direct on high poly meshes and final rendering in 3d coat. No texturing in external apps, no effects/Photoshop except composing the image with text and the simple drop shadow. Image is basically a raw render from 3d Coat. The guns, chain blade and base were sculpted entirely in 3d Coat. All meshes were painted directly on high poly meshes, no autopo/retopo as I haven't explored that part of 3d yet I will figure it out eventually when I need to have a bunch of characters in renders altogether. ___________________________________________________________ Here are the base sculpts somewhat laid out before painting them. Here is the chest armor with a base shader material I created for the armor and then painted the model green. Chest armor fully painted then textured with different brushes in 3d Coat. I kept the green paint on its own layer, the metal silver and gold paint on another layer. This way I can easily change the base color of the armor if need be via the Hue/Saturation tool in the Paint Room. Chest, Helmet and belt painted and done. Full armor and weapons layout, painted and done. Colonel Cray, painted, tatt'ed and done. I didn't put veins/scars on all his body since the majority of it won't show. Kind of bugs me though, for consistency reasons Final full statue of Colonel Cray and slain demon on base done. Front view. Transparent helmet visor done by choosing a material shader that has the transparency option, duplicating it and setting the transparency to .4. Works fairly well for the intended effect. Back/quarter view. 3/4 view. 3/4 rear view. Top down view. Detail front view. Detail back view. I would like to make two alternate heads for the statue, one with helmet, one without. Detailed view of base including unpainted, then painted. About 30mil poly count total for the entire statue including base. Even though the board game mini obviously does not need such detail, I would like to make this statue someday so there it is Things of note: For sculpting nice detail on mesh: Put mesh in surface mode, select Live Clay Build Brush, set detail fr4om 1-5, beware, more detail = more polys, then go at it. Creates awesome small minute details. For painting skin in Paint Room: Paint the base color of the skin all around. Then use the option to paint More In Cavity, choose a slightly darker color, might have to set Cavity Scale to maybe 2, then paint in all the depth/cracks on the mesh. Then switch to Less In Cavity, switch to a lighter skin tone than the original (might need to use Sampler Tool to get correct color), may need to switch Cavity Scale to 3 or 4, and then paint model on all sides. Using the base paint brush in the Paint Room and More in Cavity/Less in Cavity really works good and fast for many things (weapons/armor/skin). Not as great as artistic brushing everywhere but as you can see from the above, the result is not "bad". I found the More In Cavity/Less In Cavity painting to work best for skin when you use just slightly lighter colors to go darker and lighter. I use stronger color variations for armor/weapons to really pronounce the edges. Issues: Some issues I had with 3d Coat along the way. When importing a 3b files with multiple color layers in the paint room, it disperses them in the currently opened file across many layers, therefore losing the structure. Opened a bug report for this: http://3d-coat.com/mantis/view.php?id=1650 Tried painting glowing/luminance directly on high poly model, didn't quite work, chatting about it here: http://3d-coat.com/forum/index.php?showtopic=16796 Things I would like: I know like everybody uses external render'ers to create the final product but I quite like 3d Coats Render Room. the ability to rig lights, place them where you want them around the scene, choose if they are static or revolve with the model, and choose their depth and how focused they are would be killer. Being able to assign multiple materials/shaders to a mesh would be awesome and also assigning the material options like Darken/Overlay/Highlight/Multiply/Color Burn etc would be killer for subtle details/light sources. The ability to export rendered images with a transparent background so you can more easily add one later (especially for a 3d turnaround with hundreds of images in a movie editor) would be wonderful. Last but not least the ability to add luminance/glows around an individual mesh and how much it glows would be awesome. You could have glowing eyes, weapons, fireballs etc. Something very simple like this:https://www.youtube.com/watch?v=4QAHIYCYB3o where you just check a box, click glow, choose the glow color, how strong it is and done. Like an Outer Glow in Photoshop but all around the 3d object, not just on a 2d plane. So sick! With a few of those features and using the ability to run the camera around at various points which 3d Coat already does, I think we could make some insanely awesome 3d turnarounds without ever leaving the program. Sweet! Anyway, love 3d Coat, Zbrush made me want to stab something due to its "unique interface" and terms. Been a computer graphic artist professionally for 16 years, never encountered a program I couldn't just "figure out" until I met Zbrush. Sculptris then 3d Coat saved the day, very intuitive! My main reason for posting here is like with everyone else, to show that 3d Coat is a great app that should perhaps be taken a bit more seriously than the big 3 i.e. Zbrush/Max/Maya. Will be posting more werks soon, thanks!
-
HR Ranger PreviewPic 014 ColonelCrayStatue 008 Hell Rangers RKE
Rkhane posted a gallery image in Finished Works
From the album: Rkhane - Hell Rangers
Hell Rangers Colonel Cray statue fully finished, alternate heads, helmet and no helmet. Process: Base shapes/mesh blocked/roughed out in Sculptris, then base sculpting, detail sculpting, painting direct on high poly meshes and final rendering in 3d coat. No texturing in external apps, no effects/Photoshop except composing the image with text and the simple drop shadow. Image is basically a raw render from 3d Coat.© Red Knight Entertainment rkegames.com
-
Finished works largely for my miniature board games I am developing.
-
-
HR Ranger PreviewPic 015 ColonelCrayStatue 009 Hell Rangers RKE
Rkhane posted a gallery image in Finished Works

From the album: Rkhane - Hell Rangers
Hell Rangers Colonel Cray statue base with dead demon on it. Multiple views including raw mesh before painting. Process: All sculpting, detail sculpting, painting direct on high poly meshes and final rendering in 3d coat. No texturing in external apps, no effects/Photoshop except composing the image with text and the simple drop shadow. Image is basically a raw render from 3d Coat.© Red Knight Entertainment rkegames.com
-
HR Ranger PreviewPic 013 ColonelCrayStatue 007 Hell Rangers RKE
Rkhane posted a gallery image in Finished Works
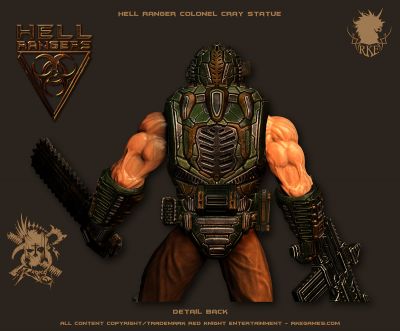
From the album: Rkhane - Hell Rangers
Hell Rangers Colonel Cray statue fully finished, back detailed view. Process: Base shapes/mesh blocked/roughed out in Sculptris, then base sculpting, detail sculpting, painting direct on high poly meshes and final rendering in 3d coat. No texturing in external apps, no effects/Photoshop except composing the image with text and the simple drop shadow. Image is basically a raw render from 3d Coat.© Red Knight Entertainment rkegames.com
-
HR Ranger PreviewPic 012 ColonelCrayStatue 006 Hell Rangers RKE
Rkhane posted a gallery image in Finished Works
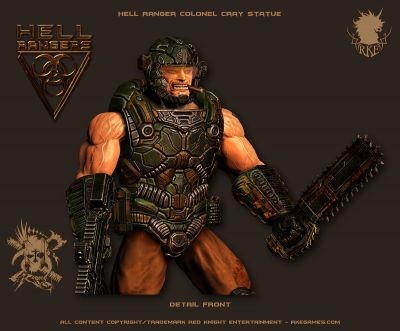
From the album: Rkhane - Hell Rangers
Hell Rangers Colonel Cray statue fully finished, front detailed view. Process: Base shapes/mesh blocked/roughed out in Sculptris, then base sculpting, detail sculpting, painting direct on high poly meshes and final rendering in 3d coat. No texturing in external apps, no effects/Photoshop except composing the image with text and the simple drop shadow. Image is basically a raw render from 3d Coat.© Red Knight Entertainment rkegames.com