


druh0o
-
Posts
131 -
Joined
-
Last visited
Content Type
Forums
Calendar
Gallery
Posts posted by druh0o
-
-
10 hours ago, Carlosan said:
or to create transparency
I have some problem with that (probably a bug):
-
 1
1
-
-
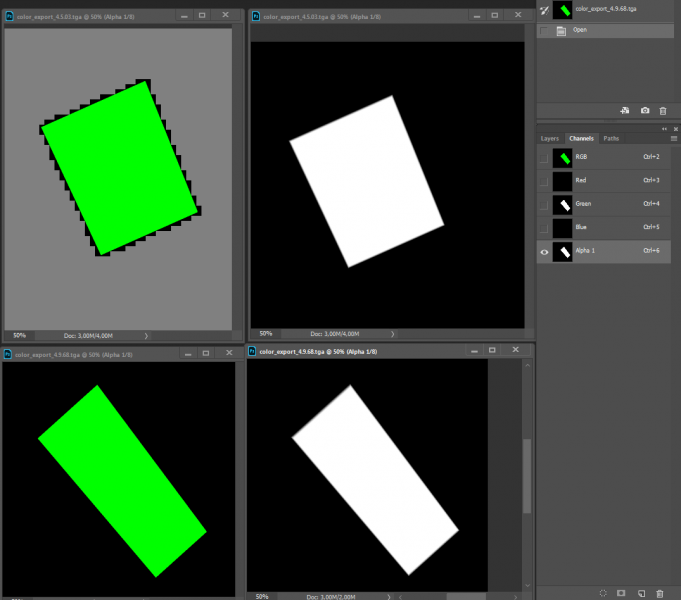
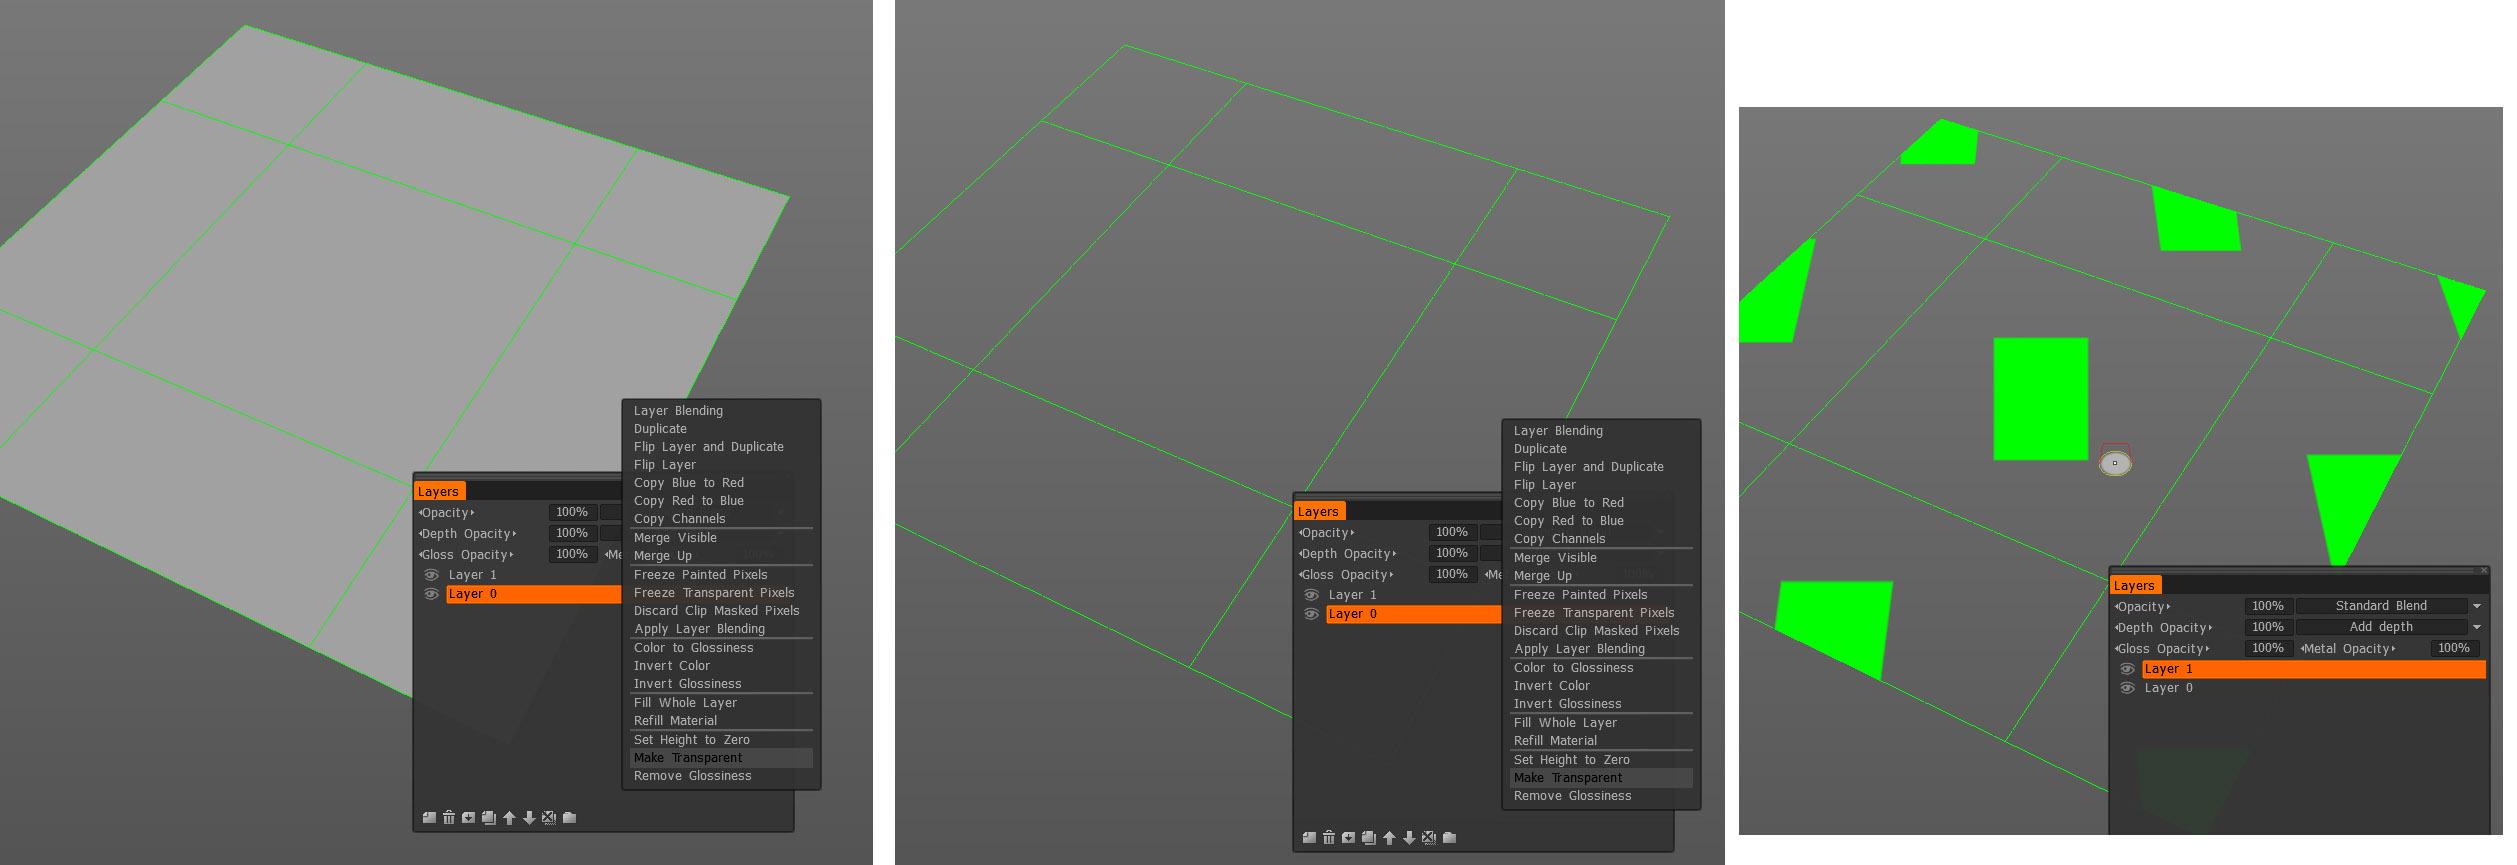
I was trying to edit some textures with transparency to Photoshop by making Layer0 transparent.
1) In the Paint room select Layer 0 and Make Transparent.2) Select Layer 1 and fill it with some shapes or brush strokes with hard alpha.
3) Edit All Layers in Ext. Editor (Ctrl+P)
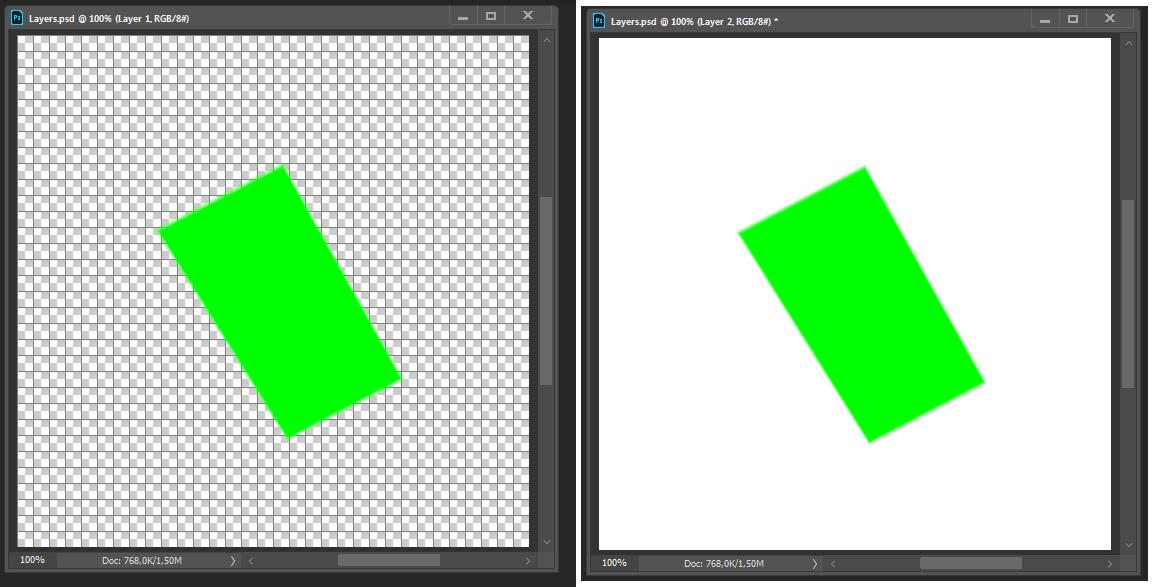
Using 3d-coat v4.5.03:
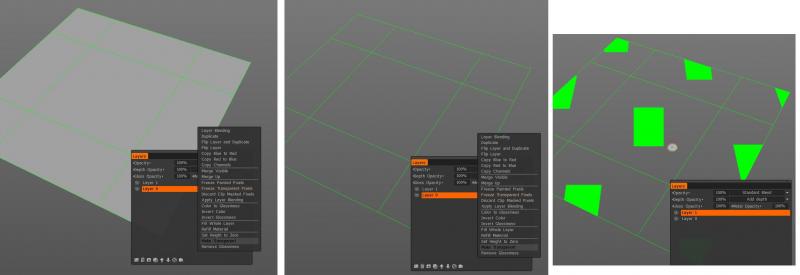
In Photoshop (added white solid layer under the green shape to see more clearly)
Looks like everything is fine.
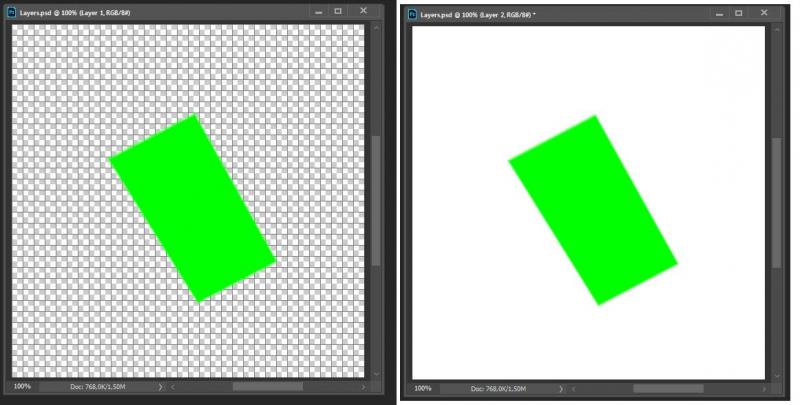
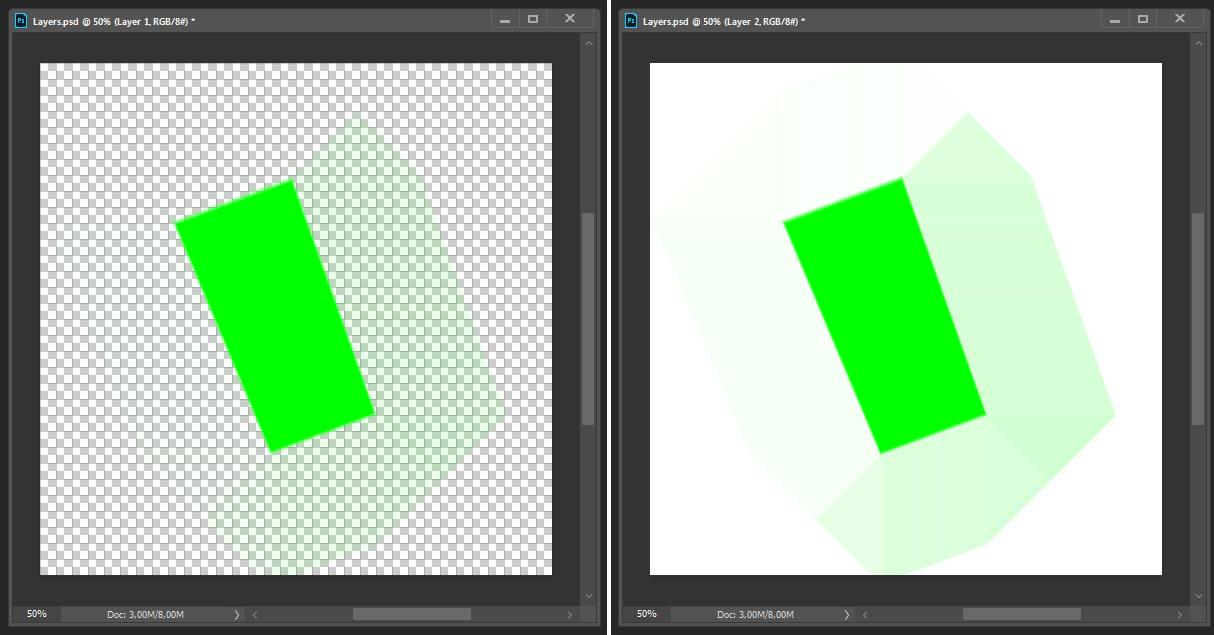
And now using v4.9.68 (by the way, i got the same result with the older version - 4.7.37C):
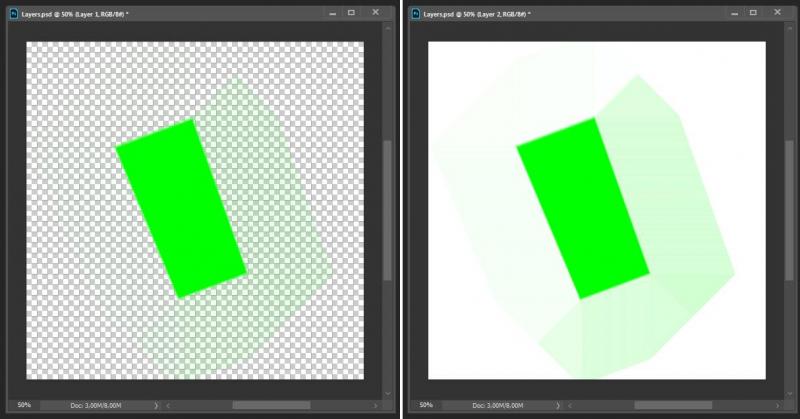
But using Textures > Export > Color/Albedo Map, I have usable alpha in both cases:
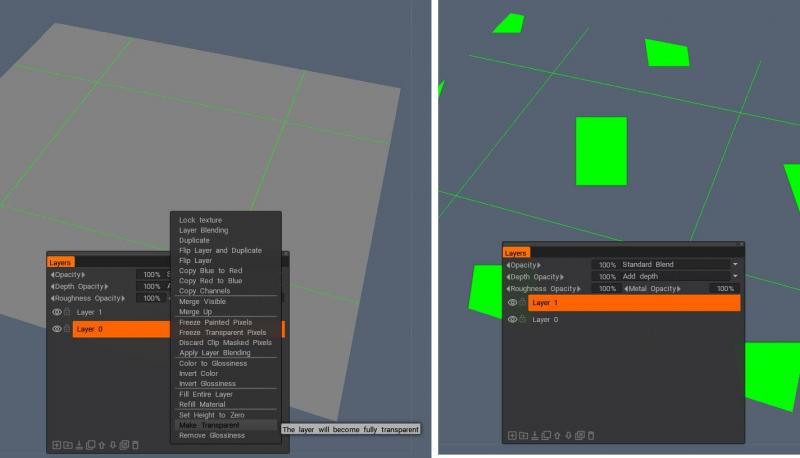
Also, I got some weirdness in 4.9.68 using different Mesh templates and trying to make Layer 0 transparent:
-
I think I faced with a super old bug but probably this bug is well known because it's a very common scenario.
1) In the Paint room choose some brush alpha except the first one. For example, choose hardest round alpha. Or something else.
2) R-click on a layer and choose Fill Entire Layer.
Immediately after that, 3d-coat resets the alpha of my brush to the first one. It even looks like two alphas are selected at once but it's just a UI issue.I tested several versions I have installed and I found 3d-coat version without this bug - it's V4.1.17D. All versions after that have this issue.
Tested on two PCs. -
-
2
-
-
Can this be fixed?
Not critical, just a "quality of life" things.Also:
-
4.9.57 is beta?

How can I find NOT beta?
-
It's not about what is more intuitive. Sometimes it's just necessary to paint in the UV Texture Editor.
-
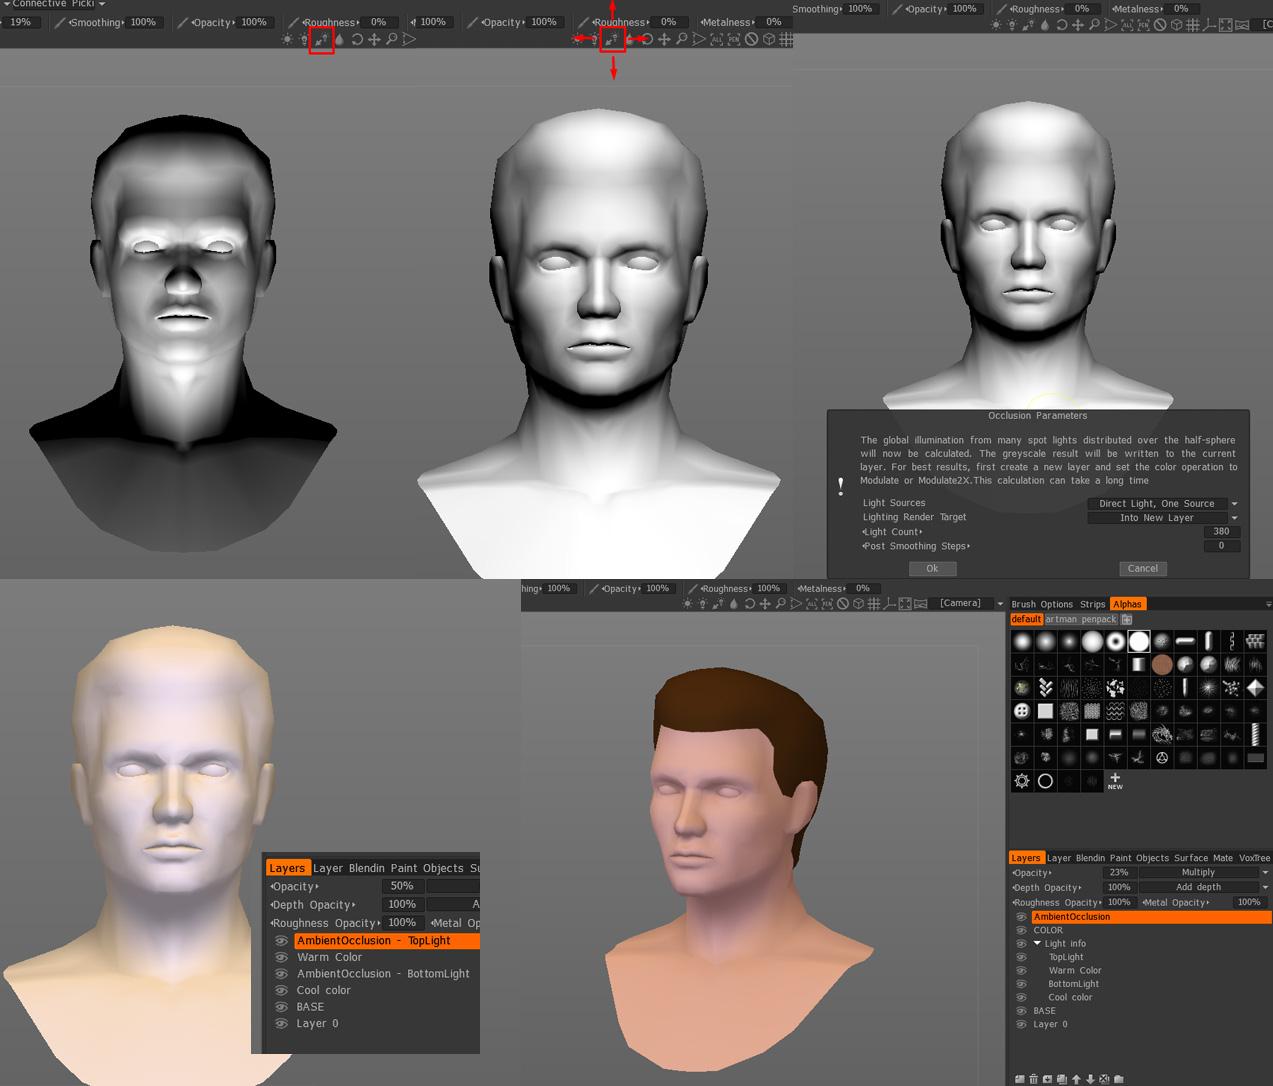
So there is Relief Only view mode in the View menu - hotkey: [1]
I have an old version 4.5.03 where I can adjust the light angle in this view mode. But also I can bake this light information using the Calculate Occlusion tool because there was an option for that.
I think this is pretty fast and straightforward method, and especially useful for handpainted workflow to quickly make a color base for further painting.
But in more recent versions I can't adjust the light angle in this mode (probably a bug). Also, it looks like there is no way to use this lighting information anymore because there are no options for that in Calculate Occlusion or Light Baking tools.
So, looks like this view mode is useless right now.
Yes, I know I can bake lights from the Render Room with the Light Baking tool. But this require some amount of jumps between rooms and some adjustments of lights and parameters in the Render room and that's not so fast and straightforward, but it's totally doable, and also looks like it's a more advanced option to do this kind of stuff. But again - what's the purpose of Relief Only view mode in that case?
-
I have a very old 4.5.03 version as well as more recent versions including the latest 4.9.57.
So in 4.5.03 I can double-click with the Hide Poly Tool (Paint Room) on the UV-island in the Texture Editor window to hide that island, and Ctrl+double-click to show it back. This doesn't work in recent versions including 4.9.57.
Is this an old bug? Or is it just different behavior and I am missing something? -
13 hours ago, drysider said:
latest 3d Coat
It might sound strange, but it might not be a good idea. I mean, you can try the older version.
-
10 hours ago, Rygaard said:
So I didn't know that the user had to go into the settings to access the ViewCube navigation.
No, it was pretty useless for users. So it's gone with the legacy viewport and no complaints from users.
-
On 6/12/2020 at 11:33 PM, Rygaard said:
It would be great to have a navigation system similar to the Maya ViewCube in the 3D-Coat interface.
It's funny because by default there is no viewcube in Maya, it's gone with the legacy viewport and you need to enable it with some special settings, and I think it's good. Never seen anyone using ViewCube in Maya.
-
Looks like they use Unity.

-
https://www.kickstarter.com/projects/owlcatgames/pathfinder-wrath-of-the-righteous/posts/2754606
QuoteDear Pathfinders,
There are three things you never get tired of watching: burning fire, running water, and other people doing their job well. Today we’ve prepared an extremely sped-up video of our texturing process for character models in Pathfinder: Wrath of the Righteous. It took our artist around 52 hours of work to finish this texture! And you are able to watch the whole process in just 6 minutes.
QuoteOur character creation pipeline is quite uncommon for modern video games and involves a little bit of modeling and lots of painting. We loved how Kingmaker’s visual style turned out, with every texture made individually, by an artist’s hand. And despite upgrading our lighting model, we decided to keep the same approach to texturing in PF: WotR. We wanted to find a way to make our textures look handmade and painted in a modern lighting environment.
So this is what we came up with. We start by creating very simple models of body and armor parts (which, by the way, usually share the same UV layout for similar parts) in Maya and bake some extremely low-detail normal maps. The only purpose of these normal maps is to get rid of the hard edges on the model and replace them with some nice, smooth bevels.
When this part of the job is done, we pass the models and normal maps to the texture artists and let them go nuts with the models in 3DCoat. In the final result, 95% of normal map detail is painted by hand, with diffuse and roughness being 100% hand-painted. This part of the process is shown in our video. You can see how the hand-painted look is preserved on a normal-mapped model.
Another reason for choosing this approach was the fact that by the time we finished Pathfinder: Kingmaker, we had gathered quite a few really good artists capable of creating hand-painted textures. The idea was to teach them the theory of physically based rendering and let them apply their painting skills to PBR. This would allow us to keep working with the same artists who had such a big impact on Kingmaker’s visual style.
It turns out that the pipeline has its downsides, the most notable being that every artist new to the project has to spend at least a month getting up to speed. But so far, the benefits have outweighed the drawbacks. We’ve learned a lot, we love how it’s coming together, and, most importantly, we’re having so much fun painting!
To arms!
Owlcats
-
3
-
-
2 hours ago, AndrewG said:
I didnt know how to complete this course as many of the tools that Robert used was working in other way that he showed.
Thats the general problem, if some tool tutorial is older then a year it is highly propabally that it will work completely different than in recent version.
I didn't have any problems with that course. Probably because i installed the same version (4.5.37).
https://3dcoat.com/ru/download/older-version/When I learn new software i always tend to install the exact version that i see in the tutorial.
-
https://www.pluralsight.com/courses/3d-coat-getting-started-2487
In this course, Getting Started with 3D-Coat, you'll first learn about forming base shapes with fast and efficient voxel editing tools, decimating your geometries, and making normal maps. Next, you'll learn how to create textures through both automated and manually processes. Finally, you'll learn all about rendering and exporting your final result. By the end of this course, you'll be comfortable with hard surface modeling in 3D-Coat. Required Software: 3D-Coat.
-
But i'm kinda lost. What was the latest stable release?
-
18 hours ago, Javis said:
it is clearly marked as beta.
Excuse me, but

and
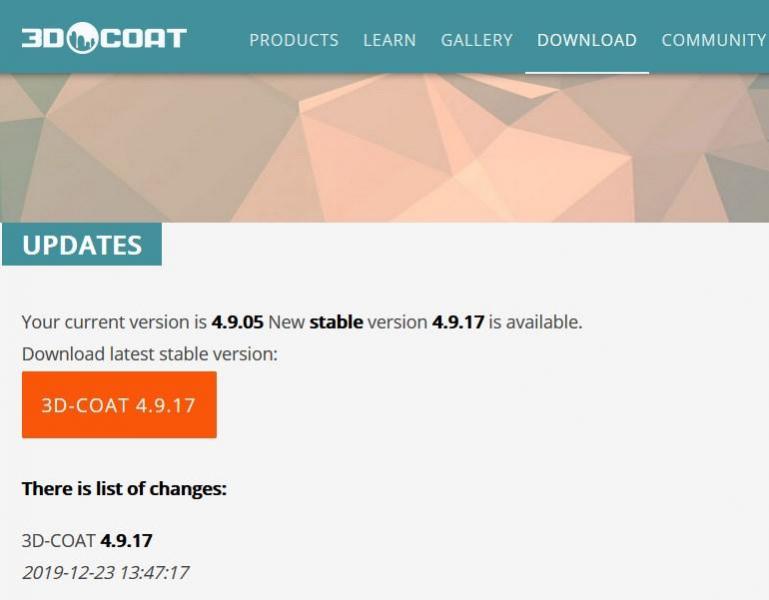
Oh, and 4.9.05 is now marked as beta in this thread?! Really confusing.
-
1
-
-
16 hours ago, allanmrtn said:
Thank you! What is the difference between the SL and the normal version?
SL includes Sculpt Layers, which is an experimental feature (at least for 4.9.05)
-
17 hours ago, allanmrtn said:
Where can I get a dl link for the 4.9.0.5?
https://drive.google.com/open?id=0ByesnXO2ExYDOFJDSkJBWk91Tlk
-
1
-
-
3 hours ago, tsabszy said:
- is it intentional/or if not is it known that color picker doesn't work from the model in paint room any more? only from ref image and it's working perfectly in the old version. this is a really important and essencial feature for color blending in textures!
I had no issues with color picker in 4.9.05 or 4.9.15. It's working - picking color from the model.
3 hours ago, tsabszy said:- is there any comfortable way of transfering your brushes with brush settings and everything (maybe already organized too) into your newer version of Coat and I just don't know about it?
Using the Presets window for brushes.
Also you can move everything from you "3D-CoatV48" content folder in your \Documents\ folder to the other place, let's say D:\3D-Coat-Stuff and create a new environment variable with the name COAT_FILES_PATH and value D:\3D-Coat-Stuff. After that the newer version of Coat will (hopefully) auto-load everything from your older version.But it was told that for pure diffuse-only handpainted texturing it's preferable to use pre-PBR version of Coat, before v4.5. Something like 4.1 - 4.1.17D, i think. There was some change in the brush engine, as i remember.
-
Probably a BUG
1) Bake any mesh from Retopo room to the Paint room (with or without the normal map)
2) Right-click on an empty layer and choose Fill Entire Layer -> crash
Tested in 4.9.14 and 4.9.12BF4 on two computers4.9.05 - ok
-
14 hours ago, lesaint said:
Invert selection doesn't work anymore. It just deselects everything !
For me - it works ok ( 4.9.12 BF4 )
-
On 11/22/2019 at 6:53 PM, druh0o said:
4.9.11 has the same bug.4.9.12 - FIXED! Awesome! Thanks!


3DCoat 2021 Open Beta test !
in New Releases, Bugs Reports & Development Discussion
Posted · Edited by druh0o
It is locked in Photoshop, but you can paint on it without problems. This is an inconvenient way of working, not suitable for any serious project, but completely legal.
")
If Layer 0 in 3DCoat brings so much trouble to new users, why not just make it hidden, inactive, grayed out or something else. Just call it DON'T PAINT ON ME by default instead of Layer 0