Fluffy
-
Posts
76 -
Joined
-
Last visited
Content Type
Forums
Calendar
Gallery
Posts posted by Fluffy
-
-
You can use the Smooth All command in the Geometry menu to smooth all objects on a layer (there's also a Smooth All button in the Commands tab of the Tools palette on the left hand side of the screen).
-
I've also had trouble getting the Lock Normals feature in the Bake menu working (according to this thread it seems the feature currently isn't working).
As a workaround you can export the retopo object (Retopo menu > Export) and import it to Maya/3DS Max/etc to set up your smoothing groups, then re-import the object into the Paint room and use the Bake menu > Bake sculpt mesh onto paintroom mesh option, which will bake details from your sculpt object to your paint object without interfering with the previously defined smoothing groups.
-
19 hours ago, roycebarber said:
Quick question about the glass3 texture posted above. I just paid $3.00 for a similar texture on sale here: https://gumroad.com/l/VuDn
So I just want people to be careful when posting textures which may be pirated. If it's not pirated, please forgive my response.The glass3.3dcpack posted above contains a shader, whereas the texture for sale on gumroad is a smart material. Also the link was posted in June 2014, about 6 months before PBR/Smart Materials were introduced in 3D Coat.

-
 1
1
-
-
I don't use Lightwave myself but according to this post from the Newtek forums
QuoteIn layout go to File>Save>Save Trans Object
This will save out your object as it is seen in layout.you can save out the visible geometry as seen in layout (so assuming Lightwave is capable of displaying displacement maps on models in the viewport it should be possible to export the displaced geometry).
-
Have you tried exporting the depth information from the paint layers as a Displacement Map (Paint Room > Textures menu > Export > Displacement Map of Visible Layers), then applying that displacement map to a high poly version of your model in Lightwave?
-
If you go to the Sculpt Room and adjust the pose of your high poly model with the Conform Retopo Mesh option enabled (see video below for details), you should then be able to use the Update Paint Mesh with Retopo Mesh option (found in the Retopo Room > Bake menu) to replace your paint object with your newly adjusted retopo object while still retaining all the UVs and Paint Layers.
-
 1
1
-
-
@Shift StudioI recently had a similar issue with retopo models being much too large and it turned out that all the Scene Scale settings had changed (I'm still not sure what caused it), so if you're having problems you may want to check in the Sculpt Room (Geometry menu > Edit Scene Scale) and make sure the X, Y and Z shifts are set to 0.0 and the SceneScale value is still at 1.0?
-
 1
1
-
-
7 hours ago, netgoblin said:
is it a correct place to ask for a life-saving feature?

plz, add 2 buttons to UV-room: align vertices/edges vertical and horizontal.Perhaps I'm misunderstanding you but there are already Horizontal and Vertical alignment tools present in the UV Room, however you need to have the Mark Seams tool active and in Edges mode for them to be displayed. You can then select edges in the UV Preview window and align them horizontally/vertically.
They work the same as the Retopo Room versions (see video below).
-
 2
2
-
-
21 minutes ago, Metin Seven said:
Found it! It was caused by the Rotate Along Stroke option.
Ahh, glad you got it figured out, will have to remember that for future reference, thanks!

-
 1
1
-
-
Just tested this and it seems to work fine on first click for me with the usual stroke types regardless of settings, but if for some reason you can't get it working as before you could always try using the Stamp/Stamp Drag Mode options.

Stamp Drag mode would allow you to change the position of the sphere after clicking, whereas Stamp mode is locked to the initial click point.
There seems to be some odd behaviour with Stamp mode & the Sphere tool in that normally Stamp mode allows you to change the scale of the alpha you're applying, but with the Sphere tool it appears to be locked to the initial brush size/radius setting for the tool, but if you wanted the ability to change the radius of the sphere an alternative would be to use the Extrude tool and Stamp mode with the default spherical alpha and a depth setting of 100%.
-
-
1 hour ago, Metin Seven said:
Hmm, it's even weirder — as I orbit around the model, the visible paint flips to the other UV parts. Might this be a bug of the 4.8.3 beta for Mac OS that I'm using? Otherwise I could try to revert to the default Mac OS driver for my NVidia graphics card. I'm currently using NVidia's latest Web driver.
Just a hunch but I've seen similar behavior in 3D Coat when there are multiple copies of the same paint object (since they both occupy the same space sometimes the unpainted version will render over the top of the painted one and vice versa, this usually results in the object flickering and the texture appearing and disappearing on different parts of the model as you move the camera). Check your Paint Objects palette and make sure you don't have multiple copies of the object visible.
-
Glad that it helped, and yes 3D Coat really is a treasure trove of features just waiting to be explored!

I must admit despite owning both Substance Painter/Designer and Quixel neither of them get very much use in my current workflow as I find the tools in 3D Coats Paint Room to be more than adequate for most tasks and constantly switching apps and importing/exporting files can be such a pain at times.

-
 1
1
-
-
There's some info on installing Alphas, etc in a different location in this thread - Is there a way to store brush alphas on a different drive?
-
 1
1
-
-
You can triangulate a retopo mesh during texture baking by enabling the Triangulate option, then just export the model from the Paint Room.
-
 1
1
-
-
A good alternative to the Text tool if you want to achieve really sharp accurate edges is to create a bitmap in Photoshop then load that using the Logo tool in 3D Coat (you'll need to load it into the Stencil Texture field, you can leave the Top/Bottom Texture/Bump Texture fields blank).
Example:

The image needs to be reasonably high resolution to avoid pixelation (the original size used for the above image that was imported to 3D Coat was 2048x512 pixels).
As you can see from the above images the results are very clean and there are no lumps or jagged edges.
Be careful not to set your Image Size in Scene or Thickness values too high, as the resulting objects tend to be rather large and the process is quite memory intensive (it can also take a few minutes for 3D Coat to process the image and display the results depending on the resolution of your original image and the settings you use in the Logo tool window).
-
 1
1
-
-
On 10/1/2017 at 4:41 AM, MonolithTyriss said:
Where in the world did you get that menu from?? The only 'properties' window that I get is like this: http://prntscr.com/grsk0h
The one you show up there doesn't exist. And if I go into advanced in that menu I just linked to, I can see a 'reverse' check for each axis. But when I check that and hit close, the setting for reverse is instantly cleared! I'd guess 3D coat is over-riding the settings, but within 3D coat there is no setting to reverse any movement axis! Is there perhaps a piece of software for the 3D mouse that I missed installing?
I'm still using an older version of the driver. I did upgrade to their latest driver at one point and had several issues with it, and it seemed to be limited by comparison while adding very little additional functionality so after reading a lot of very disgruntled comments on their forums from users complaining about their new drivers I decided to keep using the one I had previously (Release Version 3.17.7). There doesn't seem to be a link to it in the 3D Connexion Legacy Driver archives, the closest available version would be 3.18.0 which you can find on their archive page.
-
Firstly you may want to update to a newer version of 3D Coat, there have been quite a lot of changes since 4.7.24.
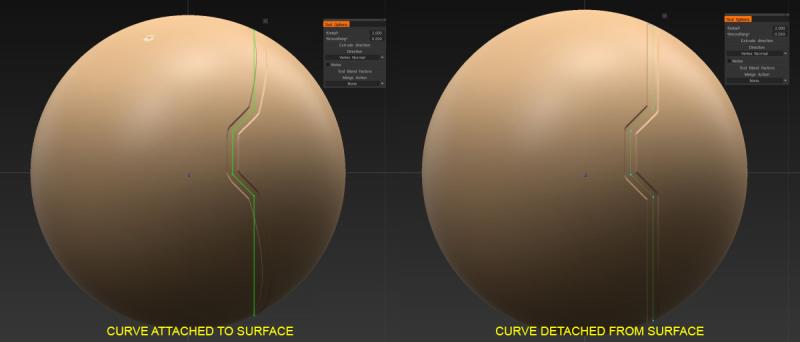
That being said this sounds similar to an issue I've encountered a few times recently where, upon reloading a saved file, the retopo mesh no longer snaps to the surface of the sculpt object. Right-clicking the corresponding layers in the VoxTree and selecting the To Global Space option before trying to adjust the retopo mesh seems to fix it, but the same issue will sometimes reoccur the next time the file is saved and reloaded, despite no alterations being made to the voxel layers in question.
-
While Second Life doesn't support PBR it does have support for normal maps and specular maps (as well as specular exponent and environment intensity), and since any baked lighting on the diffuse map would clash with the real-time lighting for anyone with ALM enabled I would personally avoid using it unless absolutely necessary.
If you want to export textures for use with Second Life "materials" then you'll need to create a new export preset using the export constructor (Paint Room > File > Export Objects & Textures). Based on the information on SL advanced lighting and materials found here it should look something like this ...
If you don't want to use normal/specular maps you can bake a diffuse map using Textures > Texture Baking Tool, or if you want the color information of a single layer (or want to export to PSD format keeping all the layers intact) then you can do so via the Layers > Export > Color or All Layer Color options.
3D Coat does have a Light Baking Tool (it's the last option in the Textures menu of the Paint Room) but as far as I can tell it works on a per vertex basis rather than with low poly models (when I try using it on a low poly paint object the lighting seems to fade as it gets further from each vertex/UV), so you'd need to bake the lighting info to your original high poly sculpt (make sure you have Show Voxels in Paint Room enabled and turn off the visibility of all your paint objects), then use Bake Sculpt Mesh Update to Paint Layers option in the Retopo room Bake menu to transfer the resulting Direct Light Map to your low poly models while preserving any existing layers.
You may also want to take a look at the info in this thread Bake lighting to color.
-
 1
1
-
-
Intriguing! I mostly use Maya and 3D Coat and whenever I import a model with multiple materials 3D Coat seems to create a UV set for each material so I always just assumed that's how it works.
If you do find any solutions or further info be sure to report back and clear up the mystery.

-
2 hours ago, RogerWalco said:
I'm currently thinking that my trouble is that i am UNIFYING UVs....which resets everything to the #1 material.
I don't really understand how 3DC works w. multiple materials on a single UV space--i see greyed out stuff until i unify....even when the OBJ started out unified already.
So this may be my area of weakness. Kindly illuminate me into a correct workflow, O Swamis!
Thx-
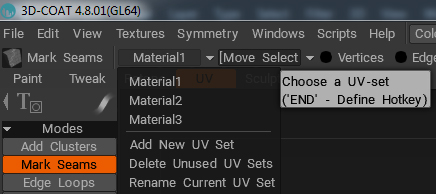
R/.If you're seeing greyed out areas in the UV room then you may have the wrong UV set selected.
3D Coat does seem a little confusing when it comes to differentiating between UV sets and materials, if you Unify UVs then it also "unifies" the materials, similarly deleting the unused UV sets will then delete the corresponding materials. That being said I'm not sure if this could be considered the "correct workflow" but here's what works for me.
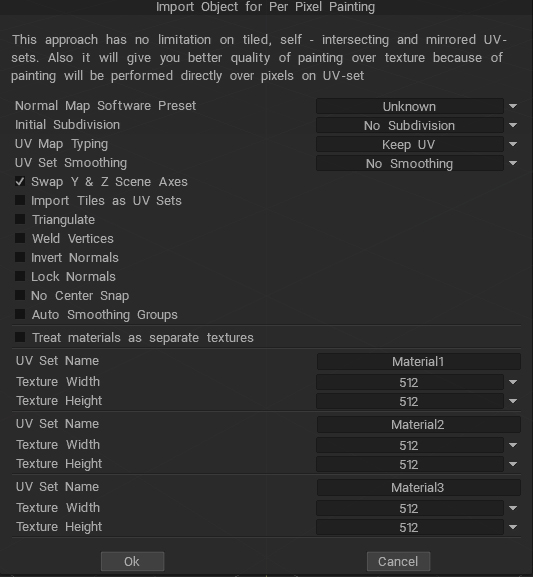
1. Import the .OBJ model using either the UV Map Mesh option in the Start Menu (Shift+M) or by going to File > Import > Model for Per Pixel Painting.

2. Modify the UVs (using the pulldown menu to select the correct UV set for each material).

3. Once you've finished editing your UVs just hit Apply UV-Set then export your object.
(tested & working on v4.7.36 and v4.8.01)
If you need to unify the UVs in order to view them all simultaneously when editing them you can always use the pulldown menu just to the right of the UV Set Selection menu to move selected islands back to their correct UV sets afterwards.
-
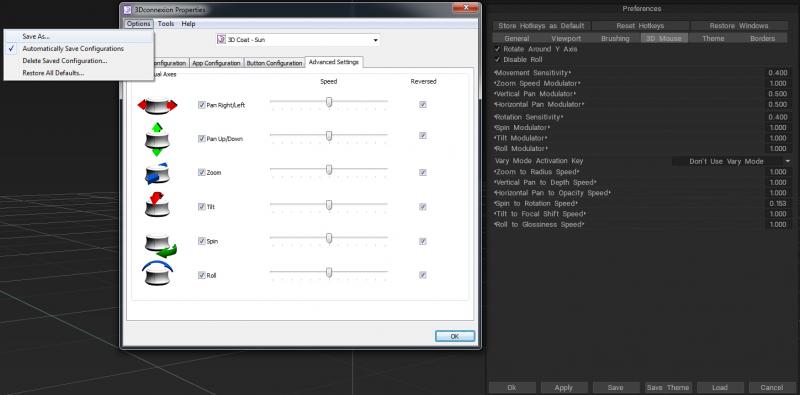
Did you try saving a config specifically for 3D Coat using the options menu in your 3Dconnexion properties window (you may also want to turn on Automatically Save Configurations). These are the settings I'm currently using for my 3D mouse.
It's been a while since I had to set my 3D mouse up but I do vaguely remember struggling with lost settings and I'm pretty sure it had something to do with setting up & saving custom configs for each app.
-
 2
2
-
-
Did you try rebaking using different Normal Map Software Presets to see if any of them gave better results?
I'd recommend starting with the presets provided, and testing each until you find the one that works best. If the results still aren't quite right you could then try going to your Preferences and tweaking the individual settings for whichever preset gave you the best output to see if you can further improve the results.
Don't forget to make a copy of the preset before changing the settings (select the preset to edit then choose Add Normal Map Preset from the Normal Map Software Preset pulldown menu) so you don't overwrite a preset you may need later. And if you happen to find the perfect combination of settings for Daz Studio and/or Simlab don't forget to post a screenshot of them for future reference!

-
Hi all, long time 3D Coat fan and forum lurker here. I'd been heavily into 3D for quite a few years (mostly using 3DS Max and Maya) before discovering 3D Coat, but pretty much fell in love with it instantly and now it's my weapon of choice for almost everything. Looking forward to contributing here and hopefully learning a whole bunch more in the process.


[Solved] Why the weird normal maps ?
in General 3DCoat
Posted
If you import your model to the Paint room (File > Import Object) and use the Bake sculpt mesh onto paint room mesh command in the Bake menu 3D Coat will retain the models existing smoothing groups.
Cube baked in Retopo room...
(same cube with normal map hidden)
Cube baked in Paint room
(same cube with normal map hidden)