


Robert N
-
Posts
9 -
Joined
-
Last visited
Content Type
Forums
Calendar
Gallery
Posts posted by Robert N
-
-
1 hour ago, AbnRanger said:
Thanks for the added info. Could you append the Applink Manual by pasting this information into it?
Definitely, I'll summarize it for the Manual!
-
 1
1
-
-
Okay I see and here are a few hints:
Green channel (some background information)
Just read that Modo by default interprets normal maps in the OpenGL way instead of the DirectX way and these two interpret the green channel contrary (because the y axis in UV space is inverted).
So inverting the green channel in Modo is one option - thanks for the hint!
The other option is to invert the green channel when exporting from within 3D-Coat. This can be done by setting the "Normal Maps Export" in the Preferences to "Maya, Blender".So "Maya, Blender" corresponds to the "OpenGL" way normal map
and "3DS-Max, LW" seems to be like a "DirectX" normal mapBy the way I have to agree with Gary (https://3dcoat.com/forum/index.php?/topic/20056-why-so-many-normal-map-options/ ) stating that the option to invert the green channel in 3D-Coat might be more accessible with a separate checkbox (or by naming the dropdown options like "OpenGL" and "DirectX") instead of binding the preference to Software names. The software specific stuff should only be saved in within the chosen options of the "Normal Map Sofware Presets".
Padding
Unchecking "Denormalized TB" seems to create a padding once, which had a positive effect here (though does not completely solve the issue).
Also make sure "Create Padding" is checked in the export dialog.UV Map
I believe the issue is partly caused by the jagged UV map 3D-Coat's auto unwrapper is creating. On your model the critical areas probably are placed on that kind of UV seams, too.
Modo seems to be pretty merciless rendering jagged UVs, but I’d be interested to know if this is just a question of correct settings on the mesh or texture maps.
Currently I didn’t get better results by manually exporting/importing the normal map. Let me know if there’s anything particular to take into consideration.I do notice though that the critical areas are already visible in 3D-Coat (at least in my test case), but harder to see.
So ultimately a nice UV map might solve this, but more tips and hints on a smoother normal map exchange are very welcome!
-
@AbnRangerThank you for creating a new video about the Modo Applink! Your tutorials are done so thoroughly and illustrative!@mues2 hours ago, mues said:
The normals sent over from 3dcoat are off in modo. I've tried messing around with different normal map export options but can't seem to get it right?
Thanks for the feedback! I’d like to reproduce the issue you are experiencing to see what could possibly be done to fix it.
How/When does it occur in a way that I can best see the difference between both programs after transfer? (preferably with steps to reproduce)Btw. I did notice that jagged artifacts in textures render out more explicit in Modo than in 3D-Coat, but these were cases with artifacts caused by painting on (jagged) uv seams. -
Thank you guys very much for your feedback!
Prepared a minor update to 3.0.2 that Pilgway already made available on their Applink Download Site:
http://3dcoat.com/de/download/applinks/To install or update the Kit, place or overwrite the coatlink directory in your user Kits dir.
---
v3.0.2
- Complemented Alpha/Transparency transfer for advanced Material and Unity Material
- Restricted auto creation of masks in Modo to texture workflows
- Added dialog warning when object to import not found
- Renamed Send/Update buttons to Push/Pull
- Fixed unsought change of viewport from camera to default
- Fixed exception messages about 'incompatible scenes'
- Fixed internal path setting of Export.xml
-
Fixed auto swizzling for Modo 902
-
3
-
The possibility to make the texture workflow a two-way exchange with 3D-Coat would be nice.Imagine you’re managing a large scene with textured objects in Blender/3dsMax/Modo etc. and you’d like to polish existing textures of particular objects in 3D-Coat.I’d like to send them from my Host Application with all its texture layers to 3D-Coat, tweak and refine them, and send them back to the original App. Without manual texture assignment in 3D-Coat.It’s mainly a 3D-Coat API request offering new possibilities for Applinks.The import.txt (or whatever kind of file) built from within the external application could for example serve the following information per texture layer:
-
Target model name/identifier (e.g. "Mesh_Human")
-
Material name (e.g. "mat_body")
-
UV map name (e.g. "uv_body")
-
Kind of effect layer (color, normal, metallic etc.)
-
Channel filter RGB / R / G / B / A
-
(Absolute) path to texture file
Whether material or UV map name applies depends on the user choosing to treat materials as separate textures or not on import.(Currently it seems to be partly possible for some basic maps that import with .obj files, but it doesn’t suffice for all PBR layers - also depending on how the Host exports to obj -, file format independency and channel packing.)I think it could create a pretty unique workflow.-
1
-
-
Hi Modo and 3D-Coat users,here’s a new v3.0 of the Modo-3DCoat Applink I have been working on with changes stated in the Release Notes below.Version 3 has been tested with Windows, macOS and Linux, Modo 9-13RC and 3D-Coat 4.8.Since this is the first release of the overhauled version, I hope everything works fine.Installation:
-
Download the attached zip and copy the „coatlink“ folder into Modo’s user folder „Kits“ (Quick access via Modo -> System -> Open user folder).
-
Restart Modo.
-
Inside Modo you’ll find the applink in the Kits popup at the top right. Add the Applink to your Kit workbench for quick access.
Path settings for the exchange folder should be set automatically, but check them if you encounter any issues.You can find more information about setup and use of the Modo Applink in the Manual that’s accessible via the respective button in the Kit or in the /Manual folder.Depending on the shader you want to use in Modo, simply choose the corresponding export Preset that comes with 3D-Coat when sending items back to Modo (e.g. Modo Physical/Principled, Unity, Unreal or one of the Vray-Presets). Additionally you can use the attached Preset for the glTF shader (install via File -> Install extension) or build your own custom export Preset.Feedback, Bugreports, Code-Contributions or demo videos are welcome.P.S.: At its core the overhauled Applink is based on the classes designed by Styler in version 2. Many thanks for that!Thanks to Pilgway for their support!---v3 Release Notes- Added support for Modo’s Unity, Unreal and glTF shader and basic Vray support
- Added support for Metallic/Roughness/AO/Curvature layer transfer
- Added support for RGBA channel packed maps. They relink in Modo according to the way you packed and exported them from 3DCoat.
- Swizzling automatically gets set in Modo according to the color channel the map was packed to in 3DCoat
- Colorspace per layer gets set in Modo according to the shader specs
- Added support for multiple material masks per item
- Added support for multiple UV maps per item
- Moved from .obj to .lwo as exchange format
- Options to update textures or geometry or both
- Options for Geometry import: Replace geometry / Replace mesh item / Add new mesh item
- Options for Material import: Import all Materials / Ask per Material
- New interface using Modo's Kit UI
- Some additional tooltips and warning/error messages in the log. Relevant messages display as dialog.
- Manual added
- Removed options to configure 3DCoat Export Preset from within the Applink due to growing config complexity with different shaders and channel packing

-
6
-
-
Okay, if I’m getting it right, the Modo applink currently supports Color (Albedo), Specular Color, Specular Amount and Normal Maps.
The code gives me the idea though that things are more or less prepared for a Metalness/Roughness workflow and for Emissive/AO/displacement exchange too, but it isn't finished yet.
Let me know if it’s incorrect.Getting these effect maps to work with the applink would be a first big step towards a deeper integration of Modo and 3DCoat. This would be a nice feature for all kinds of PBR workflows.
In a second step it’d be great if we could use all four kinds of Modo materials (default, Unreal, Unity, glTF) directly with the applink. This is mainly a question of texture assignment to effect layers in Modo.
On the one hand this would require at least four different Modo export profiles in 3DCoat with the assignments and channel packing tailored for the corresponding material kind.This appears to be rather easy to set up.
On the other hand the applink would have to be in state to import and assign the Metalness/Roughness/Emissive/AO (and possibly alpha) maps to corresponding effect layers in Modo, depending on the chosen material type/shader. Luckily there already is a dropdown for the Shader setting in the Import Options of the Applink with "advancedMaterial" as its single entry, which lets me think that different material types have been considered.
I can’t tell how complex these two steps (1: all map types, 2: all four material/shader types) are to achieve, but it’d be a pretty nice feature for us Modo+3DCoat users.
-
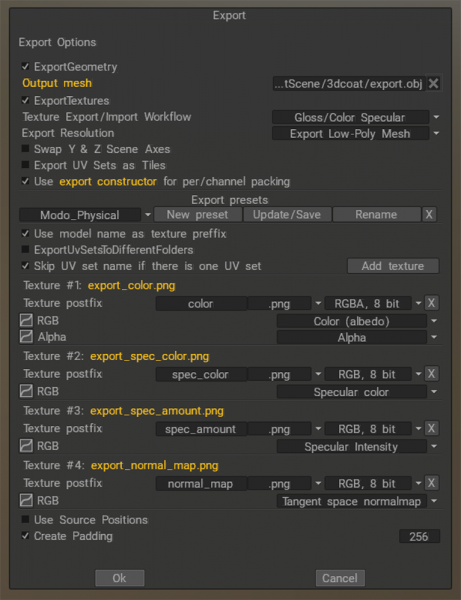
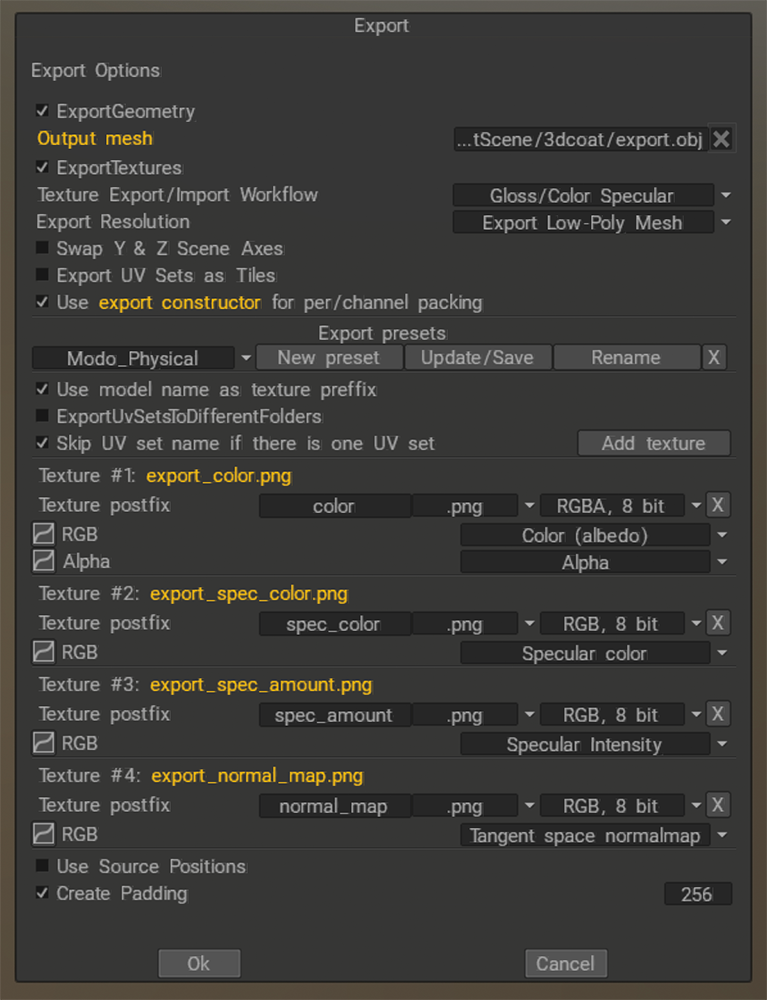
In my experience you can make it work with the constructor if you manually change some of the export maps that are set by default. To transfer the color map, the first map should be set to "Color (albedo)" instead of "Diffuse". Secondly, the app link currently seems to be focussed on a Specular/Glossiness workflow and Roughness maps don't get transferred into Modo yet afaik. But in the constructor you can get it working for Specular when replacing the Roughness map (set by default) with a "Specular Intensity" map as shown in the attached screenshot, complementing "Specular Color".
These maps should also be selected in the options of the applink in Modo.
You’ll get the same result like when using it without the constructor, just wanted to let you know for custom exports.
Btw it’s nice to see some first videos about the applink for Modo/3DCoat in action.
A "How To Use the Modo Applink" video would be great whenever the applink is ready for that.
2024 Feature requests wishlist
in Feature requests
Posted
Support of alpha shapes for the Pencil tool (pixel art texturing workflow)
Apparently the pencil tool does not support alpha shapes, even though the selected shapes do get displayed in the cursor of the pencil.
This also applies to the other three paint channels (depth, color, glossiness).
I'd really like to see 3DCoat become more versatile in terms of pixel perfect / 3D pixel art texturing workflows.
That's why I'd like to ask for the following two features:
- The pencil tool supporting alpha shapes and the other paint channels, just like in the brush tool
- The preview icons of alpha shapes for the pencil tool being generated with nearest neighbor interpolation instead of bilinear/bicubic, according to the pixel precise application of the pencil.
This would allow a precise and quick application of dithering and other pixel art pattern brushes, simple placement of pixel art decals (with 2 colors) or a randomized pixel spray to name a few applications.