

digman
-
Posts
4,720 -
Joined
-
Last visited
Content Type
Forums
Calendar
Gallery
Everything posted by digman
-
 It is possible since you can now paint on voxels a paint object has to be created. Not sure a guess here. Though the extra 2 objects that could be an error. I tested other default models and they all appear as a paint object as well but with only one paint object. Windows 3DC version 2023.41 does the same as the new beta 2024_01 beta. Update. I can delete the paint objects with no effect so why there are there as you said could be a bug. When I start to voxel paint no paint object is created.
 -
The reason you can re-bake in the paint room changes from the sculpt mesh to Paint mesh is that if you make minor changes to your sculpt model you do not have to go the whole baking process again. It will rebake and apply the changes to the normal map and any painting you have done. This feature was requested my many users. Next the reason you are asked if you want to delete the paint model and layers when re-baking is that in the old days you had to manually delete your paint model and layers to test if your new re-baked fixed problems. This automatically now does it for you. That was another request by many users. I see you have Named Correspondence checked. Did you set this up property in the Retopo room. Did you baked many separate objects at the same time? It could be an occlusion problem without setting up Named Correspondence correctly. No way to tell the problems for sure unless I could look at your 3DC file. If interested pm me with a link to your 3DC file from a file sharing site and I will look at it.
-
The blender mapcap is just used for a example. I was in the layout room in Blender and the Sculpt room in 3DCoat. In 3DC. Click the Camera icon, choose background and then select Vertical Gradient or use the Background image selection to closer match Blender's default grey background. Under the View menu Select Greyscale Panorama just to be sure no colored light is in your scene. Chose Clay2 shader Construct a new shader. Turn everything off leaving only the Gloss channel to adjust. Choose a red color and of course you will have to play around with red color in its value etc etc. I eyeball the red color RED-137 Blue 51.0 Red 34.0. Of course yours will be different. Adjust the gloss so your shader is less reflective This appeared to work pretty well. Edit: I added a picture with 3DC's default background image
-
Not a tutorial here> I have gotten very good results in fixing or modifying a photogrammetry or scanned model. A combination of voxel mode and surface mode.
-
FBX export 2023.40
digman replied to Tomas B's topic in New Releases, Bugs Reports & Development Discussion
3DC Windows version 2024_01 beta. Harder to answer your question as your computer specs are not mentioned in your post. Exported a 42 million FBX surface mode model from the sculpt room and no crash. My specs. Windows 11 Intel CPU, i9_ 12900 64 gig of ram Nivida 3090 It took a while to export as the exported FBX is 1.03 gig in size. -
[Solved] Materials all show as black after viewing in render room
digman replied to Jamie Norton's topic in Finished Projects
If possible send the 3DC file to support (at) 3dcoat.com for them to look at with a link to the post. If possible you can pm with a link to your file if you use a file sharing site. I will look at it. I do not have as much time as I did in the past to check 3DC files but I will look at yours. -
How can I increase the performance of 3DCoat??
digman replied to keithfishbiscuit's topic in General 3DCoat
Windows 3DC version 2024_01 Hard to answer in detail. You mentioned sculpting. Laggy in vox mode or surface mode both. How many millions of voxels or surface mode polygons? Could 3DC be using your built in video card and not your RTX 4070. Most laptops have a built in GPU, is yours disabled. I am only taking a guess here your laptop has a built in one. If not disabled sometimes the built in video card will handle some applications. -
3DC Windows version 2024_01 I ran a test and, on my end, had no issues. My settings below. I created my own folder to put the mp4 into. My steps. Selected my settings in the panel. Pressed ok. Panel closes. Pressed the Render button. top right of the 3DC interface. Chose my folder I created and named the mp4 file then pressed save. 300 frames rendered with 1000 rays per frame. Next to the render button, pressed Show folder. The mp4 was there. Only giving you my steps to be clear, not saying you did something different.
-
If possible send the file to support (at) 3dcoat.com and have them look at it. Describe your problem in detail.
-
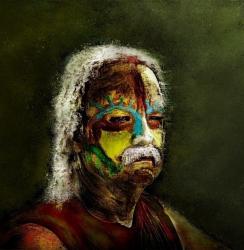
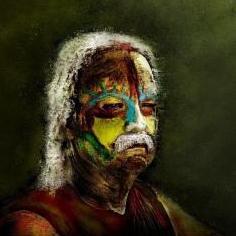
Finished. Baked for normal map. Rendered in 3DCoat.
-
Maybe this will help. Hover over a Gizmo element------ hold down the LMB and hit the space bar then add your input. Make sure the Gizmo element is highlighted when holding down the LMB. This might not entirely be what you need, if not put in a feature request.
-
A work in progress. I've been away for a few years pursuing some other interests. Now I have some time for 3DCoat again. Checking out some of the new tools, like voxel painting and vector displacement maps. Rendered in 3DCoat. Stand is generic atm.
-
Since Andrew found a problem and fixed it, I will await a new build to test the file.
-
Is is possible to share the model. I would like to run a few test also. Pm with a link to download.
-
I would switch back to the old style curvature for now if you need to get this done atm. The new RGB cavity curvature baking works in most cases but still needs some fine turning I believe. You could send the file to Andrew to help improve the RBG cavity baking. I found a few places where the uvs were getting stretched a bit but it was not so bad to cause the problem. I made no changes in the scene scale nor scaled the object using the older default curvature baking.
-
Out of town today but will look at the problem when I get back this evening unless Carlosan looks at the problem as well and figures it out.
-
Windows version 2021.63 I still have those options on my end. You do have to setup your own hotkeys for them now I noticed.
-
I looked but did not see anything to turn it off. Though I could be missing it. I believe it is hard coded.
-
Paint Room Model to Sculpt Model with Textures and Depth
digman replied to digman's topic in General 3DCoat
The depth being inverted when converting a normal map texture to real geometry(Surface Mode) when using the new feature has been fixed. Using the function now works as expected.- 1 reply
-
- 1
-

-
2021.62 - If you import the mesh for the vertex painting and it has textures, all of them will be applied to the mesh (color, gloss, metal, displacement) - Now you may transform paint objects to sculpt objects, textures (color, gloss, metal, displacement) will be transformed to vertex paint layer. ------------------------------------------------------------------------------------------------------------------------------------------------ The above works but a possible bug. When the normal map is converted to real geometry, the depth becomes reversed. This is with hand painted depth and my testing of some of my personal smart materials did the same reversing of depth. I do nor know if this due to the type of normal created in the paint room but expected behavior would be any norrmal map preset should work correctly. This is a new feature so I expect some problems in the beginning. Open beta testing we have. //edit Fixed on .63
-
2021.62 Information on the new feature form the update post: "- If you import the mesh for the vertex painting and it has textures, all of them will be applied to the mesh (color, gloss, metal, displacement) - Now you may transform paint objects to sculpt objects, textures (color, gloss, metal, displacement) will be transformed to vertex paint layer." --------------------------------------------------------------------------------------------------------------------------------------------------------------- I had been a little confused about the feature. I thought it was for importing external models for vertex painting with now all the textures including depth. Carlosan showed me it is from the Paint Room to the Sculpt room surface mode. A new selection has been put in the Bake menu in the Paint Room shown in the picture. You have a choice of subdivision levels when transforming the paint room model to a sculpt surface mode model. Use the Default Shader in the sculpt room for the best representation of the textures between the two rooms. The normal map is converted to real geometry in the sculpt room. (surface mode) One use. To have a more accurate idea for adjusting by sculpting the object and then baking the changes back to the paint room without losing your work. This is possible in 3DC if you were not aware of the baking feature without losing your previous work.
- 1 reply
-
- 1
-

-
I saw the video image did not expand the post... opps. Will correct my postings.
-
2021.62 There is a highlighting function but it appears to have a bug atm with Mat_Cap shaders, the other shaders work. Confirming Sprayer findings. For now hover over an object press the "H" key in the viewport. That object will be selected and the correct layer will be selected and it will take you to that layer even if the layer is far down in the stack. The highlighting function works with the shaders but atm not with the mat_cap shaders, Sprayer pointed that out in his post.
-
2021.62 Confirming Sprayer's report the highlighting function does not work with Mat_Cap shaders.
-
2021.62. Confirmed that you can not change the environement map
