Search the Community
Showing results for tags 'Sculpting'.
-
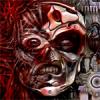
Hi, how do you guys make rocky worn surfaces with layered bits? My goal is the style of layered rocky surfaces on the bellow Also achieving texturing like this is also quite hard to do in 3d coat. ide like to here some suggestion on getting this dirty ancient effect My (rather poor) attempt is bellow, its just nowhere near as good. He really defines and shows off his layers using specularity and highlight on them, but thats not really relevant, i just want layer in the first place.
-
So I decided to give the sculpting tools a shot so that I can fairly compare 3D Coat to my existing workflow to determine if it justifies the cost to purchase and have run into a few problems trying to replicate my previous workflow. I am wanting to find out how I can achieve the same results I get in Sculptris when I use the Grab tool. I found a tool in 3D Coat called Move, but it only grabs 1 pixel and drags this.. kind of works more like the Pinch tool from Sculptris. If anyone knows the name/way to use the right tool to achieve the same result please advise. EDIT I also have seen a Pointers counter at the bottom of the 3D Coat program and every time my cursor is over my model, it starts to rapidly count down. It was at -7000 a little ago and is now all the way to -12000. As this number decreases.. I am seeing my memory getting chewed up. this can't be good right? DOUBLE EDIT The larger the brush size the faster it decreases, the smaller the brush size the slower it decreases. I'm not clicking just hovering my cursor over the model with the Move tool selected. TRIPLE EDIT Is there a way to change how much detail is added or removed when you are sculpting. In Sculptris I was able to adjust the tessellation level so that it would either work without adding any new polygons or it would add extreme quantities of them. Using this method I was able to control the polycount in areas where high detail was not required. I'm just trying to determine how to achieve this same result inside of 3D Coat.
-
Hello, I have a frustrating issue with 3D Coat where the only voxel tools that behave as expected are Grow, Smooth and Clay, all the other voxel tools (carve, scrape, pinch, smudge, plane, 2d paint, sphere, airbrush, blob) draw a green marquee which origin starts from where I click with my brush and adds or removes rectangular shape of the marquee orientated towards the camera. I have looked at many written and video tutorials and these tools are not functioning as demonstrated (Attached is an image of the behavior). I will be very thankful if someone can help explain why this is happening? Note: I have re-installed 3D Coat and run the software in all DX and GL 32 & 64bit mode. 4.1.04A (CUDA)(GL64) Windows 7 Ultimate Intel Core i7 950 @ 3.07GHz 12 GB Ram NVIDIA GeForece GTX670 2Gb
-
Does anyone know of a way to sculpt like this. As you can see they have some lovely hard edges and indents - in 3d coat i cant get this king of effect, if i were to sculpt a rock using build,scrape/pinch tools, the rock would end up smoother looking; without receses and crevices but only out going parts in the rock. Anyone know of tools/brush tequeniques to make rockes like this? (btw, they were made in zbrushy)
-
 Hey Guys, Just wanted let people that I released a new Get-Started Trainng Series for 3D Coat Version 4 for beginners or people who are new to 3D Coat. http://www.learn3dsoftware.com/3dc_4_bundle_pack_I_Vol_1_to_12.htm This collection of 12 Volumes of Tutorials contains over 28 hours of 3D Coat Version 4 Training. An ultimate get-started guide for new users of this amazing software package. This 3D Coat bundle contains the following titles: 1) 3D Coat 4- Volume #1-Getting Started 2) 3D Coat 4- Volume #2-Getting Started II 3) 3D Coat V4-Volume #3-UV Mapping I 4) 3D Coat 4- Volume #4- UV Mapping II 5) 3D Coat 4- Volume #5-Retopology I 6) 3D Coat 4- Volume #6-Retopology II 7) 3D Coat Version 4- Volume #7-Voxels I 8 ) 3D Coat 4- Volume #8- Voxels II 9) 3D Coat 4- Volume #9-Voxels III 10) 3D Coat 4- Volume #10-Voxels IV 11) 3D Coat 4- Volume #11-Voxels V 12) 3D Coat 4- Volume #12-Voxels VI
 -
Hi folks, I was wandering if anyone could explain the best practise approach for tileable voxel sculpting in 3D Coat? I have downloaded a file that Andrew released "TiledVoxels" however I find that pretty difficult to line up the edges of the centre quad, I also tried the Surface Menu Preset Tile/s. Is there a way to carry the stroke over the mesh border like in Z-Brush? Many thanks for any ideas. All the best Greg I've been looking through these so far http://3d-coat.com/forum/index.php?showtopic=6518 http://3d-coat.com/forum/index.php?showtopic=11454 http://3d-coat.com/forum/index.php?showtopic=6518&pid=88252&st=0entry88252 http://3d-coat.com/forum/index.php?showtopic=11454&&page=3
-
 To all 3DC'ers! I am new to 3DC and I have been trying to solve an issue with sculpting and texturing a model that I would like your help with. I have a .OBJ file of a sculpture that has been captured by a 3D Scanner and has a UV map/texture. The problem is that, the model has some defects, both texture and geometry that require correction. I have managed to correct the geometry defects and I have also managed to correct the textures and export the model out of 3DC. I can do these operations INDIVIDUALLY but I cannot seem to bake the new texture on the modified (Voxelised) geometry. Could you please help correct my noob mistake or if this is a known issue/limitation then please feel free to put my mind at ease. My workflow (based on tutorials and searching the forums): 1: File > Import > import for voxelising (select the .OBJ) 2: Make modifications to geometry using clay tools and live clay etc. 3: To the Retopo room 4: Retopo menu > import - select the same file as original import to get Retopo mesh - (no UV edits as the texture already has UV mapped textures) 5: Retopo Menu > Merge NM 6: To Paint Room 7: Import Texture > import normal map 8: Back to Retopo 9: Bake scan settings and Bake 10: Back to paint Room for export and the model shows the Voxel sculpted edits and the texture (albeit with wierd layers - most of the time the texture is a bronze colour!) Please help!!! Endless hours trying to solve this and I am stuck. I appreciate your comments and help, thanks in advance. Ash
 -
Happy New Year Everyone!! We are are having a $7 Video Madness Sale at Learn3dSoftware.com All 3D Coat Video Titles are only $7 Each along with our other 3D software packages. So that's approximately 63% OFF our regular prices!! Or $12.00 in savings for each video title!! Visit Us At: http://www.learn3dsoftware.com/7_dollar_madness_New_Years_2014.htm Sale ends soon!!
-
Hi all, I'm currently on a bit of a mission adding several new 3D Coat related tutorials per week to my youTube channel:- Here's a link listing all my 3D Coat tutorials:- https://www.youtube....sources+3d+coat Hope you find em useful!! Please fav/rate, comment & ask any questions you like. Thanks, Psionic
-
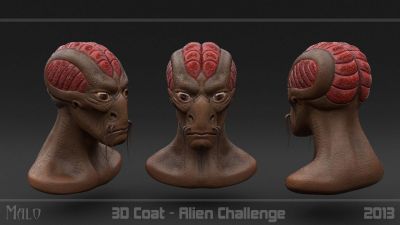
From the album: Malo
Head for the Alien Challange. Complede workflow timelapse. Sculpting, Retopo, UVs and Texturing. http://youtu.be/h_exNtRdW5M© Malo
-
Hello everyone! This is the very first Community Challenge here on the 3D-Coat Forums! This challenge will be to sculpt a King's Throne! It has to be a chair (for a humanoid shaped King), but it should be decorated, big, and awe-inspiring. It should NOT look like an average chair that anybody would use. This is a special chair that only the King is allowed to sit in! Some ideas to inspire you: Think about who the King is. Is he an Elven King? Is his throne made of intricately carved wood, inlaid with magical glowing crystals? Maybe he is Poseidon, King of the Sea? Is his throne made of various seashells and coral, with electric eels living inside of it? Or perhaps he is King Louis XV of France? What would his throne look like then? In this Challenge you are required to sculpt the entire throne within 3D-Coat. Sculpting is the only requirement of this Challenge, but you are free to retopo, UV, and paint your model if you so desire. If you only want to vertex paint your sculpt (with no retopo or UVs) that will also be acceptable. The final version must be rendered either in the Render Room of 3D-Coat or you can also use any external render engine you desire. Please post the progress you are making by taking screen shots from within 3D-Coat. Also feel free to discuss any problems you run into while working, or ask any questions you might have, so that we can all help each other, and learn from one another (as this is the main purpose of these Challenges). You can refer to the Rules thread (first sticky thread in this forum) for any other questions you might have about how this Challenge will be run. The deadline is one month from today. Oh and by the way, I will also be taking part in this Challenge, but obviously I will NOT be allowed to win this one! Good luck! I am excited to see what we all create!
-
Time to start my sketchbook around here. Here some finished illustrations, sketches, wip's, sculptures, etc... Enjoy and don't forget to watch my portfolio: www.GiovannyArce.com
-
Hey Guys, Just letting everyone know we are having a $9 Dollar Video Sale all our Video Tutorials at: http://www.learn3dsoftware.com We have dozens and dozens of tutorials for Lightwave, 3D Coat, ZBrush and Modo. The Sale ends when we have sold over 500 videos. Have a Great Weekend!!
-
Greetings all, I've put together an extension for 3D Coat's Community of Voxel Sculptors to use in their projects as my way of giving back to such a wonderful and helpful group of people. I found myself constantly needing to export simple 3D Geometries so found it to be best to make a compiled list of many things I used regularly to carve in to a sculpt. Pack Details: A collection of hundreds of Negative Volume primitives for use in voxel sculpting. Types include: Chamfer Boxes, Chamfer Cylinders, Cones, Cylinders, Geo-spheres, Icosa Hedras, Octa Hedras, Spheres, Stars, Tetra Hedras, Torus, Torus Knots & Tubes. Most come with various slice options such as 90, 180 & 270 segments. Allowing for easy carving in to Voxel sculpts. Link: Download from "Others" category >>Here<< Terms of Use: Enjoy and post some screenshots if you like in the this thread when you can! Preview: Menu Previews: Chamfer Boxes Chamfer Cylinders Cones Cylinders Geospheres Icosa Hedras Octa Hedras Spheres Stars Tetra Hedras Torus Torus Knots Tubes Special thanks to Digman & Carlosan for their help getting this finished!
-
What's the best approach to multiple levels of LOD in 3D Coat? Multiple baking with different subdivision levels and then exporting hi-res meshes of each bake from paint room to a file, while reusing textures painted once (on the highest subdivision bake)? Sorry if I don't sound too clear. I slept for only one hour today.
-
okay, i thought i had a methodology worked out that worked for me, but... going through the same steps is giving me different results. is it me, or is this some kind of bug i need to report? OVERVIEW: i'm trying to make a morph for a poser figure. problem number one for poser obj's is that they are incredibly microscopic compared to the universes of other 3d tools. problem number one for making morphs is keeping the vertex order and count of the object the same. here are the exact steps i followed, and the anomalous results i got from them. Version: 3D Coat V4.00.b15AGL ======================== ROUND ONE TEST 1: No Symmetry Start in Surface Modeling Mode (i figured this would preserve the obj surface without mucking around in all those voxels) Open/Import the base OBJ file. The Transform Tool is selected when the OBJ is brought into the scene. Move the Gizmo Only to 0,0,0. Scale 200% five times. (Note: my scaling math is off during this part of the test, so of course the position and scale of the resulting morph is FUBAR, but i'll include it here for the sake of completeness.) Select the Surface Tool: Expand Click 2x on the Right Forehead (i'm using a head model base) Select Adjust: Transform Tool (note: if I select the Transform Tool I saved in my presets, it tries to change me to voxel mode) Move Gizmo Only to 0,0,0; Scale 0.25% five times. (yes, totally WAY wrong.) Export OBJ, hit Cancel on mesh density reduction. TEST 1: Results Load Morph Target in Poser; turn on Attempt Vertex Correction. yeah, the scaling is FUBAR, but... the important thing, the vertex order is clearly correct (I can see the shrunken, misplaced head is not exploding). However... i don't see the lump on the forehead. ??? it just looks like the base object. TEST 2: Mirrored Since I know Sculptris totally FUBARs the vertex order when going into symmetry mode, i'm testing symmetrically painted morphs separately. Undo the Previous scene 5x, until the object is un-shrunken, and undo the forehead lump. Turn On Symmetry X. Use the Surface Tool: Expand 2x on the forehead. Two lumps are created. Repeat the same (incorrect) de-scaling and exporting as TEST 1. TEST 2 Results Load the Morph Target in Poser. This time, turn OFF Attempt to Correct Vertex Order (just to test) Results are the same... exactly the same. First, hooray! the vertices are all in the correct order and the morph doesn't explode. Secondly... uh... still no lumps on the forehead. EXPERIMENT ONE Undo the file back to the base head that was scaled up and has lumps. Attempt the de-scaling 4x, then 1x, try to figure out where my percentage math is screwed up. EXPERIMENT ONE Results the 4x descaled head was still a pinhead. the 1x descaled head was too high/large (naturally), and also exploded. NOTE: why is it now exploding, when before it was perfectly fine? ROUND TWO at about this time, i figured out my scaling routine is wrong. duh. yeah, so sue me, i'm not a math major. i calculated if i just scaled the object up 1000%, then i should scale it down 2.5% TEST 2.1 Start new scene, go to New Surface Scene. Import the base OBJ file. Use the Transform Tool (gizmo at 0,0,0) to Scale 1000%. PROBLEM: why is the object not scaling up where i can see it, like it just did before? (okay, doing 200% 5x vs 1000% 1x is probably different, but... that different? if i hit the scaling at 1000% again, then the object was large enough to see. did it ignore my first scale-up? did i put it in wrong? i restarted 3dcoat a couple of times, because it appeared to not be working as expected. TEST 2.2 i decided to scale up 2000% and scale down 1.25%. here are my notes on this attempt: (okay, stupid newbie mistake: always say yes to merge) Turn on Symmetry X. Surface Tool: Expand 2x on forehead. Resize (Gizmo @ 0,0,0) 1.25% Export OBJ, Cancel on reduction. TEST 2.1 Result: PROBLEM: target geometry has wrong number of vertices. 38,246 vertices instead of 38,290 it has 112,857 polygons instead of 38,354 and it is all triangulated! (which the original OBJ is not.) NOTE: i have not changed my import/export/sculpting/scaling methodology. why am i now getting wrong number of vertices results? i checked the original exported mirror test obj. it, too was triangulated, and it, too, had almost twice as many polygons as the original OBJ file, but... it had the correct number of vertices in the correct order. PROBLEM: when i imported the obj into poser, the head was not the right size/position as expected (could be my scaling math. i used to have a program that did poser obj scaling and de-scaling, but i no longer have that.) however, i DID see the knobs on the forehead, unlike previously. TOO LONG; DIDN'T READ: importing and exporting an object for a morph resulted in a morph that worked, except the sculpting that was done on it did not appear. exporting the same object again resulted in a morph that exploded. importing and exporting an object again, in a new file, using the same methodology as before, resulted in a morph that didn't work because of wrong number of vertices. but did have the sculpting appear on it. bloodsong needs help scaling an object up to work on it, and then back down so it is in its original size/space (it is not centered in the universe) for export. what, exactly, of my system specs do you need and where can i get a dump of them for you? thank you for your extreme patience.
-
Hey Guys, I'm having a MOVING SALE!! All our 3D Coat and other Software Video Tutorials are on sale for $10 Each (Almost 50% Off) -Over 65 Titles!! http://www.learn3dsoftware.com/quick_pick_list_10_dollar_moving_sale.htm All our videos will be on sale for only $10 Each until we have reached our goal of 500 videos sold. Don't forget to check out our Free Model Packs (Windows Collection Vol.#1 and #2) and our Youtube Channel with hours and hours of free video beginner 3D training. Have a Great Weekend:) Learn3DSoftware.com
-
Me as a klingon, a work in progress(-: http://bit.ly/XlNNTN