Search the Community
Showing results for tags 'Texture'.
-
Hi all, I'm really enjoying the smart materials, but I keep running into a snag. When I initially open 3DC and start working, selecting a smart material brings up the preview options at the top as well as a twirl down preview window to see the material applied to my model - sounds normal right? This works great, but if I inadvertently close the preview options (which also closes the preview window) then select another smart material, the options pop back up, but I can't for the life of me get the preview window to come back! I've looked at and clicked on everything I can think of to figure out the trick, but the best I could do was to get it to return when I open the smart material editor. Better than nothing, but it only stays as long as the window is open, and I have to close/reopen the editor if I want to try another material, which can get pretty tedious. Any ideas on how to call that preview window back permanently? Thanks!
-
Hello guys! I am really happy to use 3d coat and this is my favorite program for texturing, retoping and UVs, BUT For the competition i need texture atlas and i totally can't understand how to do it. I use UV room a lot, but still not very good in some functions of 3d coat. What i want - for example: i have 4 512 textures. All models have their own UV and they textured in Metallic PBR + AO. (3-5 textures for each one asset). Question - how to create 1 1024 texture for that models? I know only long way - create 1024 texture in Photoshop, past 4 textures and place UV's by hands with 0.5 scale. But I am sure that this is stupid action and there are ways which will be better and faster in 3d coat. Or may be there are another ways . Please, if it possible, link any video or write step by step. I will really appreciate help, thx
-
Hi Im newbie on 3dcoat and trying to learn 3dcoat. is there someone that really know how to export correct settings of textures for vray for maya ? fbx exported within 3dcoat wont importing in maya2016 correctly. also I tried to generate my own shading-network in maya. but result is very bad. do you have a practical video shows how to export correctly for vray4maya and how to setup a shader and link texture nodes in maya ? it is really confusing what does it mean "texture export/import workflow" (gloss metallness, gloss specular color.. etc.) do you see a good video tutorial that teaches it ? thank you
-
Hello, I recently purchased 3D Coat and started my first personal test project. I opened up the software and created a model in the sculpt room, then brought it into Paint Room and painted it. At this point, I tried to save out the object with all the aesthetic data and started to run into problems. 1) Tutorials show that when you go to Export objects and textures, it is supposed to give you a popup menu of the types of maps you want to save. This pop up doesn't appear. It only allows me to save the geometry as an obj, fbx, etc. 2) So, I go to Texture drop down and try to save everything manually one channel at a time. All the tga files come out black. Any insight to fixing this would be greatly appreciated. Thanks!
-
I cant find any shortcuts for rotating, scaling and paning textures/stencils. Are there any? there is no tooltip for them.
-
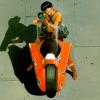
Hey guys, Here's my Steampunk inspired vehicle, I modeled everything using 3D Coat's Sculpt Room. Once the model was finished it was around 6-8 million poly. So I retopologized it in 3D Coat and managed to get it to about 39K poly and was really impressed. After which I textured it using the Paint Room and smart materials and rendered within the Render Room. Everything was done within 3D Coat. I'd wanted to try connecting a mix between a go-cart style unibody and a one wheeled motorcycle. Thanks for checking it out. :)
-
 Hi, I'm fairly new to 3D Coat and I currently only use it to work on reskins of weapons for CS:GO but I've come across an issue that is becoming rather frustrating as I can't work out what's causing it. After opening in external editor and working on the texture then saving and loading it back in 3DCoat the program seems to sample a section of the texture and draw a line right across the bottom of the UV as seen here; http://pasteboard.co/1NlqNDGM.png this line is NOT present in the .psd file! I did not put it there! But it persists and I can't get rid of it, I don't even know what's causing it or how to stop it. I thought it might be broken faces but it's not even aligned with the faces and I HAVE used this model before with 0 issues but even the save file for that, after re-opening it in an attempt to use it because I knew it was fine before, is now suffering from this issue as well! The file is attached, it's the official ripped .obj from the game and until now I've never had issues with it nor any of the other gun models so some help would be appreciated! Also, any way to fix the problem with seams? 3DCoat deletes the texture outside the uv's boundaries leaving horribly broken looking seams which can also be seen in above screenshot. I'm on Win7 and have 4.5.19 installed. Thanks desert_eagle.obj
 -
so i got 3D coat to trial out making skins for CSGO. when ever i saved the texture on photoshop it kept doing this :/ any help? thanks
-
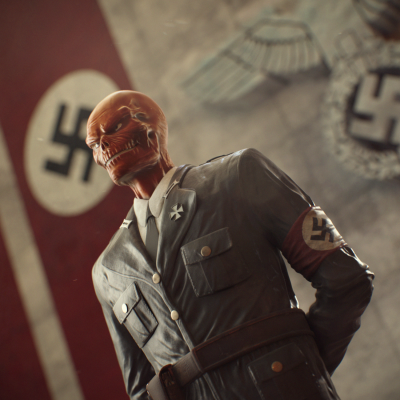
From the album: FanArt
After reading Red Skull: Incarnate I decided to create a illustration. 3D Coat + Modo. Hope you liked it! -
 New Tutorial!! Hard Surface UV Mapping in 3D Coat 4.5 http://www.learn3dsoftware.com/3dc_4_vol_21_hard_surf_uv_map.htm In this twenty-first video volume of 24 volumes 3D Instructor Adam Gibson goes through a project based session of Hard Surface UV Mapping of a multi-mesh layered sci-fi vehicle. UV Mapping for a lot of 3D artists can be a frustrating task. In this course easy to use work-flow tips and concepts are discussed and demonstrated to get you UV Mapping your 3D models quickly and efficiently. *Bonus: Content Folder Included. Table of Contents for Volume #21 Chapter 1- Intro Chapter 2- What is Hard Surface UV Mapping? Chapter 3- 3D Model Preparation Tips and Gotchas Chapter 4- Breaking Up Model Layer into Easier to Unwrap Pieces Chapter 5- Importing Model Into 3D Coat & Surface Materials/Paint Objects Visibility Chapter 6- Interior Compartment UV Unwrap Chapter 7- Exterior Compartment UV Unwrap Chapter 8- Rear Hatch Plate UV Unwrap Chapter 9- Front Wing Rotators UV Unwrap Chapter 10- Front Wing Thrusters UV Unwrap Chapter 11- Front Wings UV Unwrap Chapter 12- Upper Laser Cannons UV Unwrap Chapter 13- Lower Laser Cannons UV Unwrap Chapter 14- Cockpit UV Unwrap Chapter 15- Tail Fin UV Unwrap Chapter 16- Rear Wing Thrusters UV Unwrap Chapter 17- Rear Wings UV Unwrap Chapter 18- Rear Wing Rotators UV Unwrap Chapter 19- Rear Compartment UV Unwrap Chapter 20- Tail Fin Support UV Unwrap Chapter 21- Cockpit Nose UV Unwrap Chapter 22- Top Cap Panel UV Unwrap Chapter 23- Compartment Doors UV Unwrap Chapter 24- Rear Fins UV Unwrap Chapter 25- Export to UV Unwrapped Model to Lightwave Chapter 26- Final Running Time: 4 hrs. 4 mins. High Quality (Screen-Res 1920 x 1080 pixels) Video Format: MP4 (.mp4) Level: Beginner
 -
Hi guys I really had an idea of creating something for Dota 2 workshop and I decided on a courier. I am familiar with softwares like 3ds max and 3d coat but I am a casual user and i don't understand some parts to do it till the end. Q1: How should character look? Should i split the parts of body of courier (legs, hands etc...) or I keep it as one part? Q2: What is the workflow? Dota 2 courier asks for max 3000 polygons model which is very low. I just don't understand how can you keep the details of the courier, but guys on workshop somehow does. When i try to retopo my high poly model into fewer polygons i just can't menage the details. Q3: I know that you somehow have to apply texture from high poly to low poly mesh but I don't understand how and there is not enough information online? Q4: I want to export model from 3d coat to 3ds max to animate, but when I do that materials dont apeear to be right, how to adjust it inside? I hope you guys can help and others who has similar ideas to create something for workshop can learn, feel free to send any links that might help, but personally I didn't find any real source of info that really explains everything step by step ( for dummies ) Thanks a lot!!!
-
-
Is there a way i can replace the checker grid/texture on my retopo mesh, with a custom texture. Edit: ah found it. select mark seams tool, and you will see a box defaulted as "simple checker" (in the tool options box along the top of your screen), drop down the list and select custom checker.
-
Здравствуйте, обитатели форума 3D coat, недавно перешел на новую для меня версию программы 4.5.02. И заметил в новых фичах обидную проблему. Есть модель с текстурой 2048Х2048. И превью материала показывает мне такое качество: Я радостно беру кисть и получаю на выходе вот такое : И еще раз для сравнения: Прошу объяснить, из какой жопы у меня растут руки, и что я делаю не так. Вот еще UV, авторазвертка, может в ней проблемы?
-
Hello 3D Coaters! Is there a way to export a model to keyshot and have your vertex paint show up (no UVs)? In keyshot I can see the model but no texture. I know how to do this in blender (export as fbx, and plug in the 'Col' etc) but is there a way to do this with keyshot? My goal is to find a UV free workflow. Any knowledge cakes will be appreciated!
-
Hey Guys, Were having a Super Halloween Special at LEARN3DSOFTWARE.com. -Lifetime Memberships are 50% Off -Only $249 US (Reg.$499) Until October 31st!! -Training for 3D Coat, Lightwave, ZBrush, Modo, Substance Painter, and DDO training. -One Time Fee and you get Access to All New and Older Tutorial Releases!! -Over 157 Video Titles and More Being Added Every Month!! http://www.learn3dsoftware.com/membership_lifetime.htm
-
Hello and nice to meet you all fellow artists! I have a set of hand painted texture I have made from photoshop and need to be applied to a collection of buildings. These include textures for walls, roofs, wood, bricks etc that can be applied to parts of buildings. I would like to use a similar tool from photoshop called clone pattern if theres one in 3d coat? Or is there another method you might use to ease the process than using the brush tool and apply your textures as stamps? Thanks in regard!
-
Hi there ! I'm a long time Blender/Gimp/Krita user but I'm quited tired of blender's texture painting... No layers and all.. It's been troubling me for a while. So I made my first steps to 3D Coat a few days ago and I love the app so far. Two things are bugging me though : 1 - I googled a lot and tried a lot of options ("paint through") and all but I can't seem to get the behavior I'd like with the brush concerning clipping faces. I'd like the brush to paint everything under it, and not just snapping on a particular polygon. Is it possible ? 2 - I googled that already and it seems there isn't but I'm still asking... who knows Is there a smudge/smear brush in texture painting ? Thanks a lot for your help ! Regards, Ghislain.
-
При експорте материала из коата в макс/вирей материал становится совсем не таким, каким он был в 3д коате, как я понял - это из-за того что вирей не поддерживает PBR, но ведь как-то наверняка можно в вирее использовать текстуры и материалы коата... Подскажите как сделать так чтоб в вирее материалы отображались верно и как вообще рендерить модели и материалы с коата, не на коате... например как их рендерить на вирее, или может вообще воспользоваться возможностями рендера на движке вроде анреал енджина?
-
 Hello, HELP ME PLEASE. when i exporting model and materials from 3d coat to 3ds Max (vray), the materials looks not like it was in 3d coat. I realized - this is due to the fact that vray not support PBR, but that somehow it should be possible to use 3d coat textures and materials in VRay renderer. Tell me please how to render my model with 3d-coat textures NOT in 3d coat renderer (cause i need a glass), for example - vray, or maybe better to use unreal engine?
 -
Hi guys! I have a project I am working on and the bit I have gotten to now is really making my head hurt haha! So I am trying to make terrain pieces that can fit together side by side and be seamless and flow from one to the other. The idea is that I can sculpt a number of pieces and they can be used multiple times in different positions and rotations to create a potentially infinite number of terrain boards. http://i.imgur.com/NGRCrqg.jpg That is my rough concept where there are pieces like straight rivers, curved rivers, rivers with crossings, cliffs, cliff corners inner and outer, cliffs with slopes, lakes and grass plains and they can then be used multiple times to create varied landscapes. My issue is that I am unsure how to make them tileable! Ideally I am looking for a way of sculpting a perfectly square mesh that repeats at the edges so each module can fit next to another module with relative ease. I have tried doing it via photoshop creating heightmaps but the results are not great and it takes far too long to make a heightmap by hand, with detail without having a reference as to what it looks like when applied to a model. I would appreciate any help that I can get with the matter! I am struggling! Thank you!
-
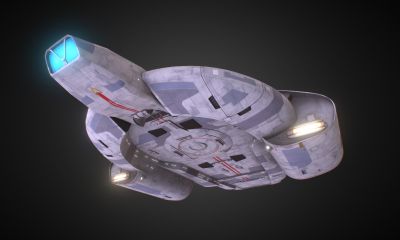
From the album: Javis' Works
Finished textured model of the U.S.S. Defiant NX74205 from Deep Space Nine. Modeled in Modo, textured in 3D-Coat (and a splash of Photoshop). -
I have a model I've painted, and I can't seem to export the texture; choosing 'Textures' -> 'Export' -> 'All Layers Color' produces transparent (empty) layers in the Photoshop file. It's also 256x256 which leads to my second question: choosing 'Edit' -> 'Mesh & Texture Resolution' doesn't do anything-- is this where you'd set the size of the exported texture images? EDIT: one more question-- when I export 'object and textures', I'm only getting the files for the object (obj file) and the material (mtl file) but not the actual image file that goes along with the material. Thanks! Bryan
-
Привет всем !! Проблема: →когда я рисую текстурой по воксельному объекту (режим Surface) то на объект наносится текстура низкого качества (файл Texture_Paint_Real), в то же время при масштабировании-перемещении этой же текстуры по объекту она отображается в её реальном (высоком) качестве (файл Texture_Preview).← Я заметил такую закономерность: чем выше разрешение сетки в режиме Surface - тем выше и разрешение наносимой текстуры - то есть получается что-то сродни PTEX-текстурированию - в каждый отдельный треугольник сетки заключается определённое количество пикселей текстуры... Вопрос: Это нормальное поведение программы в режиме рисования по воксельному объекту - так и должно быть? или я что-то не так настроил? Почему я рисую именно по вокселям : Я хочу сделать довольно-таки обширную локацию, окружённую стенами из скал, а также отдельно стоящими скалами. Потом этому всему надо будет сделать ретоп и преобразовать в лоу-поли объект - и желательно чтоб он состоял из минимального количества отдельных кусков Ну и потом запечь карты с воксельного объекта на Low-Poly И чтобы потом не текстурить детально всю эту огромную скальную стену я пришёл к такому алгоритму: 1) Сделать модульный "конструктор" из нескольких детально проработанных скал на которых сразу будет сделан мелкий рельеф, нарисована диффузная карта и блеск 2) Потом собрать из этих деталей конструктора весь скальный массив - так как это делается в игровых движках типа Unreal или Unity - и он сразу получится с текстурами. 3) Слить эти детали в один единый объект... вот тут и пригодятся воксели! - Все детали объединятся в единую оболочку, и поверхности из мест взаимопроникновения деталей удалятся! Собственно поэтому я и затеял все эти манипуляции с вокселями, ведь после слияния у меня не будет лишних поверхностей утопленных внутрь соседнего объекта - а их может быть немало при многократном наложении/пересечении деталей "конструктора" 4) Дальше - по стандартной схеме: ретоп, запекание Normal, Diffuse, AO, Spec maps 5) Дорисовка текстур уже по лоу-поли модели Как думаете - можно ли каким-то менее сложным и более быстрым способом реализовать такой модульный подход? - чтоб не моделить и не текстурить каждый участок скального массива с нуля, но при этом не получить лишних полигонов, которые проходят внутрь соседнего объекта?
-
 Is there something similar to the "on brush" tool for placing objects, but that keeps the uv's of the model. I want to import textures for the models placed - This would be brilliant for adding textured details (I.E grass, tiny stones, small weeds) to a scene.