Search the Community
Showing results for tags 'Texture'.
-
Hi I am looking for software which will allow me to make tillable textures by just placing my models; This does not work for ready textured models in 3dcoat.
-
 Hey Guys, I'm not that familiar with 3D Coat yet. For awhile I was mostly using Blender but more recently i've also grown rather fond of 3D Coat especially with the UV Toolset, Voxel Sculpting, and Retopo Tools it has which I happen to like a lot better. I'm working on a first indie game I started with most of my models done so now I just need to texture them decently so that they all look decent when used together for game objects. Originally I was exporting the UV Image only then opening that in Photoshop since I have textures I would then map over it because I'm not very good at texture painting yet so that is why I have gone that route for the time being until I can figure it out better over the course of time. Now, in 3D Coat I am looking for that but I can't seem to do that? Is there no option or way to do that or am I missing it somewhere? I have poked around and tried to look for clues and made several attempts to figure this out more but other than messing around with it more until I get the results I desire. Any advice about this or could someone at least help point me in the right direction that has more experience than me with this?
 -
Hi everyone, I am brand new to this forum but I have been enyoing 3D Coat for quite a while, especially for modelling. Well for my job I have to take a 3D Scan high resolution .obj file of a head and its texture (8k) and create a low poly version that can use the same texture. I can the create the geometry quite well thanks to the awesome AUTOPO tool but I am struggeling with the UV Maps. Could you guys give me please a small guide how I can get the retopo mesh to use the same texture as the high resolution mesh and if possible keep the details in a normal map? What I've tried so far (Some menu entries names might differ I am not using English as menu language): 1. At startup panel -> Correct scanned Model -> Surface Mode -> Select the High Res .obj 2. Right click on the voxel volume -> Autopo -> Autopo ( Pixel Base) -> ok -> continue -> continue -> the retopo mesh is created 3. Then for the maps -> ok -> ok -> then I select keep uv coordinates, change the uv map size to 8k and press ok 4. Then I am kind out of options, so I go to the Retopo Panel -> File -> Export Retopo Model Now when I go into Blender and import the Retopo .obj file -> select the object -> go to edit mode -> select all vertices -> go to UV/Image editor the vertices are not layed out as usually like a UV map, in fact none are visible and when I load the texture it is tiled all over the head model (many small versions of the whole texture are visible) I already tried messing around with several options under UV-Tool panel -> Textures before progressing to step 4, but did not get any results. Could you please help me out, what have I to do in order to be able to reuse the texture and details in a normal map? Your help is greatly appreciated... Regards, Marcurion
-
Hi Is there a way i can pack the uvs and textures of multiple models and texture maps into one texture map? (within 3DC) if not, could someone suggest a program that can? (price doesn't matter)
-
И так. Когда редактирую проекцию в фотошопе(изображение 1), то все выглядит нормально, но когда возвращаюсь в 3d coat, то текстура становится ломаной (изображение 2). С чем это связанно, как с этим бороться? [hide]Изображение 1: Изображение 2: [/hide]
-
Well I created this model in 3d Coat in the Voxel Room. I did the manual retopology. I uv'ed the model. Clicked apply uv set. I painted the model and when I try to export the model all I get is gray textures. I am sure I messed something up in the file just not sure how to fix it. I was going to upload the file but it is way to big.
-
Hey Guys, I created a Free collection of Sci-Fi Alpha Brushes that you use in your projects. You can download them at the link below Enjoy!! http://www.learn3dsoftware.com/50_Free_Sci_Fi_Alpha_Brushes.htm
- 2 replies
-
- 2
-

-
- alpha brush
- scifi
- (and 3 more)
-
Hi Everyone, I am very new to 3D Coat and digital design but have more or less worked out how to make 3D Coat do what I need it to do. There are a few things though that I would like to refine relating to colour and texture mapping. I find the user manual pretty vague on this so i'm hoping someone here can give me some pointers. I am using 3D Coat Paint tools to colour a blank 3D model obtained from a laser scanner, then exporting that model to print on a full colour 3D printer. My workflow is pretty basic, I import the .STL model file using 3D Coat's "Import for vertex painting" function. I then go to the paint tools and just use the paint brush to colour everything (I don't use layers or anything, just paint straight onto the model), then export the model as a .PLY file so I have a printable colour 3D file. Most of my files come out with my intended colours when I 3D print them, though there are some that are way off. This is due to 3D Coat using RGB colours and my printer only using CMY (no K) I know this is a problem many graphic designers face when 2D printing but not sure if it can be applied to 3D? Is there a way in 3D Coat to get it to display a version of CMY colours so I can get an idea of what I am going to print? I know about computer monitors only displaying RGB but is there a sort of simulated version of CMY it can do? I have noticed in the "Textures"->"Adjust"->"Transform color space" tool in 3D Coat that I can set the Red to Magenta, Green to Yellow and Blue to Cyan, but when I click Apply nothing changes. If I can't get 3D Coat to adjust the colours on the 3D model, my next option is to export the texture map and have a go at altering it in Photoshop. The problem with this is I can't work out how to export a texture map that I have painted, I just end up with a black square. Is there a way to do this for models I have created in this way? Looking forward to your replies. Thanks!
-

tiled sculpting - paint, shaders, and separate volumes
worldcrafter posted a topic in General 3DCoat
The surface mode for creating seamless textures works, but is lacking allot (it seems to me). please say if you know a work around or method to the problem below # If i wanted to make a pebbles and dirt floor texture, i need to paint the pebbles and the dirt, is it possible to have multiple volumes work with the tiling system so I can paint or apply shaders to the dirt and pebbles separately? -
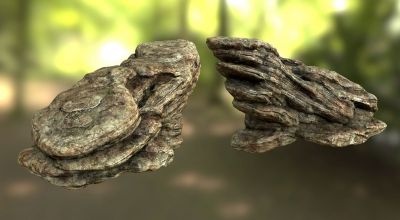
From the album: Fantome artwork
Hello, here is a rock study I did entirely in 3D-coat. The final render was done in Marmoset. Thank you for watching! -
I myself have been on a alien kick lately. I thought this would be fun to really let your creativity run wild. Not only that but we will expand our skill set into micro-vertex painting or essentially just texture painting your sculpt. Contest Guidelines: 1. Sculpt an alien bust (shoulders up), due to time constraints. Make a variation on your favorite alien, or sculpt a completely new one. 2. Take it into the paint room and give it some love. 3. Make a nice presentation shot as if you were giving it to a client for review, as if it was a concept. Use any Image editing software you would like for this portion. All your texturing though should be done in 3D Coat. I will be judging that based on your WIPS. 4 Resolution of final is up to you. I recomend staying above 1k (Portrait) Thats it. Budget your time because there is essentially more than enough time with 4 weeks. Remember, professionals do this kind of work in a couple of days or less(understood that they are spending 12 hours a day doing it). Ready, set, go. Lets see what we can do. You go 4 weeks.
-
Hi guys. I am posting this for help and advise. I have been modeling human characters in 3d-coat, then rendering a scene with them in blender. But i just keep noticing that my characters aren't close to real, they look more like mannequins. Am i just lacking something, or am i just fundamentally wrong?? would really appreciate some advise for this... Here are some of my recent works (hair is done with blender hair emitter) Thanks
-
Я значит сделал модель, разукрасил её все дела и теперь хочу перенести в cinema 4d r14 чтобы сделать анимацию и рендер. Но при переносе сама модель переносится а цвет нет. Что я делаю не так? Как закрепить текстуру на модели? Или там с UV map что-то сделать надо? Помогите пожалуйста!
-
Hi there I am currently giving 3dCoat a spin and have a question for the UV room: I've created the seams and unwrapped the model successfully. The texture export also works well apart from the fact that I would like to export the UV wireframe as a reference as well (on a separate layer would be cool). I havent yet been able to do that. Any ideas on how to do this? Cheers, Michael PS: Why can I only make 2 posts per day?
-
It would be great as a game artist to be able to show Diffuse, Spec, AO, Wireframe and Normal Maps straight from the texture editor or some menu item that will export them in one image. What I mean is...when I'm done making an asset, regardless of the program I'm using, I have to go into each map, pull them into Photoshop and then lay them out in a way that I can show all of them in one image to display to an employer or prospective client the layout and work done. It would be super awesome to have a feature in place that would do this for me in one shot. It's a lot to ask for, but would save tons of time and would help attract more game artists to 3DC than there already are.
-
OK, I've created a multi-subobject Voxel asset, retopologized each, painted each, and now I want all the textures and subobjects combined. I can do this in Max, Photoshop, etc. but I'm trying to determine if there is a way to get this done in 3DC, thereby skipping a bunch of steps. I can see that the UV islands are placed appropriately already, but I don't know how to combine the texture maps together and to also get the assets out as one combined object. Is there a way to do this in 3DC?
-
Hello, I downloaded the demo earlier to see how good it is at fixing seams on a 3d model, i'm having a problem straight away though, the textures just don't seem to load at all. I import the model for per pixel import the diffuse then just nothing changes, the texture doesn't show up on the model Can anyone help me out please? Thanks
-
Hello all. I have a bucket that I made some time back with 3ds Max and brought into Mudbox. I painted it and render it out and put it into the UDK. It was OK for the time I had to do it, but now I want to try my hand at voxelizing it in 3DC and going through the motions. I have sculpted in details in the Voxel Room, but any time I Autoretopo this, it's aweful. Am I stuck with doing this one by hand? Voxelized Bucket: Autoretopo Problem:
-
"Mixamo would like to announce that The Auto-Rigger is now free for any mesh under 10,000 triangles." This amazing free option that can be beneficial to 3D Artists beginner and advanced. Check it out here: http://www.mixamo.com/c/auto-rigger
-
I still testing the 3d coat trail 3.7.0.1b Since i found vlender applink i can apint, offcorse i need to still figure out some things. Now i try to texture some object. And i get stuck on that. It seems that the tutorial video use a different 3d coat version. i dont see any material preview window. The screens look a bit different to. Some help or right instructions how to add a material on object would be welcome now.
-
Hello together .. I just play around with the trial of 3D coat on a Mac .. I´ve got some strange issues .. when I import a model for painting .. then 3d coat did not working anymore and I have to stop it .. if I choose 4096 as Texture Size , If I choose 2048 everything works fine .. Just thought hm about my Grafix-Card but I have 512 MB inside the Card .. so I´t is little bit strange for me .. Is there a Solution or just a Bug ?? I think about to buy 3D Coat if it fits into my pipeline Thanks a lot Tobias