Search the Community
Showing results for tags 'normal map'.
-
Hi! In per pixel painting I use several UV sets and there is some inconvenience in tech nuances. I have 5 meshes, 5 normal maps, I import all the meshes separately with their own UVsets. then I start importing normal maps. If I import them separately they looks correctly, but I no need a bunch of layers with same name "Normalmap" it makes workflow little messy so i'd like to optimize this bunch and there are 2+ ways to do that: 1st one is to import other normal maps into the same layer, I did this in early version of 3dc, but 4.5.16 has issue about it. 2nd way is place all normal maps into the folder. But! both ways finds same issue: normal maps get messy uv seams, because of kind a smoothing algorithm. seems like the program is trying to smooth pixels between uv shells. Is good for all maps except of normal maps Is there a swith smoothing switcher somewhere? If it isn't make it please! Thanx!
-
 Hey Guys, Just letting you know we are having a $7 Video Tutorial Summer Sale http://www.learn3dsoftware.com/3dcoatvideos_menu.htm -All 3D Coat titles are all $7 each!! -All Other Software Tutorials (Lightwave, Zbrush, Modo, Substance Painter, DDO) are $7 each!! ------------------------------------------------------------------------------------------------------ 3D Coat Tutorial Catalog ------------------------------------------------------------------ 3D Coat Version 4.5 Tutorials ---------------------------------------------------------- 3D Coat V4.5-Vol.#18-Smart Materials I-$7 3D Coat V4.5-Vol.#19-Smart Materials II-$7 3D Coat V4.5-Vol.#20-Smart Materials III-$7 ------------------------------------------------------------------ 3D Coat Version 4 Tutorials ---------------------------------------------------------- 3D Coat V4-Volume #1-Getting Started -$7 3D Coat V4-Volume #2-Getting Started II-$7 3D Coat V4-Volume #3-UV Mapping I-$7 3D Coat V4-Volume #4-UV Mapping II-$7 3D Coat V4-Volume #5-Retopology I-$7 3D Coat V4-Volume #6-Retopology II-$7 3D Coat V4-Volume #7- Voxels I-$7 3D Coat V4-Volume #8- Voxels VI-$7 3D Coat V4-Volume #9- Voxels III-$7 3D Coat V4-Volume #10- Voxels IV-$7 3D Coat V4-Volume #11- Voxels V-$7 3D Coat V4-Volume #12- Voxels VI-$7 3D Coat V4-Volume #13-Dino Detailing I-$7 3D Coat V4-Volume #14-Auto-Retopology Secrets-$7 3D Coat V4-Volume #15- Photo Painting & Masking Tools-$7 3D Coat V4-Volume #16- Texture Baking I-$7 3D Coat V4-Volume #17- Texture Baking II-$7 --------------------------------------------------------------------------------------------- 3D Coat Version 3 Tutorials ------------------------------------------------ 3D Coat 3.5-Auto-Retopology -$7 3D Coat 3.5-Retopology-$7 3D Coat 3.5-Retopology II-Project Suchomimus-$7 3D Coat 3.5-UV Mapping-$7 3D Coat 3.5-Normal & Displacement Maps-$7 3D Coat 3.5-Painting Color-$7 3D Coat 3.5-Voxel Sculpting-Project Dragon-$7 3D Coat 3.5-Photo Painting I-Project Elephant-$7 3D Coat 3.5-Photo Painting II-Project Human-$7 3D Coat 3.7-Painting Tools & Alpha Brushes Vol.#1-$7 3D Coat 3.7-Painting Tools & Alpha Brushes Vol.#2-$7 3D Coat 3.7-Starfighter UV Mapping-Quick Method-$7 3D Coat 3.7-Starfighter Detailing-Normal Maps-$7 3D Coat- 2D Sci-Fi Alpha Brush Collection Vol.#1-$7
- 3 replies
-
- 1
-

-
- tutorials
- smart materials
- (and 5 more)
-
Hi guys; So I have this project and I'm trying to painting the details using the normal map painting feature. However I got these weird artefacts when I try to smooth my brush strokes. I tried with the welding vertices option on, checking the normals and removing doubles in an external application, etc. I'm using the build 4.5.03.
-
Hi again! keep testing 4.5 version of 3D Coat... looks great! The only question i cannot find anywhere is which preset i have to use for baking tangent normal map if im going to use it in Maxon Cinema 4D for final render ? Everytime i bake the tangent NM i get very strange result with a lot of black areas :-\ When i use the normal world map its going great without any weird bugs!
-
I'm new with 3DCoat and I love the way you can send your data back and forward to Photoshop with ctrl + P. Is there any way to do the same with Displacement and Normal Map?
-
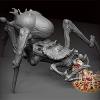
It appears that I'm getting significant normal map artifacts with the latest version of 3dCoat 4.1.17D. In previous versions, I would always get clean normal maps by simply exporting the object as a LWO. I've tested the objects in both Lightwave 11.6.3 and Lightwave 2015.1 to see if it was a Lightwave problem, but the same artifacts show up in both versions. I then loaded scenes with objects and normal maps generated by previous versions of 3dCoat and the renderings are clean with no artifacts. See images. The first image is an older scene using Lightwave 2015.1. The second image is a new scene using Lightwave 2015.1 ... it looks the same in 11.6.3.
-
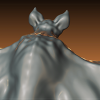
 Hallo 3d coat Community Hoffentlich poste ich das hier an richtiger Stelle^^. Hab mir grade 3d Coat edu license zugelegt, und fröne der tollen Sculpting und Retopo Werkzeuge. Nur unterläuft mir dauernd ein ziemlich nerviger Fehler beim baken(s.Bild). Mit anderen Testbakes ist das eigendlich nicht passiert, und ich hab zu diesem Fehler nichts gefunden. Ich weiß einfach nicht was ich falsch mache, da, egal welche Einstellungen ich beim Baking verwende, immer das gleiche Ergebnis rauskommt. Könnte mir jemand bitte erklären, wie dieser Fehler zu stande kommt? Ansonsten noch mal ein großes Lob an das Team hinter 3d Coat! Wirklich ein tolles Programm (sofern sich das nach ein paar Tagen feststellen lässt)
 -
Hey Guys, I just made a new tutorial on Dinosaur Detailing and Normal/Displacement Maps. --------------------------------------------------------------------------------------------------------------------------- 3D Coat 4.1- Volume #13-Dinosaur Detailing I-Normal and Displacement Maps-by Adam Gibson In this thirteenth video volume of 24 volumes 3D Instructor Adam Gibson goes through a fun project based tutorial on how to add detail through Normal and Displacement maps onto a Giganatosaurus dinosaur in 3D Coat Version 4.1. A great tutorial for beginners and those who want to create their own Jurassic Park. http://www.learn3dsoftware.com/3dc_4_vol_13_dinosaur_detailing_I.htm Table of Contents for Volume #13 Chapter 1- Intro Chapter 2- Lightwave Model Review in Lightwave 11.6 Chapter 3- How to Import Mesh Layers and UVs into 3D Coat Chapter 4- How Set-Up Alpha Brushes for Creating Scales and Creatng your Own Alpha Brushes Chapter 5- Creating Body Scales Chapter 6- Creating Tail Scales Chapter 7- How to Fix and Touch Up Bad Scales Chapter 8- Creating Arm and Finger Scales Chapter 9- Head Detailing (Part One) Chapter 10- Head Detailing (Part Two) Chapter 11- Gum Detailing Chapter 12- Gum Detail Review Chapter 13- Horn Detail Chapter 14- Exporting Model and Maps from 3D Coat Chapter 15- Checking the Normal Maps in Lightwave in VPR Mode Chapter 16- Connecting Displacement Map Node and Final Running Time: 3 hrs. 15 mins. High Quality (Screen-Res 1920 x 1080 pixels) Video Format: MP4 (.mp4) Level: Beginner
-
Hey Guys, Just created some new video training on how to Bake Voxel Data (Displacement, Color, Ambient Occlusion) to a Normal and Color Map. It was designed for beginners who are new to baking in 3D Coat. http://www.learn3dsoftware.com/3dc_4_vol_16_texture_baking_I.htm It also covers importing the final maps into Lightwave and setting them up.
-
Hello, I working on figuring out a good workflow to create tileable normal maps for use in unreal engine. In 3d coat I'm in the paint room trying to use 2d images that I create as masks to paint on normal depth. When I try it I seem to get some sort of banding in the depth. It's hard to explain so hopefully these sample give an idea. Is there some setting I'm missing or a specific file format to import that would smooth these out? I can't upload the original mask I used since its over 10meg but here's one at half res to show what I was working from. The mask I used was 2k and the UV map I was painting on was also 2k. The mask I created was uploaded from a png file. Any ideas? Thanks
-
If I understand it correctly, using the normal map and displacement map combined, the displacement map does the heavy lifting of adding in mid level details and the normal map does add in the real fine details, that otherwise would add retarded amounts of render time with the displacement map alone? What I mean to say is that anything that doesn't effect the overall silhouette of the model should be stuffed onto the normal map (as its great for this), and any major shape changing of the model should be left to the displacement map. This way you have the ideal situation. Am I correct? If so: what would the workflow in 3d coat be?
-
Does anyone know if there is a way to adjust how More in cavity and less in cavity work when painting a normal mapped model, If not this would certainly be an improvement for 3d coat, its very handy for making things look worn and eroded but depending on your model you may want to adjust the allowance between what is classed as a cavity thanks.
-
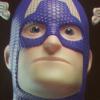
Hello guys, im new in 3D coat and have a problem with my normal map. I try it since 2 weeks to scullped my mascot, retopo and render it. But if i render it in blender it gets deep crater and quadrangle on the mesh and i have no idea why. I watched the videos about normal mapping and expording in 3d coat but nothing works. After retopo i create my uv´s and choose merge with normalmap then i export it in under file as fbx or obj ( yes i tried the other ways to export too = same results ). What am I doing wrong ? Hope someone has a solution for this problem. ( sorry for my bad english i hope you understand what i mean ) Thanks in advance. rendering from blender rendering from blender the 3d coat version after retopo and painting
-
First I'd like to thank Pilgway team for making this awesome software! I created a zombie head, after I go through "AUTOPO for per pixel", there is no BakedOcclusion layer, the normalmap have no effect on the model. It's been very frustrating trying to figure out what's wrong. I also made a human head, which everything worked just fine. if anyone knows the problem, please let me know, thanks!
-
Hi, Please take a look the attachment. When I use the exported normal map in Unity3D, some defects appear at the edge of UV cluster. How can I fix it?