Search the Community
Showing results for tags 'sculpt'.
-
-
I try to change normal sampling value to minimal = 5 - but it not change behavior of the brush. It begin change it angle to surface similar to normal sampling = 100 as soon as the edge of brush cursor touch the vertical surface - the brush begin change its tilt. But when normal sampling is = 5 - tilt of the brush must change when center of brush cursor will approach to vertical surface - but not edge of cursor. Only in Flatten tool - normal sampling work good I already reset Options-files in Documents/3D-Coat - it dont help( How to fix this problem?
-
Hey Everyone... I saw some old videos (from Raul Fernandez) about the Copy Clay tool from Surface Mode - Sculpt Room. In the videos, Raul Fernandez showed that when you copied some part of the mesh or when you load an object saved in a folder, a preview of the copy would appear in the brush before you even applied the tool. 1) I'm trying to use Copy Clay, but I'm not having this same preview of the copy in the brush before applying the tool. Is there something wrong or is there no longer a preview of the copy in the brush? 2) Please, could anyone explain all features of the the Copy Clay Tool (not only for me, but for everyone here in the community)? I could not find explanation in the manual or video about this tool. I already thank you for your attention.
-
 Hi! Hey everyone... Could someone please confirm a possible error? My version of 3D-Coat is 4.8.18 and I tested it with the GL and DX. I'm trying to use the Curve Stroke in the Sculpt Room in conjunction with any brush (freeze, Clay or others brushes) and it's not working. The percentage of the calculation appears when the tool is applied and as a result nothing happens. Now, when I went to the Paint Room, I chose the Stroke Curve and it worked correctly. I did the same test on the previous version of 3D-Coat 4.7 and the Stroke Curve worked perfectly on the Sculpt Room and Paint Room. Does Curve Stroke in the latest version of 3D-Coat not working in Sculpt Room? Thank you for your attention.
 -
Hey everyone, I would like to know one very important thing if there is a feature that I am urgently needed in 3D-Coat. I'm making a character. I used the Decimate Proxy Method to be able to make changes in the pose of the character, especially in the arm. After the character was lighter, I hid the whole character except for the arm, in which I began to repair the arm (using Pose Tool, Move Brush). Finally, when I finished all my work, I pressed the button that serves to exit the proxy mode and return the character with the original amount of polygons and then I saved the file. When I realized and looked at the character, I do not know how this must have happened, but in several places of the character the mesh was distorted and displaced. These places should be protected because I had previously hidden these parts to be able to use the Pose Tool and Move Brush. I believe that somehow 3d-coat did not respect the hidden mesh and even then made a mess in those areas. At the same time, I tried to use CTRL + Z to undo all the changes to recover the character in the original state (before my work I did on the arm). But 3D-Coat just went back to the mesh proxy and stopped there (no longer allowing undo) while remaining the messy mesh of the character. In this project, I'm using Tortoise HG (I'm new to this program) to save all my modifications rather than saving multiple files as I was accustomed to doing.That means I have only one project file. Due to my desperation and the very late hour I thought of reverting the file to the previous state I had saved in Tortoise HG (which would be a file before the modifications in the arm), but I messed up and went back to a file very early , where I lost practically all the accessories and much more of this project. And to complete the tragedy, I could not undo this action in Tortoise. Luckily, I had exported the character in .3b (before the changes in the arm) and also I had exported the character with the changes in the arm in 3b. (but with the other parts of the body messed up). Having said all this, I wonder if there is a way to reproject the good parts I've made of the (messy) character to the character who has the correct mesh? I know that in 3D-Coat there is the Copy tool (voxels mode), but for me to do this procedure I will have to convert my character to Voxels and so I will lose many details that I already did in Surface mode. I know that to keep these details, I will have to increase millions of polygons and I think my computer will not support it. So, is there any way to transfer the work I did on the arm (bad file) to the correct mesh (good file)? Similar to the mesh reproject functionality that exists in ZBrush? thanks...
-
Hi All, just using some free time at work to get some things sorted in my brain. I am a relatively new user of 3D coat and am really enjoying it. Sometimes I get a bit frustrated with the different rooms inside it and how things change but it's coming along. Out of curiosity I am just wonder what the proper workflow is to go from HP to LP game ready asset. Is this correct; - Sculpt HP in sculpt room - Retopo LP in Retopo room - UV Retopo - Bake Normal Map - Paint HP in paint room - Bake Textures (little confused on how to bake in the paint room with the options in the Texture menu.) I've only used Substance before to bake and paint. Thanks for your help.
-
is there a way to polish/smooth a mesh in the Sculpt room with a command instead of doing it manually? thanx
-
When running the Geometry menu and choosing close holes, the popup is aware of 50+ holes. I ask it to close them, some tiny holes that were not easy to spot such as single triangle become large, however, hole fill appears to have failed. Can I some how highlight the holes instead or cycle through them with camera aligning to the hole with previous and next buttons to navigate? As it is surface, the mesh have some areas that might be considered a hole but is not, eg window or door cavity with no thickness . Perhaps this causes the failure. I could manually repair actual holes if coat could show me where they are.
-
 Please move to bug forum as I'm unable to create posts there for some reason. I used the Sculpt Room Primitive tool, I selected a cube from the models tab where alphas and such are for brushes. I enabled Click to Place, Scale to Brush Radius, Use Stroke Direction. I place the primitive on to an existing surface(eg another cube), it looks correct, I can keep placing it. If I change my mind and choose a different model(or just click the same cube model again), the latice deforms. To correct this one must click reset axis(or reset primitive), then select the model to load again, the latice will be corrected, which avoids distorted mesh, although orientation was lost(I'm not sure why orientation was changing slightly in the first place). You may notice that the reloaded mesh/model had grown in size, this is a 2nd bug, just keep clicking the model icon to reload it, it will grow in size progressively to a certain point(not sure why there is a limit). This 2nd bug occurs when scale has been altered(only seems to affect smaller scale not larger than original scale). So altering scale via transform/lattice toggle or Scale to Brush Radius cause this error. 1st bug is related to Use Stroke Direction. Using Transform/Lattice Toggle and scaling/rotating the model, repositioning it with Click to Place and reloading the model doesn't appear to distort the lattice, but slight rotation offset can be noted of the lattice from the model, this fixes itself(applies incorrect lattice transformation to model) when transforming or repositoining the lattice/model(Click to Place or Transform/Lattice toggle gizmo). I noticed no difference with Use Stroke Direction(just testing now). It was when the scale was made smaller like Scale to Brush Radius setting when enabled that the lattice distortion was more evident from a rotation. No rotation, just click to place with Scale to Brush Radius and small brush radius, then reload the model, the lattice has enlarged but model stays original size, use Click to Place without scaling to the brush or use gizmo to move/transform the shape and it will then apply the lattice to itself, if you load another model in again instead of a transform, it will also apply the lattice(increase scale), then grow the lattice again with the model being replaced with larger size model. I have tried with Use Stroke Direction on different sides of the cube I was attaching the primitive model to, the lattice behaves differently(no orientation via Use Stroke Direction, and just Click to Place and Scale to Brush Radius results in lattice growing equally all lengths), on the top face I was noticing only scaling in the y axis, it also adjusted the orientation on that axis.
 -
I cannot post to bugs forum yet, please move to there. When pressing shift or shift+ctrl to switch to one of the alternate brushes like smoothing, reduce or anti-bump, presumably it is not meant to take on the behaviour/effect of the active main/primary brush in use?(brush sizes/alpha etc yes, but not the properties that make a brush unique from others, like pinch or flatten) Copy Clay when using either alternate brush will apply it's effect(sample or stamp mesh data to volume) then apply the alternate brush effect, such as smooth or add detail. Most tools don't seem to behave this way, so presumably it's a bug. I noticed with Freeze brush, hold shift to toggle brush like reduce which clearly is not smoothing, it will smooth out any mask selection, actual intention of the alternate brush doesn't happen(neat that you can smooth freeze like this but caused some confusion of how these alternate brushes with shift/shift+ctrl weren't working), similar behaviour with Surface Hide, however it doesn't toggle hide/unhide with alternate brush modes, which is what I'd expect, hence I think Copy Clay is behaving incorrectly.
-
Unable to post in bug forum, please move there. I used some live clay and made detailed sculpt area, then use Copy Clay tool to sample and apply elsewhere on the mesh, I noticed that once I sampled this data 3D Coat become quite laggy/stuttering on Intel skylake i5-6500(quadcore 3.2GHz 4 cores/threads). While bit difficult due to very low FPS, if I navigate mouse to tool options and clear data the CPU usage for Coat dropped down from 70% to 10-15%. I also tried hide the layer, no effect. It turns out that Blend being enabled caused the high CPU load, if disabled, CPU usage is still higher(averaging about 20-25%), clear data will be equivalent of changing tool which brings CPU usage back to normal(unless return to the tool). When changing tools sometimes I noticed the sampled mesh data appear in grey like when using import or primitives tool. I imagine while it is not visible when using the tool, perhaps 3DC is interactively moving this mesh around still, so the denser the mesh data sampled, the more intense on the CPU? Any reason to do this, if there is no interactive preview, then perhaps the tool should not have high CPU usage doing whatever it is doing non-stop and just apply when user clicks? I imagine the CPU usage is higher for blend enabled because it's interactively blending in advance before applying when clicked? The brush only seems to apply by single click, not applying multiple instances along a brush stroke, so it seems like this is a bug to me.
-
If you have a hole that is not a usual hole shape(eg an L or U, a line shape hole if you will) these seem to have problems closing, especially so if you have a ring shape hole with outer and inner surface(within the same volume) and you want to merge/connect them as a single mesh, understandably this is something tools like fill holes and poly remove(with remesh after) seem to struggle with. In addition to that, if I have a surface with the edge chipped of, like... ___n___ where the n is missing data, I have noticed poly remove with remesh enabled also can struggle here. How do you go about closing/extending? I have tried booleans in the past with varied success, the muscle brush has worked the best requiring some extra cleanup work after, but struggles in some situations giving failed boolean operation often.
-
Sometimes when doing boolean operations they fail, the error is long and usually about intersection. Adjusting and trying again(especially with say muscle brush) this can be frustrating process... Any tip on how to resolve? Is it just bad geometry or lack of or too much triangle density/difference between the two volumes?
-
I do not have permission to post in other forum like bugs/feature requests. Please move to appropriate forum. I used in Sculpt Room, the top menu Geometry -> Smooth All. I later find out that to just smooth tangents I need to set smooth degree to 0. While experimenting with this feature, I noticed that there is no cancel, press escape closes the window, but applies the effect, you have to undo the operation, no way to prevent it being applied once the pop up appears.
-
I have been using the clean clay tool with reduce/decimate/remesh to control triangle density in areas. Recently I have sharp edge that I'd like to keep the hard edge(I create with using flatten tool) but the current approach I use doesn't seem what settings I try, the triangles get reduced but it cannot seem to reduce keeping the hard edge shape(90 degree like a box).
-
Using the flatten tool on sculpt room surface volume, I finally get hang of controlling the plane(but it'd be really great if there was way to control more precisely the plane with transform tool?). What I don't understand is that the flatten effect has a certain depth/volume like area of effect. If I have flat surface and protruding shape, I can set the plane to the flat surface and brush through the protruding object. I notice that it may only flatten to a certain depth/height. The depth setting of the brush does not affect this nor does the brush alpha seem to matter. If I increase the brush radius/size however, now the unaffected surface area is flattened too. Is there a way to control this so I can use small brush size but still affect a large height/depth? Also why is the polygonal lasso tool not available for brush like this? (same with the clean clay tool when wanting to remesh/decimate specific region). They both seem to be affected by the effect being related to the brush size/radius, I imagine that is why.
-
Is there a way to use a volume or primitive to select polygons within it's volume? So placement and scaling like import primitive tool but rather than boolean to a surface, selection instead?
-
Is there a brush that behaves similar to flatten for surface volumes but can use a curve? Imagine, half cylinder shape, and i draw a line along the round surface to get curve/profile. Could I then use this to as a brush to scrape off excess and/or fill the surface to that curve?
-
I'm trying to unwrap a UV of my model so that I can bake it and bring it into Maya. But I'm not sure of the process needed to do this. Any help would be appreciated Thanks
-
Similar to how retopo features allow, I would like to be able to have a volume/layer that I can use to affect my active volume/layer. For example if I had a cube or sphere as reference, then my sculpt layer may be influenced/constrained by that layer. On a flat plane intersecting the sphere volume through the center, perhaps the sculpting could build up but not further than the form of the sphere, similar to a boolean operation. Like wise if the plane was above the sphere, I could push the surface of the plane to conform against the sphere volume. It is useful for sculpting where I can select a part, extract the surface(similar tools but they build a water tight extraction rather than if I select surface data I want, duplicate volume, invert freeze and hide/delete. If I want to use this as similar part to repair part of my mesh elsewhere, it is bit difficult without this sort of feature. Booleans often have trouble. Another use is noisy/damaged surface(scan data), I could repair this alright but have to be careful not to lose the original form too much(or the opposite, I have the proper form that I need the surface to conform to).
-
In the sculpt room with Surface mode, I imported a mesh(too high for retopo room), there is a long line that is pretty much like a ring cut out, like a hole but with a surface within that hole. Close hole and other tools that would usually work in this case have trouble due to the extra surface within the "hole", how does one repair this? I have not had much luck with bringing the vertices together and welding/merging them. Some sort of way to pull verts/edges(pose tool or move seem to sort of work for this) then get the edges from both sides connecting(doesn't seem to be a snap/weld verts that works?) and flattening them in some way that they could combine into a planar surface, then repeating this to manually repair? Most of the approaches seem possible in the retopo room, any reason they're not available for Sculpt room? I noticed some brushes/tools have a real-time detection merge option but this didn't seem to work. My current solution has been adding a primitive cube that's been scaled and positioned to bridge the two sides, boolean add, tangent smooth to flatten it, deleting the sides of the bridged surface, and relaxing/remeshing the bridging surface(start/end have denser topology from flattened sides). If I repeat that process I can have better luck with tools for closing/patching the holes as it is more recognizable as a hole(doesn't handle it well if there are angles to the hole).
-
Hi, How can you achieve smooth curvature in the Text tool result (voxels or surface) ? If you hit Apply in a layer with more than a million polygons, the text contours remain visibly jagged, like in a low-res voxel resolution. Thanks, Metin
-
Hi, I was wondering if the following workflow is possible: 1: Sculpt a model using voxels and/or surface tools. 2: Use Autopo to give a nice quad topology to the mesh. 3: From the Retopo room, send the retopo object back to the Sculpt room, so you can sculpt on the retopologized mesh. I guess a workaround is to export the retopo mesh and import it into the Sculpt room, but I hope that isn't necessary. Thanks, Metin
-

From the album: 8 Classic Lamps
All the sculpting I did in 3D-Coat in voxel mode, and Render in Unreal Engine 4. I did not use any post processing. -
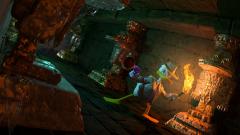
From the album: FanArt
Hey guys! A new image from a classic game. This one is QuackShot, from Sega's Mega Drive/Genesis. Hope to animate this scene soon. :) Made with Modo and 3D-Coat.