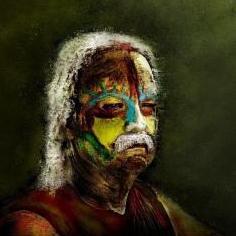
Reputable Contributor digman Posted April 18, 2008 Reputable Contributor Report Share Posted April 18, 2008 Hi all, I will be working on Tutorial part 3, using the draw with pen tool in sculpt mode soon. The pen will be use to further increase the model's definition. Edit: Tutorial 3 of the series is completed. I uploaded the finished picture from the tutorial plus a couple before pictures.One purpose of the tutorials was to learn the sculpting tools in 3DC. The goal was to turn a simple model into a more complex creature using the sculpting tools only. I used 3 tools to arrive at the finished creature in 3 tutorials. There are so many ways in 3DC to produce your work,this is only one of them,so explore,experiment and just have some fun. If you are new to 3DC, let me explain. Normally in 3DC's detailing mode the larger details are displacing the polygons of your model. This is happening invisible to you the user,with 3DC handling the displacing of the polygons. The smaller details are image based,created on the fly with a normal map. This makes the program very responsive and fast. This is a great way of handling the sculpting of our models but some artist like to have a more controlled degree over the model's displacement that's where the sculpting tools are used. In sculpting mode your input is always displacing the polygons with no normal map being created. You can get the model's form sculpted to a good degree as demonstrated in the tutorials and then use 3DC's detailing mode for the smaller details. 3DCoat gives us the best of both worlds. I kept the file size of the tutorial smaller this time but I lost some degree of showing the entire process but you should have enough infomation for using the draw with pen tool. The model's carcass polygons is 48,000, that's is low but good for the tutorials. I was able to get a good amount of detail. 100,000 to 200,000 polys [more if you have a faster computer than me]would be better and you get much more detailing ability. Quote Link to comment Share on other sites More sharing options...
Andrew Shpagin Posted April 21, 2008 Report Share Posted April 21, 2008 I have posted the link to tutorial there: Draw with pen Thank you, Digman! Also, it is hosted on other server (in USA) *edit: hosted on uther server, download speed should grow. Quote Link to comment Share on other sites More sharing options...
Reputable Contributor digman Posted April 21, 2008 Author Reputable Contributor Report Share Posted April 21, 2008 Andrew, The tutorial on that server takes a longgggggggggggggg... time to load. I think most people will stop the loading before it's done. Quote Link to comment Share on other sites More sharing options...
Andrew Shpagin Posted April 21, 2008 Report Share Posted April 21, 2008 Andrew, The tutorial on that server takes a longgggggggggggggg... time to load. I think most people will stop the loading before it's done. Ok, will post on other hosting. Quote Link to comment Share on other sites More sharing options...
Member David Posted April 21, 2008 Member Report Share Posted April 21, 2008 Is it possible to make these tutorials so they can be downloaded to view off line? Thanks, David Quote Link to comment Share on other sites More sharing options...
Andrew Shpagin Posted April 22, 2008 Report Share Posted April 22, 2008 Is it possible to make these tutorials so they can be downloaded to view off line?Thanks, David Ok, I will do that. The only limitation - maybe I will hos in on mediafire because there is some space problem on our server. USA - based server works not very good, uA -based works well but there is 1GB limitation. We will extend, but for some time I will host ttorials pack on mediafire or divshare. I have created separate topic. Quote Link to comment Share on other sites More sharing options...
Member David Posted April 22, 2008 Member Report Share Posted April 22, 2008 Thanks Andrew, downloading now. Also thank you for producing such an excellent program. Regards, David Quote Link to comment Share on other sites More sharing options...
Member Philwesson Posted April 24, 2008 Member Report Share Posted April 24, 2008 Thanks Andrew, downloading now. Also thank you for producing such an excellent program.Regards, David Fantastic tutorial! I'll definitely be putting this to use. When creating the base mesh, are there things to keep in mind? Quote Link to comment Share on other sites More sharing options...
Reputable Contributor digman Posted April 24, 2008 Author Reputable Contributor Report Share Posted April 24, 2008 Hiya Phil Glad to hear that you like the tutorial. My goal was to let users, esp new users of 3DCoat know about this great tool set.The main consideration when planning to model is, anywhere you know you will be doing more detail work,in that area increase the polygon count when modeling. As a base polygon count, I used about 3000 polys on my original model (can be higher depending on the model). That way my original mesh changes shape (not the carcass model). closer to the higher polygon model. I use that model as my base model (still 3000 polys) to be exported for displacement and normal mapping verses the original. Doing that helps for better displacement and especially helpfull on the normal mapping. Also adding polygons when modeling to areas you know that will be stretch out using the gradient tool (tutorial 1) helps in keeping the polygons from becoming elongated too much. That gives you better smoothing in those areas. Quote Link to comment Share on other sites More sharing options...

Recommended Posts
Join the conversation
You can post now and register later. If you have an account, sign in now to post with your account.
Note: Your post will require moderator approval before it will be visible.