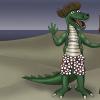
Member m8nkey Posted December 2, 2012 Member Report Share Posted December 2, 2012 I recently purchased 3d coat through Steam. I started this character watching the quickstart tutorial, rat from scratch. I don't want to invest too much into this guy but going to use him to learn the basics of retopo and texturing too. Any crits or suggestions appreciated Cheap and nasty renders in Maya using mental ray and default Lambert material for now. 1 Quote Link to comment Share on other sites More sharing options...
Advanced Member Garagarape Posted December 2, 2012 Advanced Member Report Share Posted December 2, 2012 Ha ha! Underground Mickey! I like it a lot. Could be a character from Wallace and Gromit. Quote Link to comment Share on other sites More sharing options...
Advanced Member wave of light Posted December 2, 2012 Advanced Member Report Share Posted December 2, 2012 PSmith's tuts are a very good starting point for sculpting organic models. Excellent first model, he looks like he's just emptied a bottle of Jack in his hand! Retopo'ing the teeth and gums will probably be your hardest part. Quote Link to comment Share on other sites More sharing options...
Member m8nkey Posted December 7, 2012 Author Member Report Share Posted December 7, 2012 I've been doing an hour or so of retopo each morning. I've done very little character modeling before so would appreciate any advice on edge flow or anything else. Lowpoly is currently 7034 tris. Sculpt is ~ 1.8 million tris Quote Link to comment Share on other sites More sharing options...
Contributor Tony Nemo Posted December 7, 2012 Contributor Report Share Posted December 7, 2012 Edge flow looks good. What method did you use for the cavities? Quote Link to comment Share on other sites More sharing options...
Carlosan Posted December 8, 2012 Report Share Posted December 8, 2012 yeah ! Edge flow looks good good good Quote Link to comment Share on other sites More sharing options...
Member m8nkey Posted December 9, 2012 Author Member Report Share Posted December 9, 2012 Thanks guys, I used the stroke tool for the arms and legs. The rest I just used points and faces, quads and the cap tool. for cavities I created the outer edge loops then used the cap tool. after capping I added additional edge loops. I have a day off tomorrow. currently working a horrible cycle where I only get one day off every fourteen days. Going to finish the retopo and make a start on the texturing. Quote Link to comment Share on other sites More sharing options...
Member m8nkey Posted December 19, 2012 Author Member Report Share Posted December 19, 2012 Retopo'ing the teeth and gums will probably be your hardest part. You were right, the teeth were a nightmare. I had problems when I enabled symmetry verts near the center line would snap to the tooth on the opposing side. I had no idea how to correct it so I just modelled and textured one side which I duplicated and flipped in Maya. Started experimenting with texturing yesterday. I'm going to use Maya fur but I want an interesting skin that will remain exposed in areas. Quote Link to comment Share on other sites More sharing options...
Advanced Member wave of light Posted December 20, 2012 Advanced Member Report Share Posted December 20, 2012 You were right, the teeth were a nightmare. I had problems when I enabled symmetry verts near the center line would snap to the tooth on the opposing side. I had no idea how to correct it so I just modelled and textured one side which I duplicated and flipped in Maya. Started experimenting with texturing yesterday. I'm going to use Maya fur but I want an interesting skin that will remain exposed in areas. That's the issue I had with my Ben Grimm model, teeth so close together that it was difficult to retopo. I tried two methods 1) autopo and 2) moved the teeth to separate layers (top teeth and bottom teeth) then moved each tooth further apart. I then moved them closer together in Lightwave. Ricky. Quote Link to comment Share on other sites More sharing options...
Member m8nkey Posted December 23, 2012 Author Member Report Share Posted December 23, 2012 Some more texture progress. I'm looking into options and techniques to add fur in maya. Quote Link to comment Share on other sites More sharing options...
Member Spincycle Posted December 23, 2012 Member Report Share Posted December 23, 2012 Looking good! Quote Link to comment Share on other sites More sharing options...
Member m8nkey Posted December 31, 2012 Author Member Report Share Posted December 31, 2012 Some playing around with maya fur. 1 Quote Link to comment Share on other sites More sharing options...
Member freelancah Posted December 31, 2012 Member Report Share Posted December 31, 2012 Nice process! Good work Quote Link to comment Share on other sites More sharing options...
Advanced Member wave of light Posted December 31, 2012 Advanced Member Report Share Posted December 31, 2012 Nice progress. Do you have options to increase the density in maya? Quote Link to comment Share on other sites More sharing options...

Recommended Posts
Join the conversation
You can post now and register later. If you have an account, sign in now to post with your account.
Note: Your post will require moderator approval before it will be visible.