Contributor 3d_sculptress Posted December 16, 2009 Contributor Report Share Posted December 16, 2009 hey, all, ..was just exploring the ''texturing with images' options in 3DC ...been watching everyone's texture work n wanting to try this for awhile...didn't realize how easy it was to texture with images til I watched some tutorials...basically, just press the 'c' key, n 'Ta-Da',lol....this was just a test-run, but used the Paintbrush tool in the paint room to paint this wolf via a wolf ref 'material' image....but first, I also used the wolf ref material image to create and 'sculpt' it with using the Airbrush tool on a cube in the voxel room, was so easy (and quick)....while sculpting with the image, I kept my depth setting at around 2, and the smoothing at about 7 ..(and I will also mention that there's more basic steps involved, such as picking depth, color and spec channels,but it's still an easy process)..the 2D Paintbrush also works great for this...to me, it's just kinda fascinating to watch the Airbrush tool map or 'clone' the image into the cube, adding 3d depth with it's height, etc. ... ...I also found that it's best to set the symmetry first, before doing anything else, as a rule...and then select the 'front' for the view (in the 'camera' panel options) , ...after checking the symmetry for this one, I turned it off before sculpting, because it wasn't needed for this type sculpt, but if I did happen to add certain enhancements to it that required symmetry, then at least it would already be set., but like I was saying, I think staying in the habit of setting symmetry and checking the 'frontal' view are two important set-up actions for most any project...but after I used the Airbush to sculpt it, I used the build tool (n other tools) to give it some extra depth, etc...so I guess basically, it's an image sculpt embedded/sculpted into a 3d cube, so it would be very easy to 3d just about any image sculpt using this proceedure. ..but anyhows, need to adjust the spec alot lower, n add some extra white to it, etc.,, n it hasn't been baked, retopo'ed or anything else yet, but like I said, was just a test-run....but again, since this was the first time I've worked with images in this manner, I just thought it was so cool. Quote Link to comment Share on other sites More sharing options...
Contributor Tony Nemo Posted December 16, 2009 Contributor Report Share Posted December 16, 2009 hey, all, ..was just exploring the ''texturing with images' options in 3DC ...been watching everyone's texture work n wanting to try this for awhile...didn't realize how easy it was to texture with images til I watched some tutorials...basically, just press the 'c' key, n 'Ta-Da',lol....this was just a test-run, but used the Paintbrush tool in the paint room to paint this wolf via a wolf ref 'material' image....but first, I also used the wolf ref material image to create and 'sculpt' it with using the Airbrush tool on a cube in the voxel room, was so easy (and quick)....while sculpting with the image, I kept my depth setting at around 2, and the smoothing at about 7 ..(and I will also mention that there's more basic steps involved, such as picking depth, color and spec channels,but it's still an easy process)..the 2D Paintbrush also works great for this...to me, it's just kinda fascinating to watch the Airbrush tool map or 'clone' the image into the cube, adding 3d depth with it's height, etc. ... ...I also found that it's best to set the symmetry first, before doing anything else, as a rule...and then select the 'front' for the view (in the 'camera' panel options) , ...after checking the symmetry for this one, I turned it off before sculpting, because it wasn't needed for this type sculpt, but if I did happen to add certain enhancements to it that required symmetry, then at least it would already be set., but like I was saying, I think staying in the habit of setting symmetry and checking the 'frontal' view are two important set-up actions for most any project...but after I used the Airbush to sculpt it, I used the build tool (n other tools) to give it some extra depth, etc...so I guess basically, it's an image sculpt embedded/sculpted into a 3d cube, so it would be very easy to 3d just about any image sculpt using this proceedure. ..but anyhows, need to adjust the spec alot lower, n add some extra white to it, etc.,, n it hasn't been baked, retopo'ed or anything else yet, but like I said, was just a test-run....but again, since this was the first time I've worked with images in this manner, I just thought it was so cool. A very useful technique! What tutorials do you recommend? Quote Link to comment Share on other sites More sharing options...
Contributor 3d_sculptress Posted December 16, 2009 Author Contributor Report Share Posted December 16, 2009 hi, Tony .....here's a link to the vid that I watched...after watching this vid, I just figured if we can use skin images as a texture, then we should be able to sculpt with images, so I started experimenting and the wolf is the result of a few of my experiments....there is really so much that can be done with this technique,.I'm going to try n post a tutorial vid sometime today on a few things that I've explored using this technique...., but here's the link to the vid on texturing with a photo. Quote Link to comment Share on other sites More sharing options...
Reputable Contributor digman Posted December 16, 2009 Reputable Contributor Report Share Posted December 16, 2009 Yes, the paint room has lots of tools that get overlook with all the voxels stuff going on. Try the the place an image along a spine tool. It has lots of uses. The great thing about 3dcoat is it's arsenal of powerfull tools. Even with voxels the tools in the paint room are great for adding extra depth detail and they are very fast. Any added details can be saved in the normal map or the displacrment map. The sculpting tool (room) now not used very much still can be usefull. I like it for taking a low polygon model and getting ideas for voxel sculpting. Edit: oops I realized I had posted the frame pictures in your wip thread, sorry... Quote Link to comment Share on other sites More sharing options...
Contributor 3d_sculptress Posted December 17, 2009 Author Contributor Report Share Posted December 17, 2009 ''Try the the place an image along a spine tool''...I've been wanting to tryt that, so it will be next on my list of exploration......love the richness of the texture and the the colors in both those pics...I just paid for 'AviScreenPro', soon as I get my serial number, like I was saying,I'm gonna try n make some tuts of at least 2 or 3 of my image sculpt projects. I just finished an eye sculpted from an image...may post it in the 3DC 'share' forum. Quote Link to comment Share on other sites More sharing options...
Member Yearoftheox Posted December 17, 2009 Member Report Share Posted December 17, 2009 Yes, the paint room has lots of tools that get overlook with all the voxels stuff going on. Try the the place an image along a spine tool. It has lots of uses. The great thing about 3dcoat is it's arsenal of powerfull tools. Even with voxels the tools in the paint room are great for adding extra depth detail and they are very fast. Any added details can be saved in the normal map or the displacrment map. The sculpting tool (room) now not used very much still can be usefull. I like it for taking a low polygon model and getting ideas for voxel sculpting. Edit: oops I realized I had posted the frame pictures in your wip thread, sorry... I agree, Voxels are ok, but the retopo/ uv/ paint tools are the best part of 3dc. 3dsculptress- Your "Test" looks interesting. Is that a Highpoly "cube" or is it quadrangulated. also, I find working in an orthographic view, While using symetry, especially in front view, beneficial. Quote Link to comment Share on other sites More sharing options...
Contributor 3d_sculptress Posted December 17, 2009 Author Contributor Report Share Posted December 17, 2009 digman, no problem at all with you posting youir pics here...am glad you did..they were inspiring to me....yearoftheox, that was just a regular cube that I upped the res on.....(no quadrangling)...on sculpts like this wolf, symmetry couldn't be used at all, really, or u'd come out with a mirror image of the wolf on each side of the front,,but if you decided to frame it with vines/trees,etc., for example, then symmetry could be used....,,but yea ordinarilly I firmly believe in using symmetry in all projects when usable.. here's an eye that I sculpted via 'sculpt with image'...just another test, but figured I'd post it as a freebie for those interested....(more pics at the link) Freebie Body Parts Eyes, Ears, Etc. Quote Link to comment Share on other sites More sharing options...
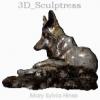
Contributor 3d_sculptress Posted December 26, 2009 Author Contributor Report Share Posted December 26, 2009 here's a sculpt I just finished of a wolf photo that I took at the Dallas Zoo.......(I love the clone tool !)...... may touch-up on it later, but here it is for now . . . . . . . . Quote Link to comment Share on other sites More sharing options...
Advanced Member Eric Dandoy Posted December 26, 2009 Advanced Member Report Share Posted December 26, 2009 Very interesting technique! I especially love the second one. Quote Link to comment Share on other sites More sharing options...
Contributor 3d_sculptress Posted December 26, 2009 Author Contributor Report Share Posted December 26, 2009 hi, Eric...I like how this one turned out, too, but the photo I used really wasn't the best photo for this type technique, so there's no way I could really have gotten it to look 100% photorealistic., but sometimes we can see the trees better when we're not standing in the middle of the forest, lol...so now that I've taken a break from this one I see a few things that I'll go back n adjust....I just happened to like the pose in this one, but I have lots of clearer photos of various animals, so I'll use a clearer photo for my next project like this.... n now that most of the holiday rush is over, hopefully I'll get my tutorial for this technique made in the next day or two. Quote Link to comment Share on other sites More sharing options...
Contributor 3d_sculptress Posted December 27, 2009 Author Contributor Report Share Posted December 27, 2009 another 'sculpt with image...was just playin with different effects on this one,...started out sculpting one of 3DC's default images (the button), then wound up with this 'dragon eye' (for lack of anything else to call it, lol)..but mainly wanted to post the linear burn effects that was achieved ( the linear burn is the dark/blackish effects in this image)...,I saved the 1st stage, and the 2nd stage, but I didn't save this stage before it got munched, (and it ate this stage and the 2nd stage ) so this may be all I can do on this one, as I don't remember the last steps that it took to get it to this point...but ..figured I'd go ahead n post it, so here it is . . . Quote Link to comment Share on other sites More sharing options...

Recommended Posts
Join the conversation
You can post now and register later. If you have an account, sign in now to post with your account.
Note: Your post will require moderator approval before it will be visible.