Microvertex
When you need to provide your model with high levels of “actual” displacement by means of sculpting or “painting” this displacement, one option to use is the “Microvertex” mode.
In Micro-Vertex mode (on Paint Room), you can go to the FILE Menu > EXPORT > High Poly Mesh.
That will bake the displacement down to the mesh.
Sculpt High-Poly and bake to LowPoly Retopo mesh
As you only can Sculpt on Sculpt Room, any model imported in Sculpt loose the uvmaps (if any).
The steps to follow are:
In Retopo Room import the LowPoly model with UVs, on Sculpt room import the HighPoly model.
If the OBJ has UV’s already, then you would import it directly from the Retopo Room from the Mesh>Import option located on the top section next to the Bake option.
Once it’s imported you should see your Obj with the simple UV checker pattern sitting on top of your sculpt mesh (in the Retop room).
When sculpt process is finished switch to Retopo room and Bake using this option:
Then proceed with the baking process.
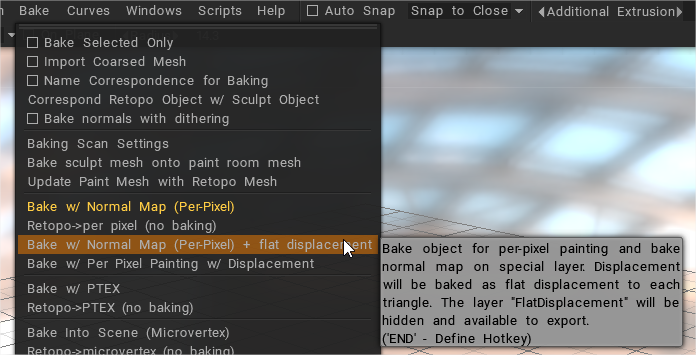
Once bake process is finished, the model with the textures is automatically sent to the Paint Room, here you can paint and add more details if you need.
Use Textures > Export to get displacement texture.
How to bake out Displacement Maps: A short tutorial showing how to bake out and export Displacement maps.
- You have imported an OBJ mesh with UV’s already made.
- From there you can send that mesh over to the sculpt workspace using one of the options under the Bake menu.
- Take subdivided paint mesh into Sculpt Room (This is the one I usually use)
- Now add any additional sculpting while in the sculpt room
- When done adding sculpted details, jump into the Retopo Room. You may see your Paint Object in the Retopo Room along with your sculpt. I would hide the paint objects using the Paint Object panel (if you don’t have that docked somewhere then open it from Windows>Panels>Paint Objects)
- Now you should only see the sculpt mesh in the Retopo Room.
- Bring in the low poly model, either using the Mesh>Import option or using the Mesh>Take mesh from Paint Room option.
- Now you should see your low poly mesh with UV’s.
- From here you can Bake your new sculpt mesh onto the low Poly mesh using the Bake>Bake w/ Normal Map + flat displacement
- Just be sure to set your outer scan depth large enough to cover your new displacements.
You could also import in the first place directly to the Retopo room and then there is an option to copy the retopo room mesh into the sculpt space as a stamp, in which case a copy would remain in the Retopo room.
To do it this way, you’ll want to first bring the mesh into the Retopo space and then switch to the sculpt space and use the Import tool (pick from Retopo button) on the left to bring in the Retopo mesh as a stamp in the sculpt space.
There will be no connection to these two meshes at this point… but there is a way to have the retopo room mesh ‘follow’ the shape changes you might make on the sculpt mesh if you check the ‘Conform Retopo’ mesh option at the top bar of Sculpt room.
You need to change thinking way to manage 3DCoat. At the beginning was difficult enough, but if you often do same things, you will feel it is not so un-usual process and maybe reasonable way to manage each process.
1. You need UV mesh in retopo room (non sculpt and usually low poly + UV) (it become bake target, so if you hope to bake some textures of sculpted mesh to UV mesh, you need to import UV mesh in retopo room or 3d coat can not bake anything.

Though you can paint high poly mesh in paint room with vertex painting, but it is not what you consider for current your purpose.
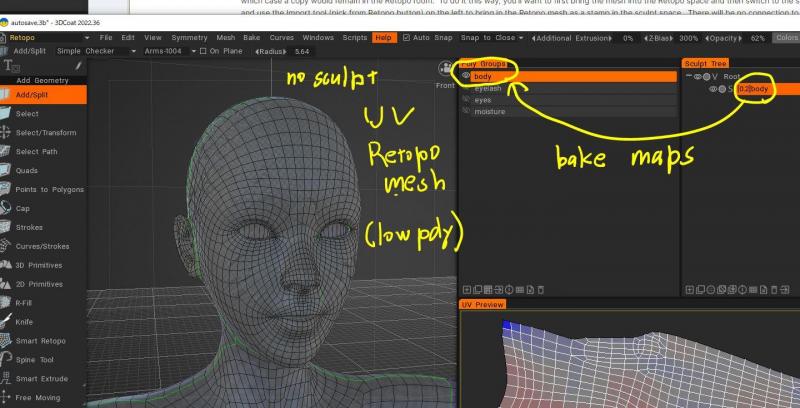
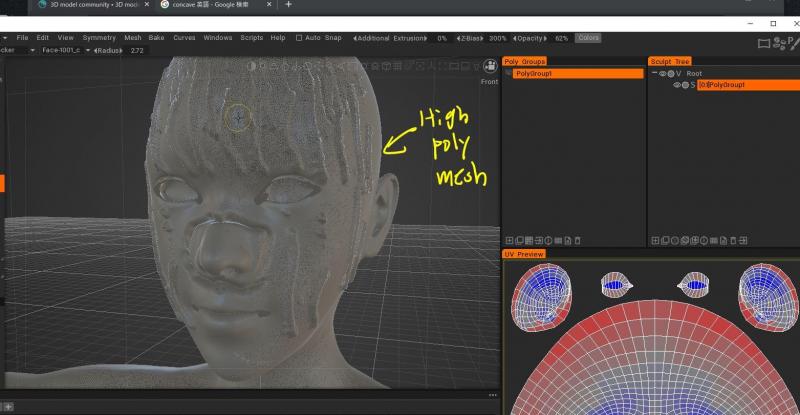
2. if you simply import mesh in sculpt room then start sculpt, you need to re import non sculpted Mesh with UV in retopo room , and set retopo groups name as same as volume name in sculpt room meshes. Then 3DCoat will consider, each “Polygroups” are for each “volume” part (sculpt room) bake target (with UV) .
Usually import retopo mesh in retopo room/paint room first, then in sculpt room, use retopo mesh in sculpt.
As mentioned, if you will try same thing (bake texture with sculpt to UV mesh), you may better import mesh in retopo room first.
Then pick the retopo room object to Sculpt room, it is recommended process. Use this function in sculpt room.
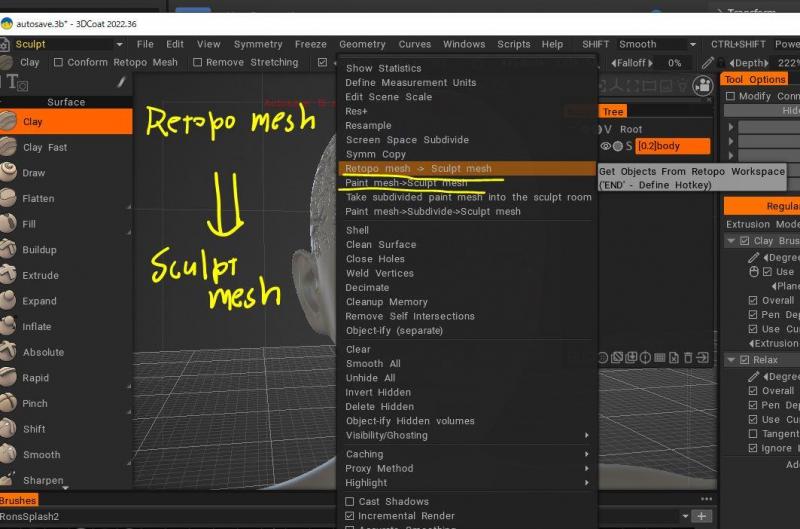
Then start sculpt in sculpt room. (now you have 2 different mesh in each room). Each room use individual mesh.
It is 3DCoat concept, so it is sometimes complex until understand theory.
If you actually follow these things (you have same poly groups mesh in retopo room as sculpt room sculpted mesh volume) then bake map.
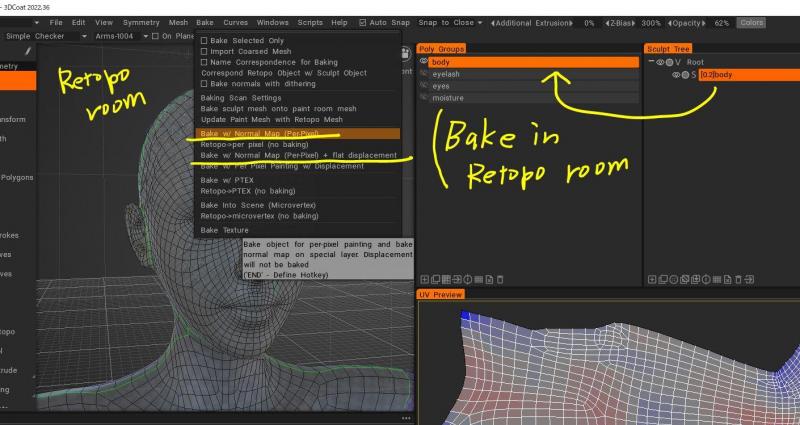
It will open cage setting view (under pic) , then you adjust Inner and outer Scan depth, along with sculpt mesh first.
With swap show inner/outer shell. (so if you increase Scan depth out-side, outer shell expand (along with normal basically, sometimes corrupt though)
Inner cage need to be under sculpt mesh. outer cage need to be over sculpt mesh. (but should not get too large margin)
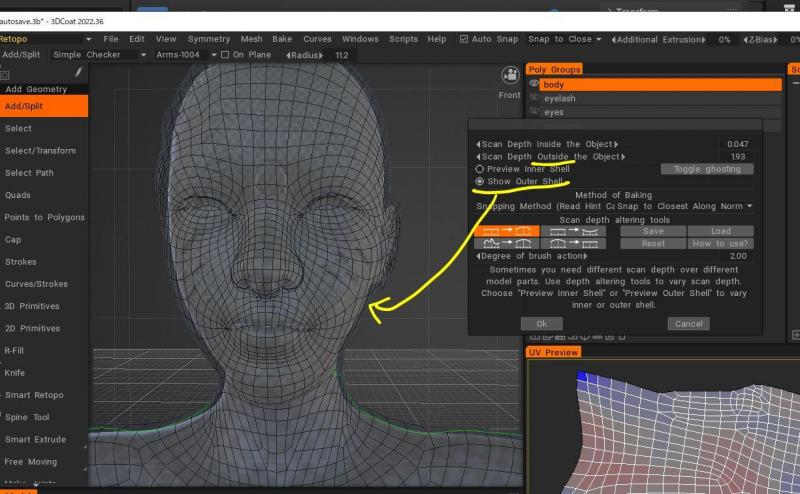
For some part, you may try scan depth altering tool (with this menu open, current tool work as shell deform brush, it only change inner/outer shell shape)
After finish to adjust shell depth (or scan depth/ cage depth ), simply click ok. Then you will see (texture import setting window)
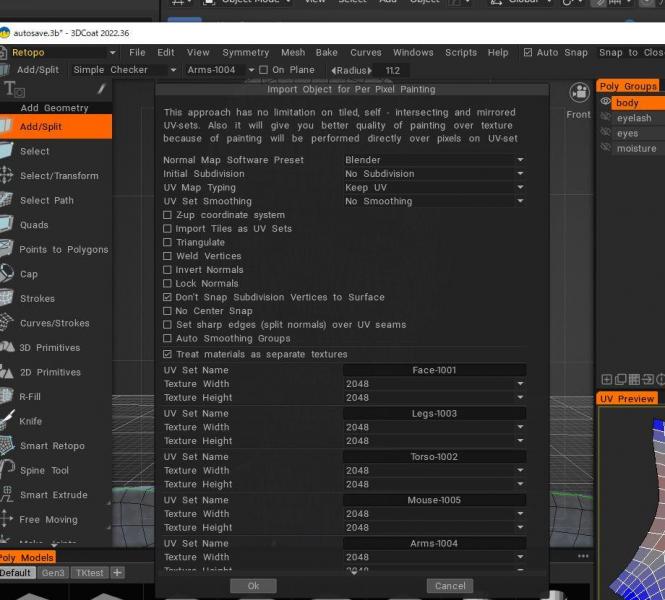
The complex part is… you can not directly save baked texture, but once generate new mesh in paint room with paint layers (which include color, depth information separately)
When import the Paint mesh when you need displacement map, you may better set initial sub-division (eg 3 times, or 4 times if you can) as same as you sub-D in sculpt mesh) > you can get clean displacement.
If you had imported mesh in paint room, you may see double mesh, with many layers, so usually until bake textures. It is better to remove paint mesh first.
Once you bake textures, you may see new paint mesh in paint room like this.
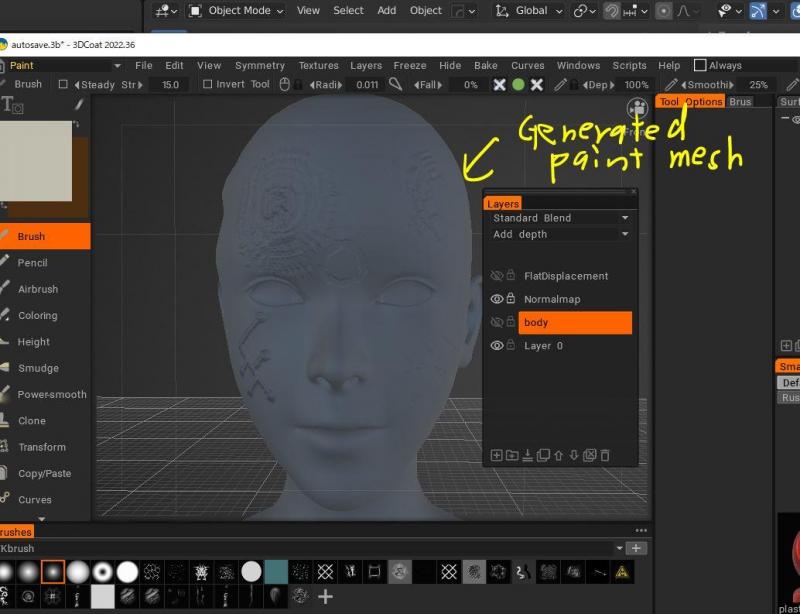
Then you can save normal/disp texture as image, from Paint room menus.
If you see somehow wrong, remove paint mesh, and try bake again with adjust shells and initial sub-D setting.
Setting initial sub-D for bake textures
When you bake textures you may see setting window, which set texture resolutions, Then there is option to set initial sub-D for paint mesh.
I suppose the sub-D setting is used for bake target (bake maps for non sub D mesh or sub-D applied mesh).
You may set initial sub-D as same level as which you sculpt in sculpt room.
(those poly edge is generated because you bake disp for non-subD mesh)
If it not work try , change snapping option when you adjust cage and bake. Scan displacement top > snapping method (Snap to closest along normal/ snap to outer surface) .
it seems change how you set-up Scan gage, snap to closest along normal was easy but sometimes brush seems not move well.
Bake clean detail displacement
If I need to bake clean detail displacement, I may carefully snap Retopo mesh along with Sculpt mesh first.
If you need to generate vector displacement map (in Blender or other app) and hope to do same thing in 3DCoat.
At same time, your figure already attached with rig, so I do not hope to deform base resolution mesh if you can (but just deform by displacement only).
But actually to generate clean displacement, need to deform base mesh (snap to sculpt mesh carefully) until adjust cage and bake.
After that may need to import modified base mesh (retopo room mesh) as new morph + set sub-D as same as in 3DCoat + set displacement map.
Tutorials
Exporting a Displacement Map with 3DCoat: A step by step video showing how to bring in a low poly UV’d object and sculpt additional details onto it, then how to bake out a displacement map and view it onto the low poly model.
 Polski
  English
 Українська
 Español
 Deutsch
 Français
 日本語
日本語 Русский
 한국어
한국어 中文 (中国)
 Português
 Italiano
 Suomi
Suomi Svenska
 中文 (台灣)
 Dansk
Dansk Slovenčina
 Türkçe
 Nederlands
 Magyar
 ไทย
ไทย हिन्दी
 Ελληνικά
 Tiếng Việt
 Lietuviškai
 Latviešu valoda
 Eesti
Eesti Čeština
 Română
 Norsk Bokmål