


probiner
-
Posts
79 -
Joined
-
Last visited
Content Type
Forums
Calendar
Gallery
Posts posted by probiner
-
-
Great! Looking forward to see that.
I'm thinking how to explain my idea for take 2 and will post it later
Hopefully when i post it, again, Andrew will already have posted a new implementation covering it. That's how fast he is =P
-
Hey there. I saw the new auto retopo method and while i think it is very impressive, there is also room for improvements.
I got some ideas that i would like to discuss here by takes.
Take 1 - Subdivision Deformation
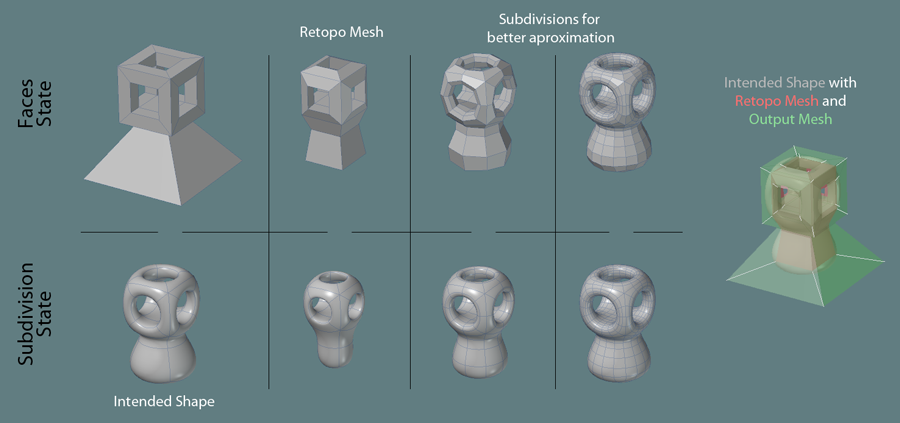
__One thing i noticed when you want to Sculpt, make a Retopo and bring it to LightWave (or any other main 3D package),is that your Retopo mesh will not have the exact same shape than your sculpt in 3D-Coat when you apply Subdivision to it, especially if the Retopo mesh is light, because the SubD deformation is not taken into account in Retopo process.
__The solution, now, is to increase the density of the Retopo mesh, so, increasing the number of polygons, in order to make that SubD deformation preety much null, although it is still there.
So my suggestion would be for 3D-Coat to have some sort of 2 meshes going on at the same time in a Retopo:
__Having a Working mesh that sticks to the sculpt Shape and calculated from this one, an Output mesh (the SubD cage). The Output is the the one to be exported to the Main 3D Package, and when Subdivision is applyed on it, it will look like the 3D-Coat Scuplt without the need of dense meshes.
What you think? No need, or makes perfect sense? Is it possible to do a reversed SubD calculation?
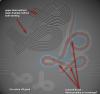
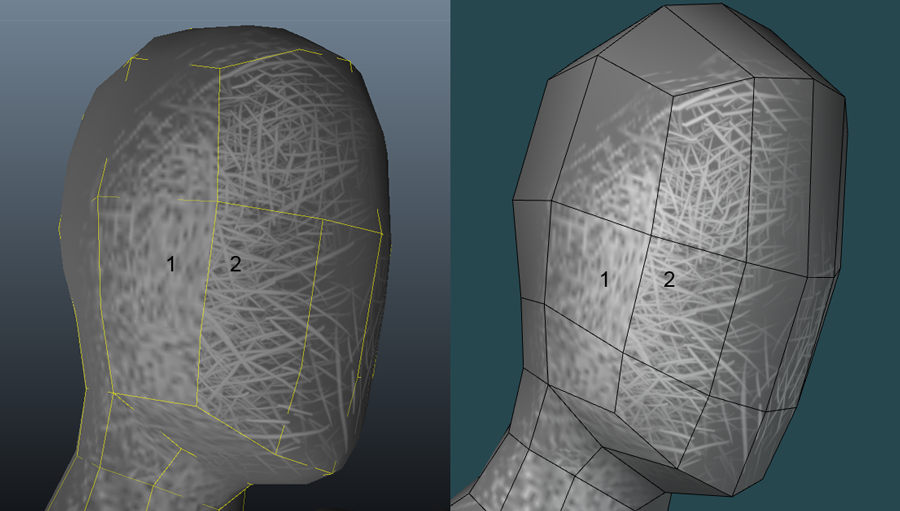
If i gave you the 'Intended Shape' in the picture below and told you to do a Retopo, what kind of mesh would you give me back from the -Faces State- line in the picture, the first or the last?
It is true that even for animation you sometimes need dense meshes but it would be nice to be able to choose and not to get stuck with dense so that the shape is the same in the primary 3D package.
Cheers
-
I hope that Andrew implements a parallel version of "Surfacing" tools in the Sculpt Room, so that any work that is done in one is mirrored in the other. Multi-Res in both would be great.
Do you know a thread with full workflow for Sculpt Room?
Cheers
-
Ok...
So my bad. The model i tested with, i forgot it had hidden triangles (so it kept subdividing for all quads). So if the model is indeed all quads, it can be imported without subdviding it, and exported equal to the original, with at least 1 PtexPlane UV Map (i had models that came out with 2 PtexPlane UVs) and correspondent UV Textures.
All quads model Imported in 3D coat and Exported model in LW.
So great we can take it back to render using Ptex different resolutions feature =)
Cheers
-
Thanks

When i read that i understood that it would support height maps (Grayscale), since these are calculated on normals, but not vector displacement, like Modo's vector displacement (RGB).
So ok, i understood it wrong. So you mean PPP supports no mesh displacement at all, just normal shading, right? It Makes sense
Anyway in the image on my first post, you can see that i was able to export a displacement map. Sure, with lots of bad pixels but it's there

Cheers
-
I tryed to search around here, but search engine of the forum can be quite hard.
How to use Texture Baking Tool to get a displacement map out of a Per Pixel Painting session. With Microvertex i got no problems.
When i bake it comes out with no displacement data (and is not gray)
When i export it come out with lots of bad pixels.
Anyone can give me a tip or point a good thread?
Thanks
-
It's a great work around Phill. Well reminded.
-
What happens when you bake a higher res?
There's no use in painting with Ptex anyway if the final UV Map and Textures don't reflect the Resolution Hierarchy. So incresing the resolution for all the areas in order to have the higest ones to render fine is not a solution in my perspective. 3d-Coat does this Resolution Hierarchy UV Map map, but subdivided, so no use for my original model.
So what now?
Cheers
-
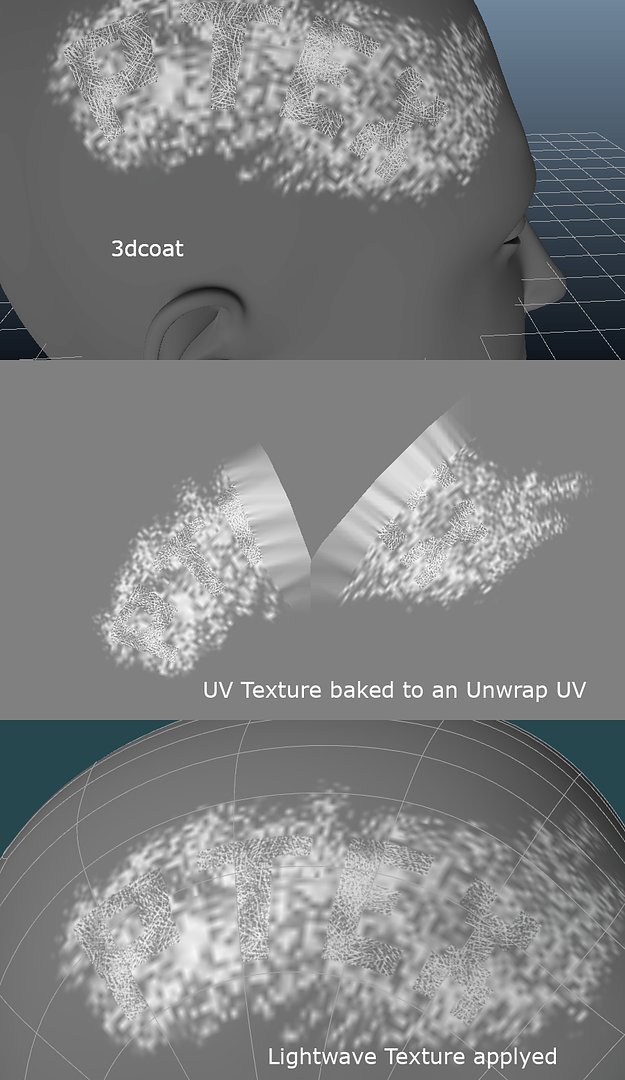
So the question is... How do i today, have a model, say in LW, bring it to 3D Coat, paint it with Ptex and then get back to my model with textures to render in Lw, keeping the Ptex resolution goodie?
Export Model, will subdivide the mode, so it's not the same.--- X
Bake Texture, will put everything back to the same resolution.-- X
Cheers
-
Ok, so i see texture baking tool does acomplish to take the textures out of 3dcoat.
Shame that all the Ptex work is kind of losts this way anyway. [image]
I think the Ptex auto-sizing for the Islands UV is great. So Ptex resolution could also be used to work has Area Weight on Polygons for Relax Calculation, so there could be generated continuous UV maps, Unwraps.
Cheers
-
Saw Phill Nolan's videos about ptex in 3dcoat and got me interested. Even got more interestes when i saw Ptex UV Map generation, very cool!
Again, great job Andrew, you keep this software looking for the best and the new.
So...
Catmull is great to turn whatever into quads. And if this tech only works with quads for now in 3D-Coat, Catmull level 1 is a must have.
But...
The issue i see here is that when you want to retrieve the textures or even export the model to the renderer application, it will be subdivided, so it's not the same model and even the new UV can't be transfred to the original model.
Is Catmull here only for the "all-quads" safe procedure or it will stay?
Cheers
-
It does. Thank you. Still slow, but my machine specs also have influence there, and the end result is the intended one. Andrew's brush works fine, since it's stretch along the array.
Only problem i see now is with the alpha when color is added in the color channel. In some other brushes the alpha gets holes and in the crossings gets black halo. In the image you see only the black soft halo.
Cheers
-
So... no way to do a stroke like that in 3D-Coat?
Cheers
-

For someone that uses photoshop to paint this kind of clean stroke is important(no visible samples). Possible in 3D-Coat with nice performance?
Cheers
-
Maybe i'm doing something worng...
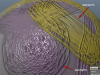
But it seems that 3D-Coat spacing is not nice for sharp strokes and if if turn spacing it gets very noisy like in the image below and also very very slow.
A faster and lessy noisy stroke with good spacing would be great, as it essential in many painting works to take the most vantage of the brush qualities (not the particular case in the image, but just to exemplify the noise)
Cheers
-
Sorry for hijacking the thread....Oh I could kiss you!! I had an old tutorial on making hair bookmarked and thought it was lost for good...didn't know I just had to plugin _old to see it again! Thank you thank you thank you!!

Always good to know several creative ways to solve things.
I would not go anymore to layout to make that type of UV. PLG can make that relaxation nice and easy.
Cheers
-
Nevermind.
Figured it out
Cheers
-
Is there a well known problem with pixel painting and mesh holes?
Most times i paint in this mode, when i "touch" the mesh around a hole (eye, mouth), then the hole, then the mesh around the hole again: it produces preety wild results, making stroke trails in places i did not "touched".
Any known reason and workaround for this?
Cheers
-
How do you paint a good Rake?
Spacing in 3D coat makes the painting very slow.
Image above 5% was slow and does not look good. 1% looks ok but was really really slow.
Hope this can be improved in future releases so there's a more of a CorelPainter or AdobePhotoshop stroke feeling.
Cheers
-
Hi Andrew
Glad to see that relaxing operations now make the mesh more "gray" (no tension) and with better results.
Just 2 aspects i think it that would make it on point:
-Itenerations. Most relaxing operations in PLG, UVlayout, MODO... etc. work with itenerations so you dont have to repeat the operation a lot of times. If i press relax now in 3DC it does almost nothing, so i have to press like 20 times or more.
-Relaxing operation now doesn't change the boundary edges of the UV, wether they are Seams or Holes. This results that Seams and Holes can becomes something like an obstacle in the relaxation process, constraining the Relaxation to a boundary that is not the correct one. So it would be nice if the whole mesh would be relaxed and not only the internal one. Still, having the option to constrain the Boundary or Holes is always welcome.
Great Job as always
Cheers
-
Thats good news Andrew.
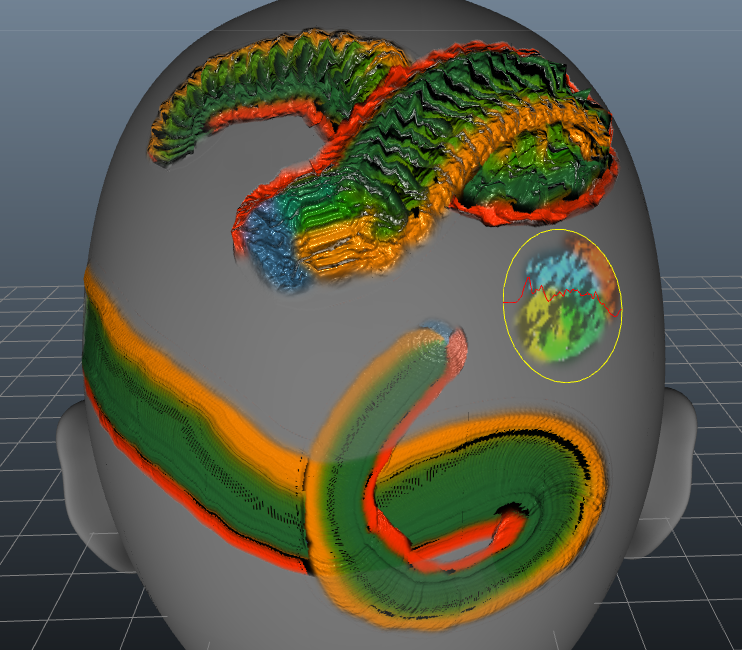
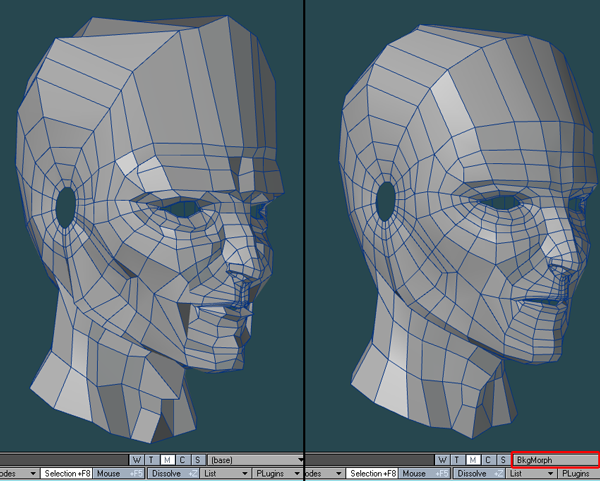
Just so there no confusion, i used the PLG Relax not in the base state but with a Morph (like in the image); that is basicly a freeze from Subpatch.
Cheers
-
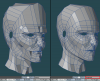
-Symmetry in UvLayout is one feature that makes you save a lot of time. Imagine you have a character and you separate hands, ears, legs, arms, etc. You unwrap but then you need to tweak some parts so its not an automatic edit. You have to repeat that manual editing in the symmetrical parts and it probably won't be exactly the same. In UV Layout you define symmetry by choosin a middle edge in the 3D object. Later you can tweak an island "apply changes to symmetrical part" with a single click.
This would be great in 3D coat for Symetrized Retopology, since that althoguh you now have Mirror Snapping, if you use Brush to edit the Mesh it will bring polygons from the other side and they will be mirrored too. This could be fixed by the above feature, or by defininf Mirror Edge Loop wich X value is always 0.
-UvLayout has a relaxing calculation mode in wich you can pre-establish lots of behaviours to vertices and edges. They can go straight, be pinned, hold an hole, relx more or less, etc... So you can recalculate the unwrap with a lot of refined setups.
-UvLayout Packing system is great. You can choose in how many Tiles you want to acomadate your islands, if you want them to be rotated, scaled, at packing time. You can choose the spacing between islands. And in the end it shows you the UV space coverage of the UV.
This is all high end UV stuff, but... sometimes you need it, other times it's simply for time saving. But let's not forget that 3D-coat lives from UVs and what it's baked with them.
Still i think the new tools can cut it. I simply point stuff where 3D-coat could improve, but it's already very competitive for its price.
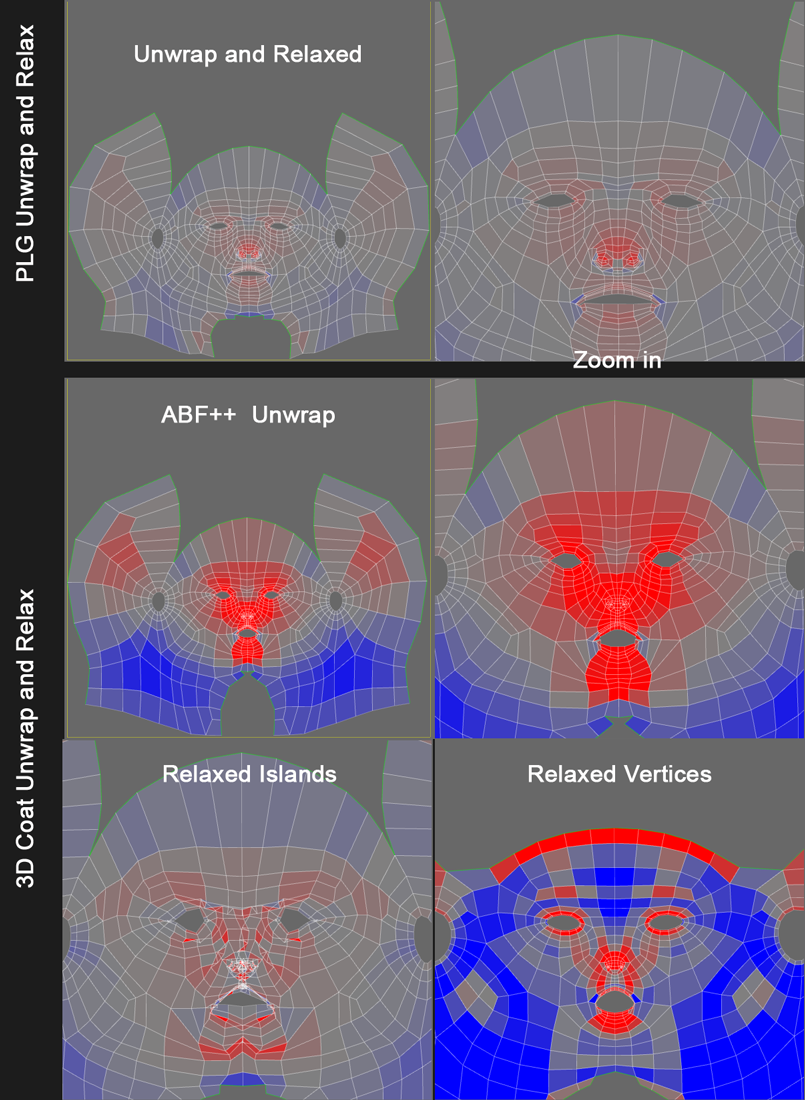
Also the PLG UV has some neat features that relate to what have already been said (Packing Islands options, Aligning Islands). But there is a thing with PLG that is nice, you have Relaxing using Area Weight. So you get a optimal correspondence between 3D space and UVspace. That how i got those results, that result better than 3D coat ABF++.
Cheers

-
Well geothefaust posted an interesting video in Vimeo about the new UV features in 3D coat. http://vimeo.com/channels/3dcoat#7005596
And i pointed some stuff i thought that could be better.
But that was in NewTek forum http://www.newtek.com/forums/showthread.php?p=936370#post936370 and welll if its good to have this kind of feedback, better to post it here too.
Cheers
-
There should be a way to import a mesh to VS smothed. If you use import u just get the reference mesh and not the smoothed.


Retopo Suggestions - Take 1 - Subdivision Deformation
in General 3DCoat
Posted
And how is that? When you subdivide the object you are already distorting the SDS lvl1.