


JanCZ
-
Posts
26 -
Joined
-
Last visited
Content Type
Forums
Calendar
Gallery
Posts posted by JanCZ
-
-
I have two already UV mapped and textured objects and I need to align them by using awesome Fit tool from the Sculpt room. But when I export them, they are just plain mesh without UVs. Is there a way to use this tool on textured objects and export themwith the original UVs and textures? Thanks
-
Thanks man, but no idea how to use this new tool. I know its beta, but is there any documentation or videos about it?
-
OK, its there at 4.9.08, but when I check the Brush Along Curve and then Rotate Along Stroke, it doenst change the orientation of the rotation. I dont see any difference. Its still rotating around the curve, but what I need is to rotate around an axis that is basically perpendicullar to the curve...
-
Im on Win 4.9.05... The latter versions are betas if I get it right. I would rather stay with a stable release. Which version are you on?
-
Thanks as always Carlosan... But... Ehmm... I dont see this option there:
-
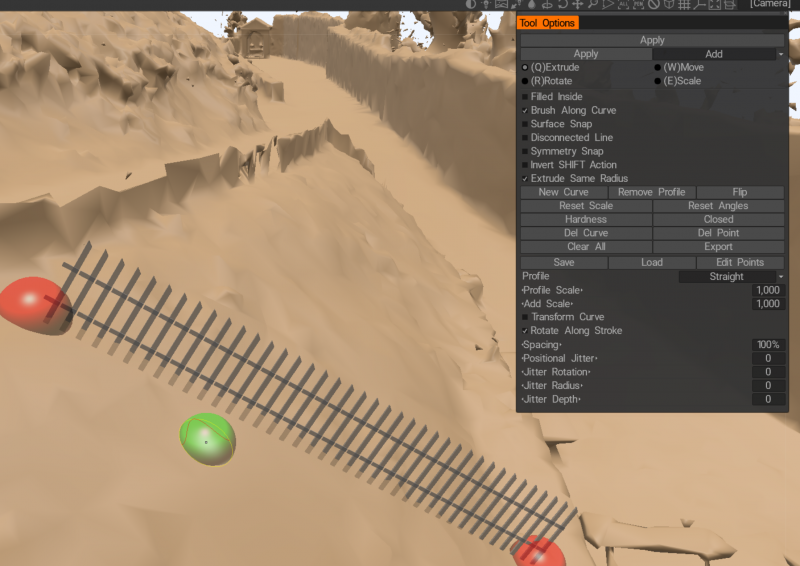
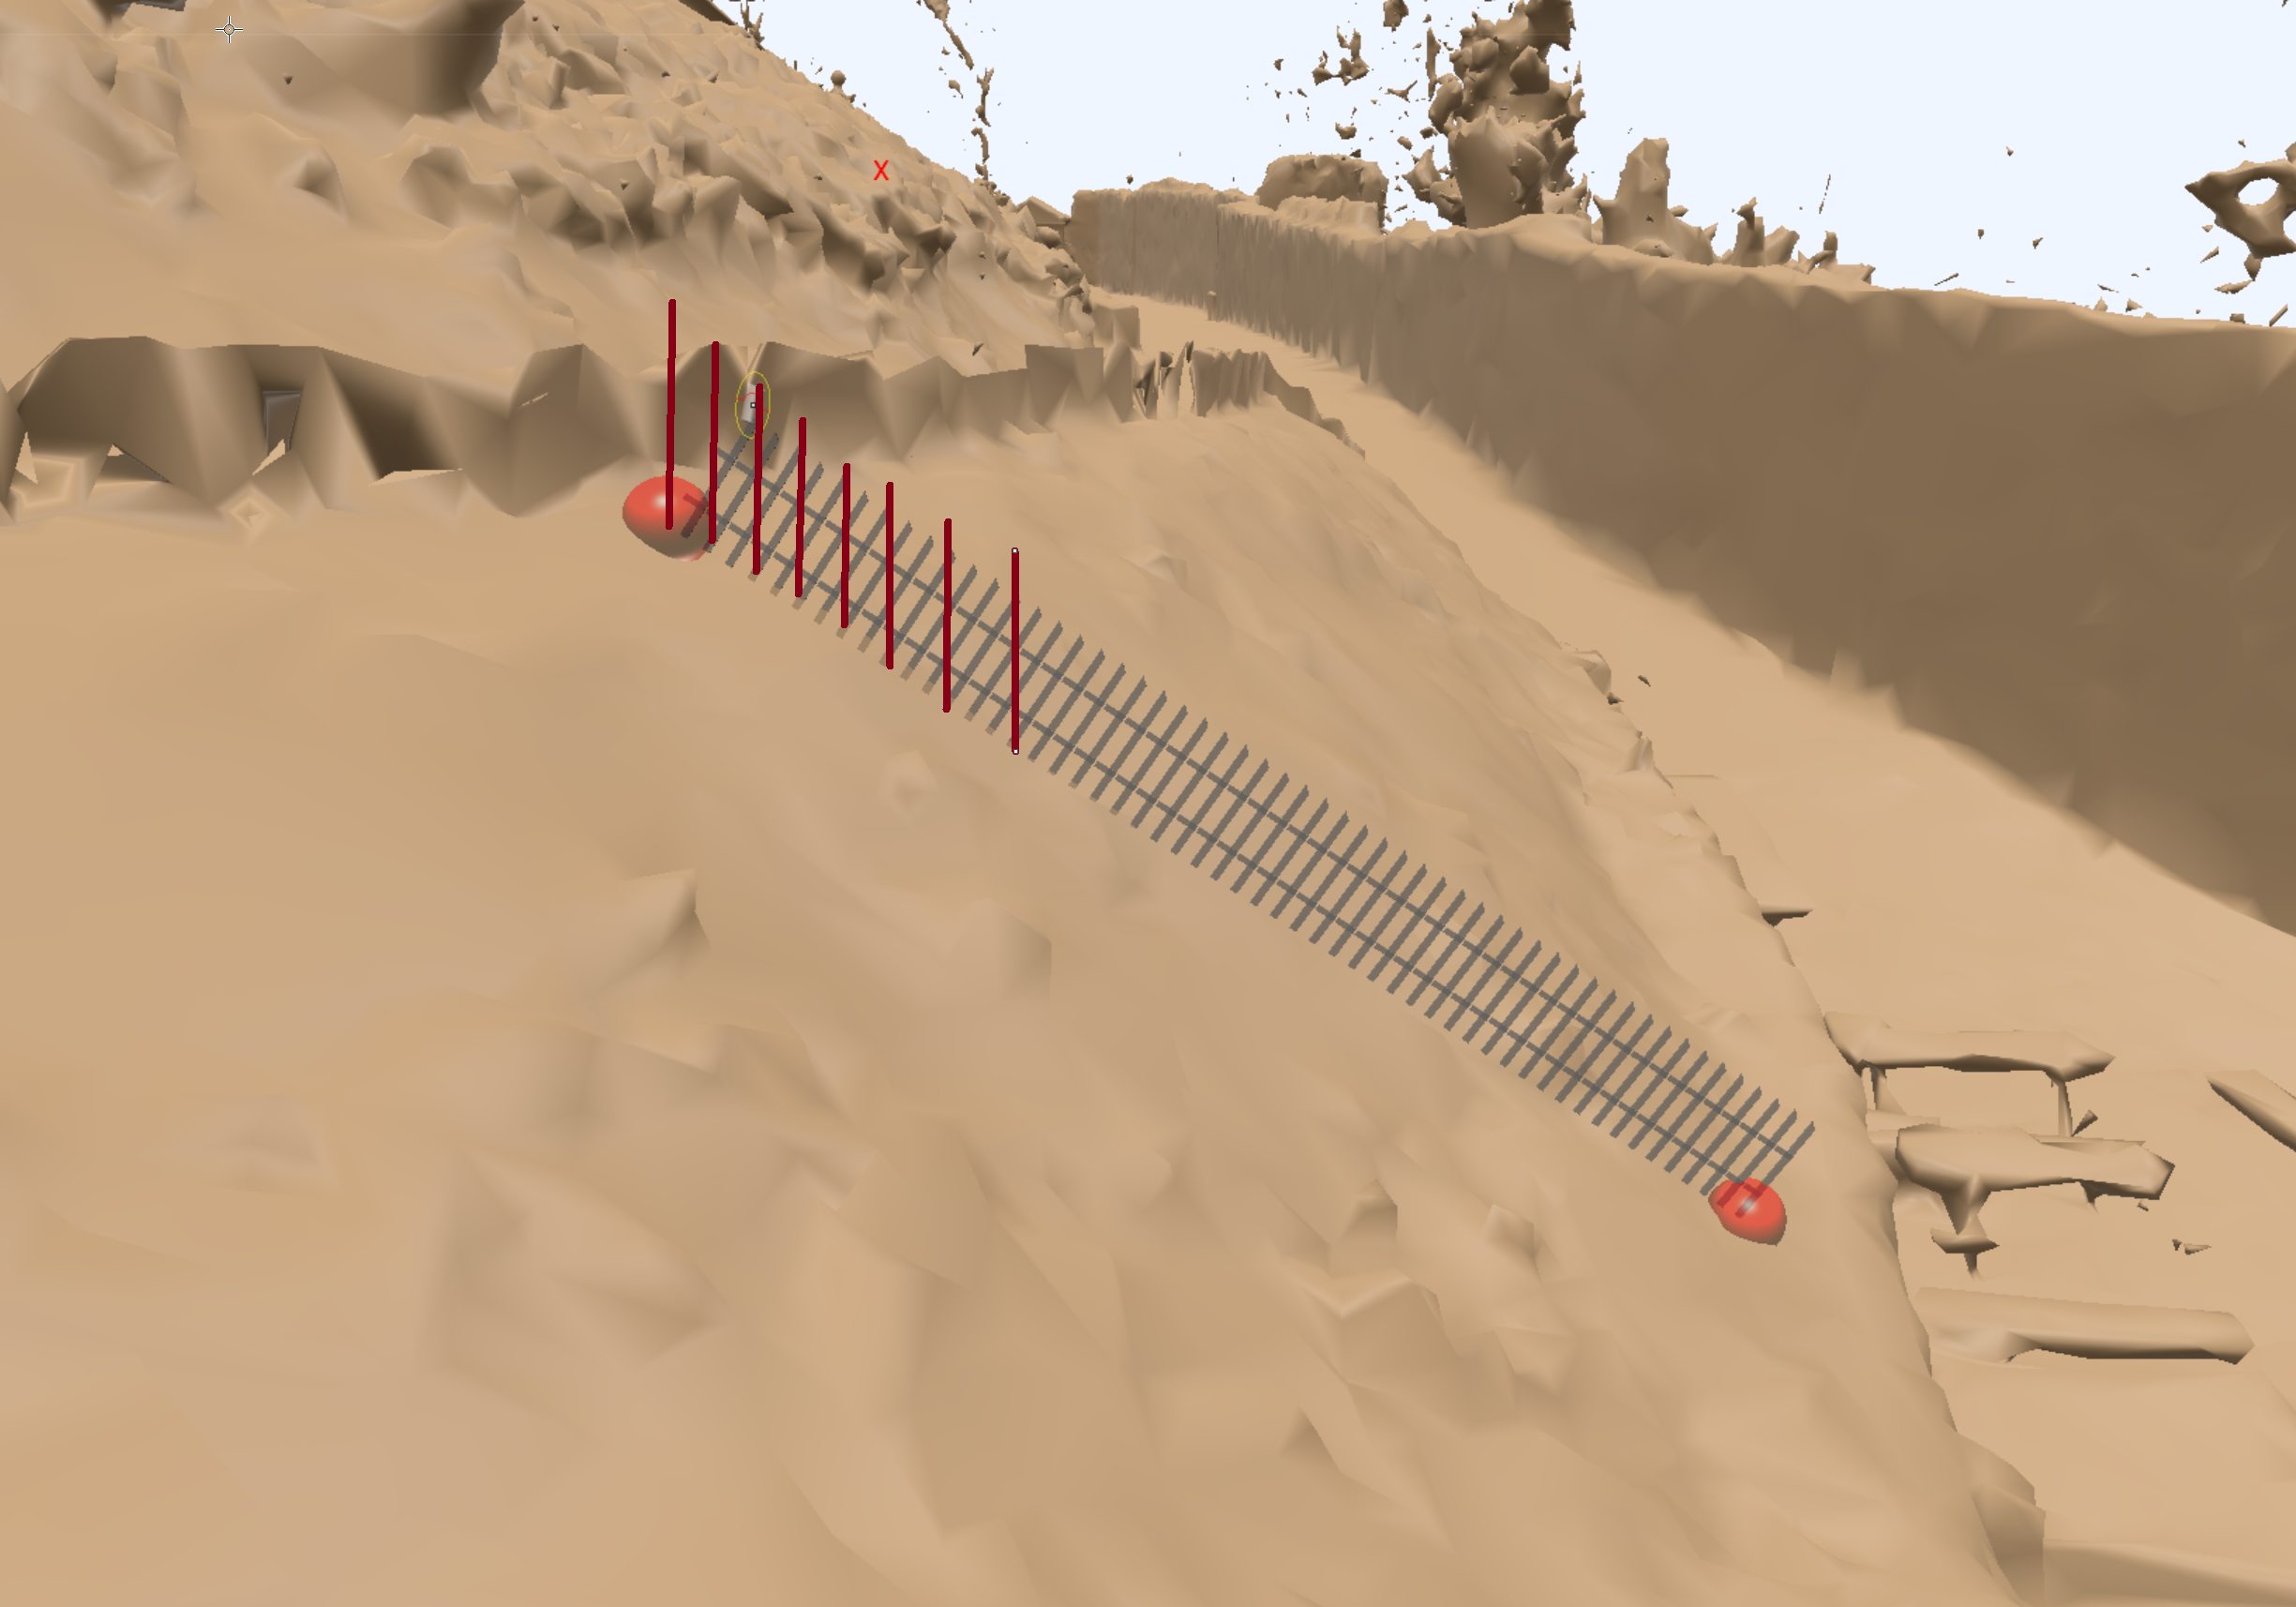
Hi guys,
I am creating curve with a custom shape and I need to rotate the shape. I know there is an option Add rotation, but it rotates the shape around the curve. But what I need is this:
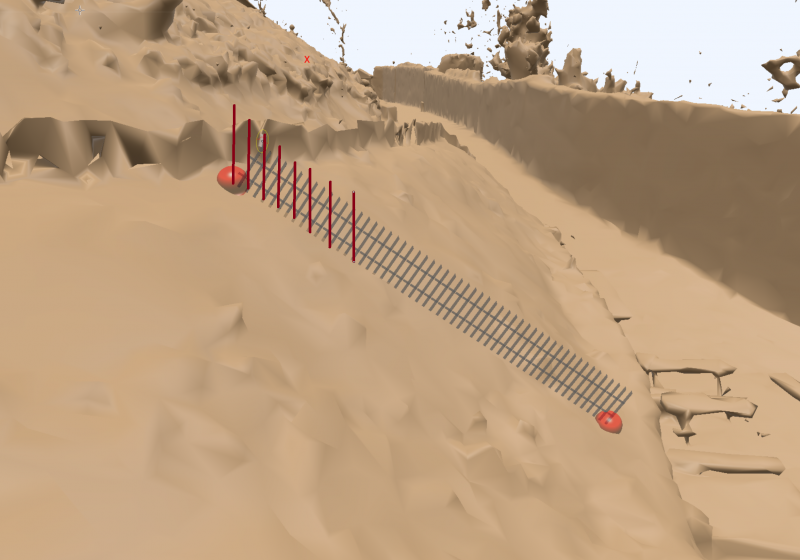
The red lines are desired orientation. If its not possible with the curves tool, is there any other tool to place automatically shapes along the line and rotate them?
Thanks a lot
-
Thanks Carlos one more time. At the end it wasnt about intersections in the shape. Even when I used the basic cube shape, the problem was still there. The solution was to set the Y-spacing (when you import the shape into the 3DCoat tool) to 1.1 instead of just 1. Looks like it cant handle when single pieces of the curve are "touching" itself. But it looks like a basic workflow to me, I would expect its gonna be possible or at least there will be some info about this behavior
-
Hi Carlosan, thanks a lot, but its the same...
-
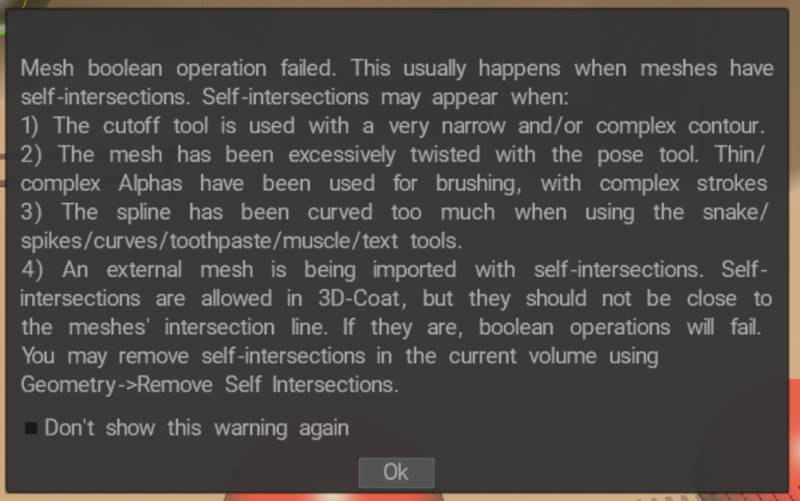
Hi guys, Im not sure how to report bugs, as i cant login to Mantis tool, so I will post it here...
I created a custom shape in Blender to be used in Curves tool. The shape's obj is attached... When I tried to import in into the Curves tool, it threw an exception - with the dialog to save work. But sometimes it worked. The shape was imported to the tool, I could have used it, but when I clicked on Apply to add it to the scene it displayed an error about the self-intersections. But its really simple shape and it didnt work even if there were no intersection with other shapes. Sometimes when I clicked on Apply, it didnt show any error, just make the application nonresponsive and after several minutes I need to manually shut it down.
Thanks for any help. Would really need to use this tool with custom shapes.
-
At the end it was "Smooth normals" in Blender what did the trick.
So my journey with the baking is finished. I can live my live again. Thanks a lot Carlosan
-
 1
1
-
-
Yes, they are inverted. I checked it in Blender. But what to do about it? On the source model they are ok, so they are inverted during the baking. And there is a lot of them, so no way to fix them manually
-
So my noble ride with baking continues... As I wrote in te previous post, I have "holes" in the new model with baked in textures. As you can see on the first video. There are not there on the original model.
I though I will solve it by displaying the model with double side rendering... Well... No... When I use double side material (its threejs), some parts of the model are blinking, as you can see there (on stairs next to a tower for example):
When I use single side rendering, there is no blinking, but there are holes... With the double side, there is blinking, but no holes... Heeelp
")
Thanks
-
Ok, so after a week of struggling I managed to do it somehow. Here is my workflow:
- import original mesh into paint room
- in retopo room import the edited mesh to which I would like to transfer textures
- Bake -> Bake w/ Per pixel painting w/ Displacement
- go back to Paint room, where I have now two objects. Original one and newly painted edited one.
Textures look good on the new one, thats cool, but... Yeah, there is always but... Some of the faces on the newly textured object have wrong normals, so they appear as holes when the model is displayed with a one side rendering. On the source object they are ok, so they must have been messed up during baking.
Any advice on that?
Thanks
-
1
-
I feel like an idiot and I am a bit frustrated already, but I cant find a way how to do that. Other way around... Lets say I have a properly textured object in Paint room, I want to send it to Sculpt room, make some changes there (remove some parts) and then send it back to Paint room and continue painting... Is there an easy way for that?
-
Thanks a lot again Carlosan. Looks like a baking should be the way to go for me, as I have original textured object and the altered one, to which I would like to transfer the texture. But documentation for baking is really bad and even youtube videos are not very clear to me.
-
Hi Carlosan,
thanks a lot, sounds simple, but... how exactly I can delete the faces in the UV workspace? I cant see any tool for that.
And btw. UV workspace has around 3fps so is hardly useable, any tip how to increase it? In other workspaces i have around 200fps...
-
Hi guys, bare with me again, this looks like a rookie question, but... I have a textured model (from photogrammetry workflow) and I need to remove a part of it (a tree). Ideally I would expect that UVs and textures will be recalculated as I remove some part of the model. Is something like this possible in 3D Coat? Or what is a workflow for such a scenario?
Btw. its not possible to modify the object at the first place and then run texturing. I need at first textures it and then modify it.
Thanks a lot
-
Hi guys, lets say I have an object (photogrammetry workflow) with 16 texures (4 096 x 4 096) and I want to "resize" it to just 4 textures (with the same size) Is it possible with 3DCoat?
And furthermore... is possible to for example choose which areas to reduce the size and where to keep original textures? My idea... I am taking photogrammetry models of castles, but lot of places on textures are occupied by trees, surrounding areas etc. which are not really important, but takes a place on textures. So I would like to reduce "resolution" of textures at these places to keep better textures resolution on the important areas. Is it possible?
Thanks a lot
-
Thanks a lot guys, at the end I partially succeeded with separate alpha maps as Carlosan suggested (load them directly into threejs engine as a transparency maps for an object) To bake transparency directly into GLTF was making the file much bigger, so it wasnt usable for my scenario, as i need the file as small as posibble.
But when I loaded the transparency maps with threejs, it caused a significant drop in performance and brings compatibility issues on mobile devices... so at the end I stop trying to make it transparent and just paint the edges to a background color... Really stupid and simple, but fast and without any issues... But yeah, doesnt look so good.
-
Sure, my goal is to have GLTF file with baked in textures and transparency files. Im showing it in browser in WebGL (Threejs) engine. Well, if something like this is even possible. I mean to have the separate transparency files there.
So my last question was how to put it together. When I can now export the model with transparency files or rgb textures.
Thanks
-
Many thanks... Bare with me, I am really new to 3D... so now when I export it, I have 4 black and white transparency maps... what is next in the workflow? To have there even rgb textures. Then I convert the OBJ file to GLTF.
Thanks
-
Just one more "little" thing... now its perfect in 3DCoat, but how do I export that? I have a model with 4 texture jpg's, but its exported with black instead of transparency... Of cource, I know, jpg's doesnt support transparency. When I export it as a png's, it is transparent. But png's are much bigger and not useable for my puporse. Is there any way how to achive transparence with jpg's? Some kind of other separate texture file that would define transparency layer...
Thanks
-
Awesome, thats the thing I was looking for. Thanks a lot sir
-
Hi Carlos, thanks a lot for a reply. Just not sure if this is the right thing for my purpose. I attached two images: on the first one is the current state with the hard edges, on the second one is the desired state. The edges should be transparent, so not just painted to the background color. I just edit the images in photoshop...
Thanks a lot


Avast found Win64:MdeClass in 3DCoatGL64.exe
in SOS! If you need urgent help for 3DCoat
Posted
Hi guys,
Avast found Win64:MdeClass in 3DCoatGL64.exe and blocked it. I tried online tools and looks the same: https://www.virustotal.com/gui/file/70518994a14a2682ac2344fb556f3d3b724ff078ba95dfabf2ebc8d8d60732cc/detection
Any idea if its false alarm, or whats going on?
Thanks