


Zeddicus
-
Posts
197 -
Joined
-
Last visited
Content Type
Forums
Calendar
Gallery
Posts posted by Zeddicus
-
-
+1 Read about this idea in another thread, love it, want it, make it happen!

-
The tablets I've owned, in order, are the following...
1) Graphire 3
2) Intuos2 9x12
3) Intuos3 6x8
4) Intuos4 6x8
5) Bamboo Pen & Touch
I'm probably the weird one here because I prefer smaller over larger. Unlike the older Graphires, a Bamboo (a first generation one) has pretty much the same capabilities as an Intuos3 so far as tech specs go. It just lacks tilt sensing and the programmability you get with Intuos drivers. I figured if the Intuos3 was good enough for everyone, then a Bamboo should be as well. I turned the touch abilities off though because they don't work too well. I have nothing against the Intuos4 mind you. I just needed something that fit easily in my lap along side a wireless keyboard because of the life style changes I was forced to make due to health problems.
Moving my whole arm to draw has always felt strange to me, as if I'm not in full control of my strokes. It's kind of hard to explain to be honest. I prefer making smaller efficient movements using only my wrist and have never found my ability to draw/sculpt lacking or compromised at all. Everyone is different though so the best advice I can give is to buy your tablet from a place which allows you to return it for a full refund, no questions asked. I never would have purchased the Intuos2 had I done that myself.
-
I really hate having to say this, but there is something wrong with the new smoothing group support. My current mesh has four smoothing groups assigned in 3ds Max. I imported this into 3d Coat (tried for PP and MV), then exported it without changing anything. When it's reimported into 3ds Max, it now says there are seven smoothing groups instead of four. Not only are there more than there should be, but some polygons have been combined so that they're in multiple groups. One neat thing I can do in Max is select polygons by smoothing group and when I choose SG #7 for example, the polygons that become selected show as also being in either 1, 2, 3, 4, and 5 (or some combination thereof). I've tried both ways of exporting this mesh from 3D Coat (File menu and Textures menu) and both end up with the same incorrect result. I don't have access to Modo anymore so I can't test this out further unfortunately. Hopefully another user will speak up with their own results.
Edit: Performance with 3.7.10 is worse than 3.7.09. I've been working on a retopo project for the past week and had very little trouble using a 2.2 million polygon model as my reference mesh. After updating, it now stutters very badly and I can't work with it at all. Tried the GL version, got the same result. Is anyone else finding this to be the case?
-
Ah, thanks, that fixed it!
Kind of strange though. Is this a bug? Sure don't see it as a feature.
If you're absolutely sure you didn't change it purposely or by accident, then it very well may be a bug. It's not one I've ever encountered though so I can't say for sure.
-
You are a truly awesome developer, Andrew. I'm looking forward to testing out those smoothing groups. You've earned a great BIG thank you!

-
If you don't see No Symmetry here you may want to reinstall 3DC.
Or just click the menu item Windows > CustomizeUI and turn No Symmetry back on so it's displayed (Edit: Go to the Voxel room first, or load a mesh so the symmetry menu is displayed). Make sure you press CustomizeUI a second time to lock things so they can't be changed again.
-
Did any of these suggestions get implemented? I really need a grow selection option for faces similar to how most 3D apps do it (e.g. 3ds Max). I could then move this selection to a different retopo group, allowing me to hide everything else. It's a ton of pointy teeth that need editing in the retopo room and it's too tight of fit to select each face one at a time, nearly impossible actually since they are not perpendicular to the surface they jut out from. Since they're basically cylinders, It would be so easy to just select the tip and grow that selection until it reached the base. Going to cross my fingers and toes in the hope that this is indeed possible, or will be soon.
-
I saw no mention of going into the "Retopo > Baking_parameters" to make sure your in and out scan depths were correctly configured prior to merging. Maybe that's the problem?
-
Quick update: I still can't get my floating popups to stay combined and where I want them in 3.7.09, but they will stay put if I dock all of them directly to the UI instead. The order of my tabs (Objects, VoxTree, Groups, et al) aren't remembered and it feels like a waste of valuable screen space, but at least it's a useful start. Off to check out Mantis next I guess.
-
I've been doing retopo work and discovered that creating new polygons via the strokes option completely ignores the "Virtual mirror mode" setting which I have turned on. Is this normal behavior? As it is now I have to exit symmetry mode, delete the extra polygons which are being made on the other side, then turn symmetry back on. This leads me to believe it might be a bug but I honestly don't know for sure.
-
-
And here is what happens when I try to dock the Groups popup on the left. The UV preview popup will dock fine though.

-
I would agree that shaders, and by extension the renderer, are the weakest parts of 3D Coat right now. ZBrush does do a much better job IMHO, but it's not perfect either. Lights can be a real pain for instance, one thing I feel is better in 3DC.
-
Thanks for the quick reply. I have a tendency to ignore that particular room lol. Docking the relevant panels is a good idea too so thanks for that as well.
Edit: Ok this is really driving me nuts. I'm trying to dock the Objects and UV preview popups into the Groups one. If I go to another room, such as the UV room, all the popups there become messed up and scattered individually across the screen (1600x900). Then when I go back to the Retopo room, I find the same thing has happened there. Neither "Store workspace" nor "Store this page layout" work properly to solve this problem either. When I reloaded my saved single page layout (filename: retopo room.onepagelayout), all my scattered Popups disappeared completely. So what's the trick to customizing 3D Coat so that my changes properly stick? Thanks again!
-
Is there a way to hide my high resolution reference mesh while working in the retopo room? I want to be able to see just my low poly retopo mesh by itself. Thanks!
-
Helo, I startet this thread coz I love my sigma dp2s so much. The dynamic range & colors are one of the best for small digital compact cams I think. But ..... its a little bit sad, that the dp2s has not so an wide angel, coz I want create also my own panoramas or even 360°/180° spherical pans for 3D programms.
So I think, that I will buy the sister of the dp2s, a dp1s or better the dp1x. For shooting nice panoramic landscapes/skys and so on
- yes, with dp2s I can also stitch photos (like in the sample image from me) ... but I need maybe 40, 50 or more pictures? With dp1x maybe only 15-20?ps.
I know, a DSLR is better, also a good fisheye objective or super wide angel objective + panoramic head/nodal head, but its too expensive for me.
But I know that I did also made panormics free hand only, and only with my dp2s, but the dp1x is like the dp2s, but withe an wide range objective
ps.
I want also create (half)spherical materials with my cam (dp2s or dp1x). I know also, that a fisheye is very good, but its expensive and the 'fishey' boarders are often not sharp enough....
To be honest, I'm not sure what the question is here. Do you want people to tell you what you should buy or are you asking if your choice is the right one? You've pretty much stated all of your possibilities. From reading your post, your choices seem limited to using your Sigma DP2s as is, or get a fish-eye adapter for it (poor quality as you say), or a new camera such as the Sigma DP1x you mentioned, or a DSLR plus fish-eye lens which you can't afford. There are no other alternatives, that is all of them.
If you can't afford a new DSLR, what about a used one? It doesn't have to be top of the line either. I'm still using my Canon EOS 10D for example and the quality is great, not to mention far from obsolete (only in some peoples minds it is). Back in the early 90's, when I first got into photography, I was unemployed and broke. Dirt cheap used stuff was all I could afford, but I was happy to have it and it was plenty good enough to win contests. So don't feel bad if you can't afford the latest, greatest gadget. Good photographers take good photographs. The camera is just the tool. Would a top of the line screwdriver make someone a better electrician? No and that's how I choose to look at it lol.
Getting back on track, I've done panoramas using a 35mm-70mm f/4.0 zoom lens hand held. Five shots at 35mm stitched together is plenty panoramic (almost 180 degrees FOV) and your Sigma is equivalent to a 41mm on a 35mm full frame camera (which would be 65mm on my DSLR because of the 1.6x crop factor). I don't think you would need to stitch "40, 50, or more" shots together at all with your current Sigma, unless your goal is to create one super high resolution image (which can be fun too hehe).
Your camera shoots images that are 2640 x 1760 pixels in resolution. This means five horizontal shots from your Sigma stitched together would end up being 13200 x 1760 pixels (aka 23.2 megapixels) which should be fine for printing 55 x 7.3 inches at 240 dpi, maybe even a bit larger with good upsampling software.
-
Fwiw I fixed the seam visibility by creating a 16x16 grey bitmap and loading it as a checker style.
-
+1 Anything that makes retopology easier and more efficient will always get a vote from me.
-
Those first three icons are basically brightness, contrast, and light position. Use them in the other rooms to get your mesh+shader looking good. The first two do have an affect on your mesh when it's in the render room (the third one doesn't), but if your happy with the way they're set when viewing your mesh in the other rooms, you should probably just leave them alone when in the render room. I do anyways.
The Params in the render room are what you want to use for tweaking the final look of the actual render. Lightness is basically brightness. AO and DOF are self explanatory (hover over them for hints). Rotation angle (which orbits horizontally) and Light height (vertical movement of the light from top to bottom) both control where the light is positioned in 3d space. The light will always target your mesh.
Light scattering is pretty much GI (global illumination) and does exactly what the name suggests, ie scatters the light rays bouncing off of your mesh. Turning it up will make shadows lighter, more diffused. Turning it down will make shadows harsher, more contrasty.
Color is the color of the light. It too can affect brightness so use it together with the lightness value for proper exposure when rendering. Intensity I'm not sure about. It didn't really do anything the last time I played with it, so I just leave it at.
The Add Light button allows you to add additional lights to the scene. For example you could have a primary light plus a second light that acts as a fill light for shadows (though turning up light scattering can also have this effect). Use the Realtime render option to preview your changes as you make them for a more accurate preview (if you get overlapping images, move the mesh a bit to refresh the window).
-
@ The Candy-floss Kid
Modo allows users to paint vertex color maps so it should be able to render them too. Then again, maybe not. Taking a quick peek at the Luxology forum, I see geothefaust asked this questions already:
-
Well that's a limitation to the smooth for voxels... the lowest your voxels.. the smoothier and indeed destryoing all details.. BUT a too high voxel .. and the smooth is almost inefficient.. so it's directly realted to the Voxel density me think... am I wrong...?
That sounds right to me. ZBrush is the same, and possibly Mudbox too. In those cases you just lower the subd level to make stronger changes, then go back to the top one. The closest thing in 3DC? Press the downgrade (aka proxy) button in the VoxTree, smooth, then press it again when your done. Note that if you're working with voxels, doing this will change it to surface.
Edit: I forgot to mention that I find the smoothing increments annoying when holding down the RMB and dragging up/down. It changes in 3% to 4% increments which is too much on a low resolution mesh, and not enough for a high res one. I propose 1% for low res, 3% for mid res, and 5% for high res, or let the user set their own increments, or change the strength algorithm internally so that 50% at low res feels exactly the same at high res. Depth is even worse. A tiny little movement of the mouse at 0% makes it jump to 9% or more. With the Wacom it's worse, jumping from 0% to 16% or 19%. This feature loses it's convenience and forces me to manually type in my percentages or click/drag on the functions name (which does change in 1% increments).
-
In case people aren't aware, the smudge tool is the third one down in the left row. Another way of putting it is that it's two down from the paint brush tool. I was using it earlier today while testing Ptex and found it has a tendency to generate blocky artifacts if I paint too vigorously.
-
Can't reproduce any of that problems even if tried a lot. Maybe short video will help a lot.
I can't get it to happen with 3.7.07 and I've tried everything I could think of. It happened often with 3.7.06 though. So either it requires a specific set of circumstances in order to happen, or recent code changes to the UI have fixed it somehow. I can still select islands in the UV preview window by clicking through overlapping drop down menus though, which is the issue AbnRanger posted.
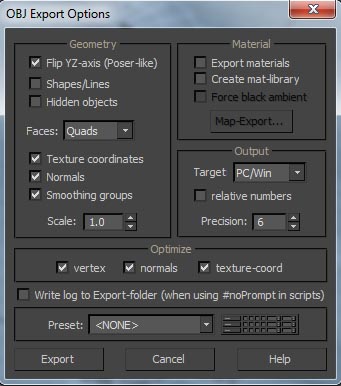
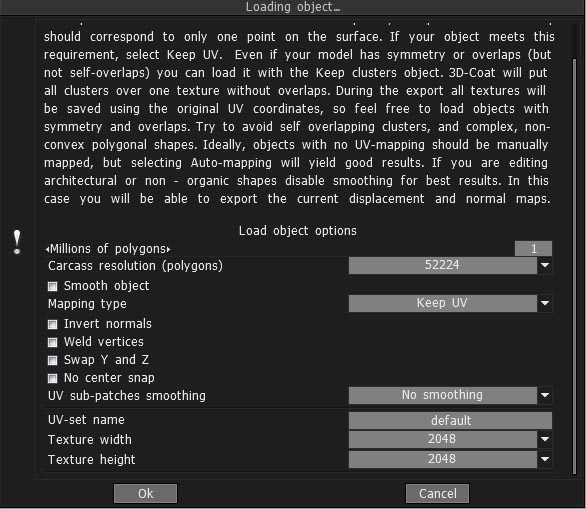
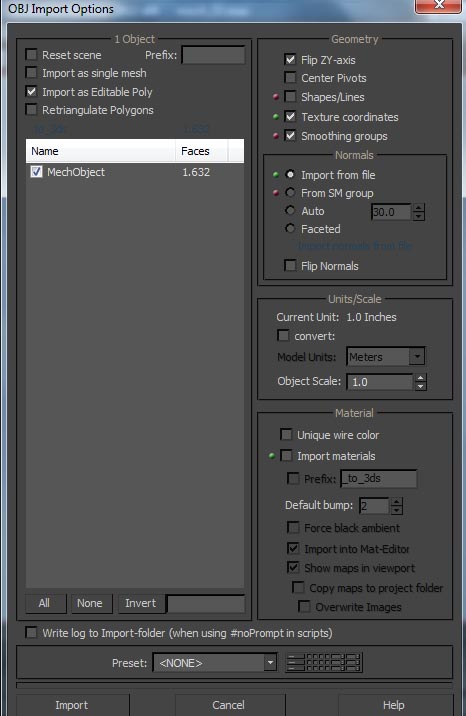
If you exporting from some 3D package you should export OBJ file with normal. 3DC uses normals to detect smoothing groups.
That is exactly what I've been doing.
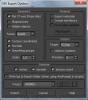
3ds export settings:
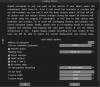
3dc import settings:
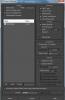
3ds import settings:
When I choose the "Export UV" option (as OBJ) in 3D Coat (which has no export options related to this), it takes all of my polygons and adds them to smoothing group #1 while deleting #2, #3, and #4. I know for a fact 3D Coat is seeing all four of my smoothing groups on import because if I turn the "Smooth object" toggle on and keep the "Ignore smoothing groups" and "Auto smoothing groups" import options off, my mesh looks exactly how it does in Max with it's turbosmooth modifier (which is set to separate by smoothing groups, something I use very often). As an aside, an OBJ imported into 3D Coat with those particular settings ends up with slightly altered geometry due to the smoothing it's applying. These alterations then get exported by 3D Coat which is another reason why I've been importing my OBJ's with all of 3DC's smoothing options turned off, the original reason being an attempt to stop 3D Coat from destroying my smoothing groups.
Another interesting quirk I just discovered in the UV room is when using a custom texture. If I alter the texture in the paint room and resave it, 3D Coat won't reload the file for display when chosen. The workaround is to change the file name of the texture upon each save and then load that new image file into the UV room checker. Kind of annoying but not really a big deal. I only discovered this because I was trying to fix some distortion.
-
I docked my UV preview window on the left and noticed while clicking on UV islands that my clicks were going through the window and onto the mesh behind it. This results in marking seams you don't want marked, often without realizing it's happened. Doesn't seem to be an issue with Add clusters and Edge loops modes, just Mark seams.
Also is there a way to keep 3D Coat from destroying my smoothing groups? I bought a mesh over in OBJ format so I could do the UV's and discovered after finishing and exporting back to the originating app that my smoothing groups were gone. I asked about this in the new user area but never got an answer. They were time consuming to set up in the first place, and took just as long to redo them. On top of that I may need to send my mesh back to 3D Coat for more UV work. If there is something I'm missing or some trick to it, please let me know.

3D-Coat 3.7 updates thread
in New Releases, Bugs Reports & Development Discussion
Posted
If I understand correctly, and this is just a guess, I would say yes regarding 2 groups that don't have adjacent faces. Say I have a 6 polygon cube in Max. I can select the top polygon and bottom polygon and add them both to smoothing group #1. I do this a lot because of the turbosmooth modifier, which can subdivide/smooth based on those smoothing groups. It's also orderly and efficient to apply a single smoothing group to multiple areas, especially on parts that look the same. Here is an example:
1) Low poly mesh with several smoothing groups assigned (no turbosmooth).
2) Turbosmooth applied, separate by smoothing groups option is turned off.
3) Turbosmooth with separate by smoothing groups option turned on.
The effect is a bit like creasing edges before subdividing. I prefer smoothing groups for this though because it allows me to easily reselect a group (or groups) of polygons for further editing if I find it's needed later on.
About performance, I loaded my last .3b save from 3.7.09 into 3.7.10 so that I could finish up the last little bit of retopo work it needed. The difference in performance was very noticeable. No trouble panning/rotating/zooming in 3.7.09, but doing so is nearly impossible in 3.7.10 and nothing else about my PC has changed (no new software, driver, or hardware).