v2024.22 add a new option “Edit->Prefs->Tools->Don’t group vertices per objects in OBJ files (like ZB)” for better compatibility when you need to keep the vertex order in OBJ files.
Anyway, Coat preserved vertices order, but in some case it is not enough, and vertices should not be grouped. In this case you need his option.
For texture Per Pixel Painting
To export DAZ figures on 3DC for painting, you need first to follow some steps to get it working without issues.
On DAZ you need to export G3 figures or G8 figures without eyelashes.
G8 has its eyelashes as a separate piece of geometry and when you export that out the eyelashes actually gets merged with the face and that causes issues with painting.
But with G3 there is not separate piece of geometry over here for separate eyelashes.
If you like to use G8 figures before exporting the model remember to delete eyelashes pressing RMB over the model layer and select Delete G8 eyelashes.

Remember to export the base mesh without SubDiv.
– To export the model without textures be ready that Collapse UV tiles and and Write surfaces are not enabled.

– To export the model with textures be ready that Collapse UV tiles is not enabled and Write surfaces is enabled.

Preserve uDim tiles
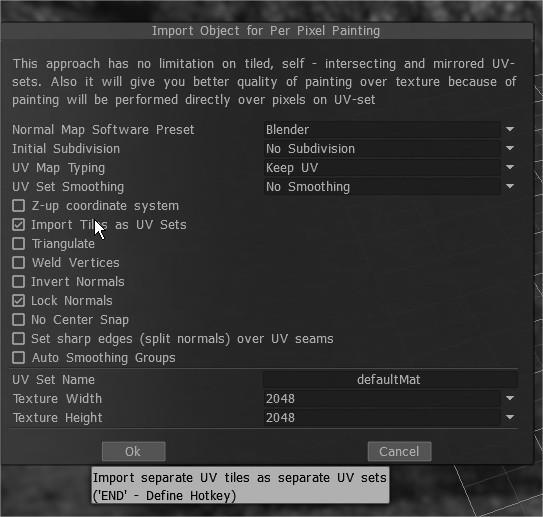
In the Splash screen you want to choose Paint Per Pixel or Choose File > Import > Model for Per Pixel Painting.
As Genesis3 uses UDIM tiling, you need to import with UV tiles support on 3DC.
This option, paint DAZ characters with UDIM workflow allows you to paint seamlessly anywhere on your character with no limitations, and to avoid the old method of paint objects layers on by one.
So import the Daz figure turning on Import Tiles as UVset.

The model is imported into 3DCoat with all the udims uv layouts preserved.

with the model objects zones

Iray shader use both types of shader mixing:
To select the correct workflow select it on Textures Menu.

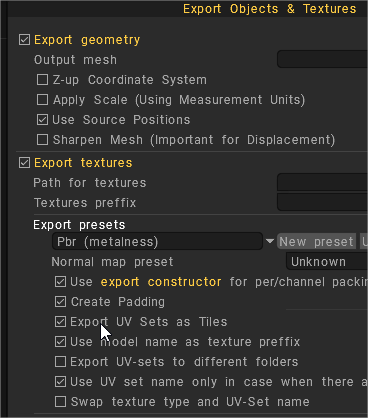
Once you finished painting, export the texture maps from File > Export Objects and Textures.

Remember on export panel turn ON Export UVsets as tiles.

After export all the texture maps to a folder, on DAZ locate every model surface and press image icon to load the new texture map.

Browse an go to the folder where you exported that maps from 3DCoat.

You also have to do every map that DAZ figure have selecting it after upload into DAZ.

For Genesis 2 models
For Genesis2 models there’s an option in your DAZ obj export dialogue to collapse the UVs, which is an alternative to previous suggestion.

It would also give you a collapsed set of UVs to import into Genesis within DAZ Studio, provided you export the base mesh -without SubDiv-
For texture Microvertex Painting
When you need to provide your model with high levels of “actual” displacement by means of sculpting or “painting” this displacement, the best mode to use is the “Microvertex” mode.
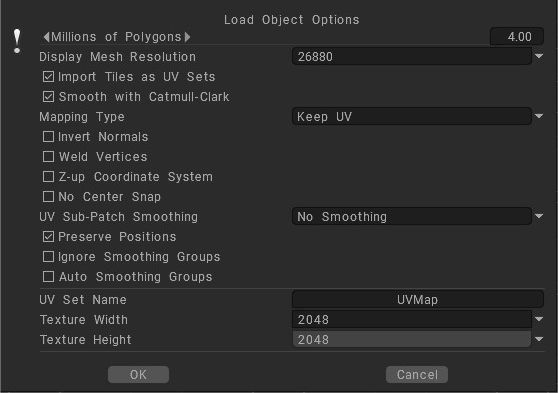
In the Splash screen you want to choose Paint Over the Model with Deep Displacement or choose File > Import > Model for Microvertex Painting (MV).
To load the model in microvertex representation 3DCoat requires one to one correspondence between the texture and surface points; one point on the UV-Map should correspond to only one point on the surface.

If your object meets this requirement, select Keep UV. Even if your model has symmetry or overlaps (but not self-overlaps) you can load it with the Keep clusters object. 3DCoat will put all clusters over one texture without overlaps.
The mesh consists of two levels of detail:
1. Display mesh (mid – poly mesh)
2. and high resolution mesh.
Usually you see the mid-poly mesh in the viewport with a normal map created using the high-poly mesh.
During the export all textures will be saved using the original UV coordinates, so feel free to load objects with symmetry and overlaps.
Try to avoid self overlapping clusters, and complex, non-convex polygonal shapes. Ideally, objects with no UV-mapping should be manually mapped, but selecting Auto-mapping will yield good results.
If you are editing architectural or non organic shapes disable smoothing for best results.
In this case you will be able to export the current displacement and normal maps
Creating Morph Targets
Tweak room is the only room which CAN edit the Paint Model, moving vertices for morph w/ or wt/ symmetry activated. Once you moved the mesh faces to new position switch back to Paint Room and export the model using Texturing > Export UV or File > Export model and texures.
When you import the mesh in DAZ Morph loader, the model’s vertex keep position and morph is loaded successfully.

As is show on this picture.

You can also use this other method. This video covers the updated process of creating Morph Targets or Blend Shapes in 3DCoat, with the purpose of exporting to a major 3D Animation application.
UV tile support and usage of multiple UV
This videos covers (in more detail) the addition of UV tile support and usage of multiple UV:
 Français
  English
 Українська
 Español
 Deutsch
 日本語
日本語 Русский
 한국어
한국어 Polski
 中文 (中国)
 Português
 Italiano
 Suomi
Suomi Svenska
 中文 (台灣)
 Dansk
Dansk Slovenčina
 Türkçe
 Nederlands
 Magyar
 ไทย
ไทย हिन्दी
 Ελληνικά
 Tiếng Việt
 Lietuviškai
 Latviešu valoda
 Eesti
Eesti Čeština
 Română
 Norsk Bokmål