


simmsimaging
-
Posts
225 -
Joined
-
Last visited
Content Type
Forums
Calendar
Gallery
Posts posted by simmsimaging
-
-
If you are using the quadrangutlate feature, I recommend using from the vox tree only the quadrangulate feature.Your voxel sculpt will then load in the retopo room only. Turn off symmetry if it is on and check to make sure that the quadrangulate covered all areas of your sculpt. In the retopo room use the retopo menu at the top, choose per-pixel with normal map or merge with microverts as that bakes a displacement map on your sculpt.
Increasing resolution helps for higher detail voxel sculpting. Think of voxels as a pixels. The more pixels you have the greater the detail in your painting.
I start out at a lower resolution of voxels to quicky build major forms of my sculpt.( like a base undercoat in painting to get the forms down).
I then start increasing my resolution for higher details.
Thanks for the help. I have been trying this approach and running into the same problem of my mesh falling apart. As soon as it hits the retop room you can see the mesh is a mess (see image below), and short of manually redoing it I can't seem to get a decent result. Is it always necessary to manually retopo a voxel sculpt, or is there likely something wrong with my approach/file?
I have uploaded the 3DC file if anyone has a moment to look at it and see if they can get a decent quadrangulation out of it I would appreciate it.
b
File:
Filename: Splash_Sculpt_01_04.zip
Filesize: 14.3 Mb
Download Link: http://www.simmsimaging.com/xfile/3o7xqwmwe07z
Image of problem:

-
I'm finally getting some time again to play with 3DC for sculpting (use it mostly for painting) and I'm having a lot of problems figuring out how to use the voxel sculpting, and get the mesh back out again for use in Max/modo etc.
It seems really hard to get nice clean hi-res details in voxels, they always appear a bit... chunky? and smoothing problems seem to be regular. However, upping the res a few times certainly helped. Is lowering the density supposed to help that problem too?
Anyway - having gotten a moderate level of detail I thought I would sculpt the higher res details in the paint or sculpting rooms. The problem is the mesh comes in with really poor detail when I use quadrangulate for per-pixel. When I tried using the micro-vertex mode I got better detail in the key areas, but other parts of the mesh are totally screwed up. (see imagaes - the one shows the voxel model and the other the MV exported version). What am I doing wrong? Is there an easy way to get a nice clean version of the voxel sculpt over to the paint room without losing all the detail?
btw - I did try just exporting straight out of the voxel room, but the resulting mesh was a 10,000,000 poly monster - a bit cumbersome to work with

Any advice or help would be appreciated as the docs are a bit thin on the ground for this stuff.
b


-
The visibility controls for objects and materials are a bit clunky if you are working with multiple sub-objects. There is also a bit of conflict between the visibility control for sub-objects and the one for materials. If you hide by sub-object and then show and hide by material the sub-object does not update so it still shows it as invisible in the palette. To get it to work from sub-object again you have to click show and hide again. It would be good if changing visibility in one would update the other.
Also: there is no quick way to isolate only one object visibility using materials or sub-objects. It would be handy to have a feature like Photoshop where you can alt-click on the eye icon and it would hide all other sub-objects or all other materials etc.
b
-
That's the problem with using this technique for applying decals. I don't want to convert every one of my images to a special format and file type, just so that I can add them to another image.
Agreed.
-
What does it say on the bottom bar about size?
It says "fps: 35 Free: 11199MB, Pointers 1241784 "
That is when I have imported the part that does not show up properly.
b
-
Perhaps your original thought of inadequate memory is the issue.
Looking that way, but there is no real indicator that I know of to be sure. The poly count of the total objects is about 400K in Max, but I am having problem before getting all of the pieces in, so probably more like 250-300K. I have four 4K maps in the 3DC file as well, the 5th one is where I have problems right now.
-
I will give it a try, but I have already rebuilt it about 4-5 times trying to import all the pieces. Different parts come out with this problem at different times, not sure if it's about the order or what it is. I'll give it another go though, just to be sure.
b
Nope, it seems to be something else. I imported the same bunch in a different order and now it's another part that is coming in black. Looking at the materials it looks like the normal map for the black object is different - darker blue. Can the normal map actually invert the normals? Not sure what the deal is, but I am unable to paint on the black objects. Another note about them: if I turn on "environment shade" instead of smooth shade they show up as grey (default import colour like all the other parts) so you don't see the black anymore, but you still can't paint on them.
Thanks for the input though, appreciate the help.
b
-
It sounds like your "current working file" may be corrupt and needs rebuilding.
I will give it a try, but I have already rebuilt it about 4-5 times trying to import all the pieces. Different parts come out with this problem at different times, not sure if it's about the order or what it is. I'll give it another go though, just to be sure.
b
-
....
1) Why 10 UV sets? Where are these coming from - why not 5 for the material ID's or 27 for the unique objects? When I do import them I see all 27 subobjects in 3DC, so it sees them all on some level. I have no idea how to control that properly.
2) Why the odd name wire/number name? If 3DC is seeing the sub-object names - which it does because each has its proper name in the sub-object list, then why isn't the UV set getting named properly too?
Thanks in advance for any help.
b
While waiting for some help on this I was playing with other export options and it just made me more confused
I exported the same object set out of Max as an fbx file instead of .obj and it imports into 3DC with 27 uv sets, but all have blank names by default. How do you possibly control this so you can choose which objects can share a UV set and texture, and which get there own individual ones?b
-
Hi, I had this happen too. If you are importing a .obj then you need to delete the "texture tag" before exporting, otherwise your imported model will import with those problems. Also make sure you align the normals before exporting too.
Thanks, I gave it a try but it did not seem to help. I am able to import the same model on it's own in a new file with no issues, but as soon as I try to merge it into the current working file it comes in either totally black, or black and partially missing - see the attached image.
The model is there in some way because wireframe view shows the whole object, but you can't paint on it properly.
Is this possibly some kind of memory related issue? Wondering if 3DC and my computer just cannot handle the textures/mesh sizes involved so this is what it does?
b

-
Every one in a while I import an object for PP painting and it comes in with an all black texture, and when painting in the viewport nothing seems to happen. Occasionally they also come in with many faces hidden, or with a strange greeked text opacity map. Not sure if this is all one problem, or different things, but anyone know why this would happen?
It's only the odd time and I can't figure out what I'm doing different (importing .obj files out of Max).
Thanks in advance
b
-
A quick question about the importing: I find that sometimes when I export a group of objects as .obj (from Max) and import to 3DC the import gives me one UV set and object, although the sub-objects show up fine in the list, and sometimes the import will show a different uV set for each object, so each gets its own texture. How do you control that?
Also: 3DC often generates a name like "wire11199302" for the uv sets of each object - could it use the sub-object name instead so we can tell which object is which on import and name the uv set properly?
Thanks
b
Just to clarify this issue: the uV naming now seems to be working, thanks Andrew, but I am not at all clear on how the UV sets get determined in a multi-object import.
I exported a model out of Max. It has 27 separate objects as parts. Each has a unique name like "hinge1", "rivet 2" etc. They came from 5 layers in Max, and there are 5 material id's assigned to them. I used some Unwrap UV modifiers to arrange some objects UV coordinates so that I could put several of them together on single texture maps, but each has it's own uv's.
I export that out of Max.
When I import for per-pixel painting in 3DC the dialog box I see 10 UVsets (so 10 materials) and each is name some variation of "wire1133002" (wire and some string of random numbers). What I don't get is:
1) Why 10 UV sets? Where are these coming from - why not 5 for the material ID's or 27 for the unique objects? When I do import them I see all 27 subobjects in 3DC, so it sees them all on some level. I have no idea how to control that properly.
2) Why the odd name wire/number name? If 3DC is seeing the sub-object names - which it does because each has its proper name in the sub-object list, then why isn't the UV set getting named properly too?
Thanks in advance for any help.
b
-
Thanks Andrew. Changing the UV sets on import, or using the UV manager was not working before (it would not stick). I will try the update this afternoon.
b
A quick question about the importing: I find that sometimes when I export a group of objects as .obj (from Max) and import to 3DC the import gives me one UV set and object, although the sub-objects show up fine in the list, and sometimes the import will show a different uV set for each object, so each gets its own texture. How do you control that?
Also: 3DC often generates a name like "wire11199302" for the uv sets of each object - could it use the sub-object name instead so we can tell which object is which on import and name the uv set properly?
Thanks
b
-
Win version updated to 3.00.08B
Changes:
- UV-Sets in DP/MV can be renamed in import dialog
- smoothing in high res meshes in surface mode improved. It still has big potential to be improved.
I had only couple of hours today, so there are not too big changes.
Thanks Andrew. Changing the UV sets on import, or using the UV manager was not working before (it would not stick). I will try the update this afternoon.
b
-
What about naming - it was not fixed, what about export - please help to reproduce, it always exports correct on my side.
(possibly archive and send me file)
I was referring to the problem I first brought up in this thread:
http://www.3d-coat.com/forum/index.php?sho...amp;#entry22127
I will try and sort out a file for you. Where do I send it?
b
-
This is beta update for 3D-Coat V3. It is "beta" because new surface <-> voels workflow was introduced.
Anyway, many but not all reported bugs was fixed.
Hi Andrew -
Just wondering if the UV set naming and texture exporting problems were fixed in this update?
Thanks
Brett
-
Thanks - I'm sorry I didn't see this sooner, but I did not receive any notification of replies. I have that problem with this forum for some reason. I found the lock button - thanks, it may help. It would still be handy to be able to see what the texture scale is - maybe relative to screen? - because making it relative to the object size on screen, which I think it is by default in 3DC, means all the variables are relative/inconstant.
b
-
I'm using 3DC for mapping some wood textures to several parts (sub-objects) and I'm using a bitmap as a material and painting it in. I have to zoom around and rotate the object to paint all sides and I'm having a really hard time getting the texture scale to be consistent from area to area when the zoom changes. Is there some way to see or control the texture scale? I keep hitting 'reset' in the preview options and then eye-balling it but it's not very precise. Is there a way to do this better?
Thanks in advance,
b
-
Login with your email? The wierd thing is there's a checkbox for the mac version. I thought it was a separate purchase.
Every time I try it dumps me back to the starting registration page.
-
Congrats guys - I hope it goes as well, it really is a great tool.
I'm also unable to login at the d-load page though, something seems to be amiss there.
b
-
We are just now trying to figure out voxel sculpting, but we are having major problems with smoothing in the exported objects. We are converting to quads, exporting as .obj and opening in Max and there are smoothing artifacts all over the place that we can't get rid of. Is this a common problem or something I am doing wrong?
Thanks in advance
b
-
I think Andrew mean this tool:
It says 'draw with extrusion' when I mouse over it so I thought it was for depth only or something. Thanks for the help.
b
-
Thanks Andrew - but how do you turn on 'airbrush' mode? I can't seem to find it in the manual. The only additive control I could find was in the depth panel. Does that affect colour too?
b
-
Hi all -
Just getting back to learning 3DCoat and I cannot understand how the transparency works with colour. I work with a tablet so in most programs I prefer to keep transparency med-high and then build it up with pressure but this doesn't seem to work in 3DC. If I set the transparency to less than 1 I cannot build up a colour to full opacity even with many strokes. If I go to more than 1 I have trouble getting lighter opacities with my tablet.
How does the transparency slider work? If we correlate it to Photoshop etc is '2' equal to 100% opacity? Is there a way to set it so that colour will continue to build up to 100% opacity?
Thanks in advance.
b
Problem converting voxels to mesh
in General 3DCoat
Posted
Thanks Polyxo and Tony.
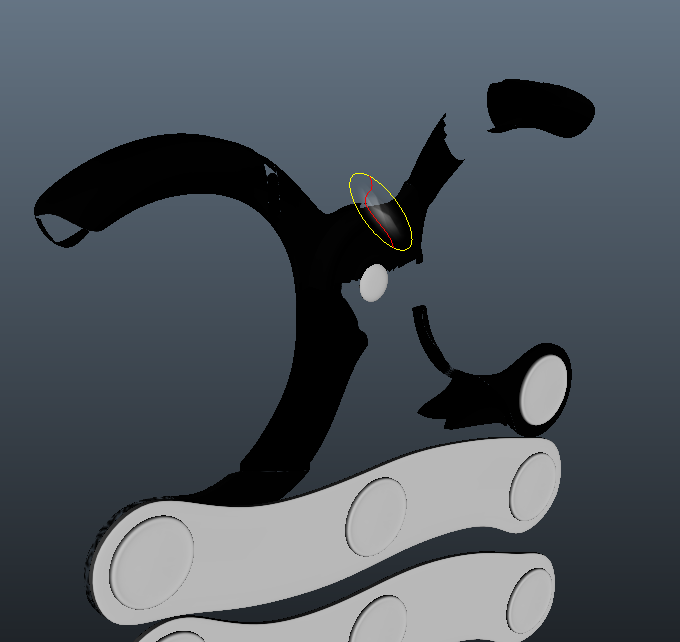
Tony - almost missed your reply, pretty subtly tucked away in there I am not sure what is happening there, but it does looks like two objects, and, oddly, when I zoom into the object in the retopo window I can actually find another copy of the whole mesh inside it, but it's about 1/3 the size. The voxel model is a single object, and does not have anything inside it that I can see. Very weird - any idea what that is about?
Polyxo: thanks, I will grab that beta and give it a try.
b