


psyborgue
-
Posts
248 -
Joined
-
Last visited
Content Type
Forums
Calendar
Gallery
Posts posted by psyborgue
-
-
Lol she's Bad Ass, she looks poiseness hehe, Great Job

Thanks!
-
Nice wrinkles on this! Did you know you can use "Grab" to take screenshots on mac? Very easy!

Yeah. But at the time I was using windows (on my mac) since there was a bug with the mac version at the time (grab only works in mac os).
In mac OS, taking a screengrab is command+shift+3 for the full screen or command+shift+4 for a cropping. Command+shift+4, hit space bar, and then click on a window takes a shot of a particular window (nicely alpha channeled with drop shadow too). Doing any of these will drop a picture onto your desktop but you can change the default location using the command line.
-
Nice toad monster. Makes me want to grab my shotgun... which depending on your intended purpose might be a good thing.
Oh. And thanks, Andrew, for the fantastic and prompt mac release as always. It's very very much appreciated.
-
But anyway I will not be able to do it until release. As always, some features like CUDA on OSX will be included in one of free updates.
Cool! This is something I've been eagerly anticipating. Any plans to implement OpenCL when apple releases Snow Leopard?
-
Hi, I downloaded the 3D Coat 3.0 Beta for Mac, but I can't figure out how to use it. Is there a .pdf manual or instructions on how to use 3D Coat?
Yes. You can get to it from the help menu. The only thing missing is the voxel tools (not written yet) but they're fairly self explanatory. If you have more questions, just ask.
-
Currently it's not possible to do so even though I manually associate 3b files to 3d-coatdx.exe
And I wish 3DC also supports opening 3b files by drag-and-drop them into the main window of 3DC.
Regards,
akira.
It's not possible on my mac either (though it would be nice)
-
BTW, on the topic of retopology... You have seriously refined them beyond belief. These are THE absolute best retopology tools I've ever laid my hands on. Period. I'm enamored when using them, they are so simple, intuitive and powerful.
Ya. I thought blender's retopo was good until I used 3d coat. Blender has quite a few tools (stroke drawing, moving stuff around) but lacks stuff such as a smoothing tool, which I find invaluable. Only weak point I see is the UV layout tools (bugs in the unwrapper mainly, lack of live transform unwrapping). Overall it's a great tool. Thanks, andrew, for the prompt mac release!
-
Well I think you've read too many "The CUDA sky is falling" threads and confused what I asked with one of those.

Whether or not CUDA is going anywhere, the point is, the 3DC Alpha instructions are to install a particular display driver set with it, one which is older than the current. I'm not asking about how CUDA is going to change or not change, but if 3DCoat is going to be locked in to a particular display driver set at all times if one wants to use CUDA.
You have a point, but it seems nvidia is moving towards open CL. Just saw this on NVIDIA's site:
http://www.nvidia.com/object/io_1240224603372.html
They're releasing an OpenCL SDK to developers.^^
More on OpenCL:
-
This is after merging from voxels. Not loading a base mesh.
Yeah, but it wasn't always that way. I haven't tested out displacement export recently but I suspect it's probably not accurate as a result of this change. All in all, it's not a huge deal since I can just generate one in blender from a subdivided base mesh and a mid poly reference.
But again, I haven't tested out displacement export recently, so it might work perfectly (or even improved). if all that works perfectly, layer 0's change is a non-issue.
-
What's the deal with level 0 being deformed in new releases? It used to just be a subsurfed version of the original mesh.
-
Glad 3dc is back. Anyone heard Cuda will be discontinued by nvidia?
That seems very unlikely, though I can see it being discontinued in favor of a cross-platform cross-hardware solution (similar to Apple's Open CL)
-
In regard to pointers; is it a bad thing if the pointers are constantly counting down while I'm in Voxel Sculpt mode?
In my latest sculpting session (my first real attempt with 3D-Coat) the pointers reached
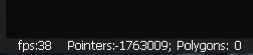
I'm on a 2.16 Ghz Intel Core Duo Macbook Pro, 2 GB RAM, 256 MB ATI Radeon X1600 and I've been using the latest alpha (75) of 3D-Coat. Nothing seems to be affected by the pointer behavior, though many of the shaders bring my machine down to < 1 fps
Same thing has been happening with pointers to me, including out of memory errors. Machine stats are in my sig (using my laptop). Only difference is I don't have a slowdown with shaders.
-
A few thoughts -
Don't buy Zbrush. I used it for years, it's just a waste of time. You'll spend more time learning the interface and RE-learning the interface if you don't use it daily.
Totally agree. The interface was the #1 turnoff for me, and the reason I would never purchace after evaluation. They tried to re-invent the wheel in an attempt to make the product easier for artists with no 3d experience to use, but they alienated everybody else in the process (it's more difficult to learn when you have to first un-learn).
3d coat on the other hand... I evaluated it for 20 days and found it so useful and straightforward to use, i purchased it immediately. It does exactly what I need a depth painting app to do, and it does it very efficiently, generating normal and displacment maps on the fly. It's more or less WYSIWYG compared to rendered result (SSS and other effects aside).
Another thing you can do with 3d coat that you can't do with many other painting apps: you can swap out UV layouts at any point in painting with no loss in quality since color + position information are stored in evenly spaced (adaptive subdivision) microvertexes rather than in images (unless you are using pixel paint mode). This is very useful if you want to use a base mesh for a game with one layout, and a high poly with another layout for hires render (no need to retopo)... or if you simply want to tweak the UV positions to reduce distortion manually.
Sculpting (non voxel) is a weakpoint, I think, but it's not so bad considering you've probably already created a base mesh in another program or with voxel sculpting and the retopo tools. Voxel sculpting on the other hand, is amazing. You don't have to worry about topology at all until you retopo, so your main focus is 100% on sculpting, and nothing else. At first I thought voxel sculpting was more or less a toy until I tried to actually use it for something. Fantastic results. The one caveat is that you can't paint or assign materials in voxel mode (at least not that transfer to paint mode), but i'm sure Andrew can extend it's functionality later.
Personally, my workflow is this for voxel projects:
1. sculpt in voxel mode
2. create base mesh in 3d coat's retopo
3. export to blender for uv unwrapping*
4. import unwrapped base mesh back into retopo
5. bake (merge in scene)
6. paint
7. export
8. render.
3d coat also has a special undocumented feature: Andrew. Since the user base is relatively small, and Andrew, the main developer, has direct contact with the users of his program, features can be requested and implemented within days (within reason). Similarly, bugs that are reported are often fixed almost immediately.
* Only reason I unwrap in blender is because it's UV unwrapping tools are top notch. 3d coat's uv unwrapping is better than many packages, but it's not as good as blender's, imo. Blender has live (realtime with pinned targets) lscm unwrapping, which was introduced a few years ago and has grown by leaps and bounds since (such as realtime distortion display by area and angle, choice of unwrapping methods, realtime glsl feedback, etc...). It's sort of like peltmapping in that you can specify where an island's edges stretch to, but it's not a brute force softbody simulation, so it takes into account angles and distortion as it re-unwraps on the fly. It ends up resulting in very low distortion islands while still being shaped the way you want em (within reason). It can also display the subdivided "ghost" mesh on the fly for you.
-
I know how to make parallax maps "by hand",
How do they differ from a height field or displacement map? Is it a special kind of normal map?
Yeah. It's an enhanced normal mapping technique. It looks more realistic than straight up normal mapping since it creates the illusion of true displacement as well (it modifies texture coordinates to do this):
-
My "elephant skin" comment was in reference to Pyborque's "Old Witch" (link above). It was well done but for (IMO) too much "elephant skin", especially on places like the bridge of the nose, etc.
You might be right about that. My guide was this image for the wrinkles (another lady for the shape of the face), but the bridge is relatively low on wrinkles. I will probaly go back and use the magnify/reduce tool on some areas. Thanks!
-
Thanks psyborgue and Eric Dandoy
Here is another update I use new 3dcoat direct paint for the cloth.

Hm. It seems like there is some distortion in the texture around some portions of the suit. You might want to toggle the "smooth UV" on your subdiv modifier to see if that fixes it. It should match 3d coats smooth UV or no smooth UV value.
Otherwise it's fantastic. Only thing I might suggest is some accessories (monacle maybe... or some sort of pin/decoration on the suit... He looks distinguished and seems to have a snobby look to him, so i was thinking accessories would fit)
Like the wall texture too.
Love your work and look forward to the next revision.
-
I'm not really sure why I need help with that
I think I misunderstood what he was saying regarding elephant skin... nevermind
-
some areas where he has no wrinkles at all, others are very fine.
The magnify/reduce tool in paint mode might help with that.
got a recent screenshot? I'd like to see your work.
-
Please pay attention if pointers count in status string below grows constantly.
That's happening with me in alpha 75 in sculpt mode. It's subtracting by about a hundred a second while idle and by about a thousand or more a second when sculpting. I'm also getting out of memory errors which may or may not be related. Restarting the program fixes the problem and auto-save on crash works, thankfully.
-
Phil. Do you have a tablet? If not, using the snake tool with the worm profile works well (used subtractively with control key)... then smooth those over lightly.
Curve tool with "sharp" profile (and sharp brush) in paint mode works well too if you don't have a mouse... again with control key pressed.
Lastly, elephant skin material works well to fill in the details. Just rotate the material to match the wrinkles you already have and fill in the between areas.
It's how I made the old witch here (a combination of the three above techinques):
-
My guess is it has to deal with the scale of the displacement (black point, white point). You might try opening a "good" texture from your 3d app in photoshop, noting what the displacement map looks like, and then editing the 3d coat output texture's alpha channel to match (with levels, for example).
Perhaps andrew can add a "normalize" option to the alpha channel displacement export if that is what is required. (you can do this in photoshop with levels set to automatic with 0% threshhold in the options.
-
Im still having this problem is anyone else????????
I can confirm (macbook pro osx version 74)
-
Bug:
Import a object into DP with subdivision for painting (with displacement display on).
do some painting.
Import a new object into dp with displacement for painting (with displacement display on).
Result:
Restarting hte program fixes it.
Otherwise fantastic work!
-
There is some really nice sculpting tools in the VS set now and I'm wondering if any might make it over to regular sculpting?
I ask, because I was painting my objects and as an after thought, wanted to pinch some of my polys together and I can't see any way to do this with the regular sculpting tools.
pinch is "collapse" in the sculpting mode (the icon for sculpting mode looks like a bust)... but this modifiies the underlying geometry, so if you already have a displacement map you could run into troubles. If you're looking to make a pinch/wrinkle, you might try using the sharp pen in regular paint with the control key (and smooth on each side of the stroke afterwards).


Vector Displacement
in Coding scripts & plugins
Posted
Try opening up the exr in photoshop and adjusting the exposure (add a stop or two) to make sure negative values are actually there (they're normally displayed as black since the're stored as "blacker than black"). If you saved with black (not normalized), they should be there. If not, it's a bug with 3d coat not saving negative floating point numbers in exrs and Andrew would have to address that. Alternatively, you could save as a float point tiff, open in PS and save as EXR (not sure if houdini supports float point tiffs). Again, you'll have to adjust exposure to make sure the negative values are actually being saved.
The EXR file format itself supports full dynamic range (signed float point numbers with no restrictions) so it's perfect for displacements.