


Ambershore
-
Posts
13 -
Joined
-
Last visited
Content Type
Forums
Calendar
Gallery
Posts posted by Ambershore
-
-
Wow. that's indeed quite... heavy handed of them, to stay polite.

-
 1
1
-
-
Very nice indeed. I like the post-apo touch of the last ones, but even more so the slightly tribal look of the bio-forms! Both offering a nice contrast to the machine vibe of these concepts.
-
1
-
-
It seems that at one point you might have edited the permanent proprieties of your clay shaders, since you only have this issue on your machine, and only with this specific shader.
And since such user modifications are saved in a subfolder of your user account Documents, they are not deleted when uninstalling 3dCoat. Hence the persistence of this issue. That's where I'd suggest you to investigate, at least, as I don't see what else could be the cause.
-
from the look of it... I'd venture a guess: different HDR panoramas.
-
Thanks for the contribution.
")
Vox Hide, one my favorite 3DCoat tools.
Seeing you using it in a similar way to mine makes me realize that we might gain some time in our workflow if we had a option for 'Objectify hidden' + 'delete hidden ' in one operation. Maybe through scripting? Then we might even have a script for vox hide+objectify+deleteHidden+some layer smoothing, in one go.
-
1
-
-
Excellent!
-
except, as the OP said ' Even after converting to an voxel object?", which I can confirm on my side.
-
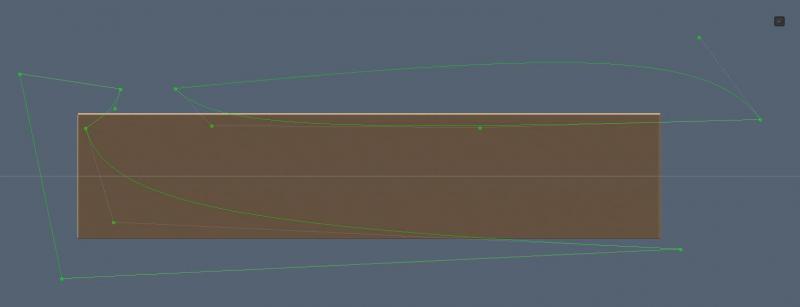
I would just use the Cut Off tool (first one listed under 'Adjust' category). With one or more closed splines (or 'curves', if you're using the new beta curves), press 'e' and third icon from the right, on the brush type pop-up.
I'd suggest also doing this in a ortho view (numpad 5), from the side of the blade.
-
1
-
-
Quote
What I need is for them to overlap. These strips will be used to create hair, so there may be dozens or hundreds of strips in total. This is why I need them to overlap.
Since you're using Maya, I would suggest the following then, as it pretty easy and fast to do in it: select each Island below the top first one, in 'w' for move tool, hold down 'd' for temporary pivot pick (in UV editor of course, not in a 3D view), pick the top left corner uv; release 'd', hold 'v' and move over the top island top-left corner: this will snap and stack them (since they have the same vertical thickness). Rince and repeat for the next island. Just be sure to paint over the longest one (horizontally)
")
But... unless you intent to use the rest of your texture space to paint something else, you might ask yourself if that's really the best choice? I mean, having 4 or 5 non-stacked hair trims, as you currently have, do have the advantage of giving a bi more variation (though for hair that might not be that noticeable, depends I guess).
-
tested on the same version too. I tried interpolated color, and each of the other kind of padding, same issue, halas. It's visible, of course, only when making the curvature map visible (only to check), but of wcourse it makes the smart materials, or any concave/convex condition painting practically unusable.
I even uninstalled, deleted all prefs / documents folders, reinstalled with defaults. the same.
-
As another opiton: You might also give a try to the bake menu option: "name correspondence for baking", which would automate for you what you did, basically; in one baking pass not three. Mouseover this command to get the pop up tooltip, which explains everything, that should help.
-
Greetings,
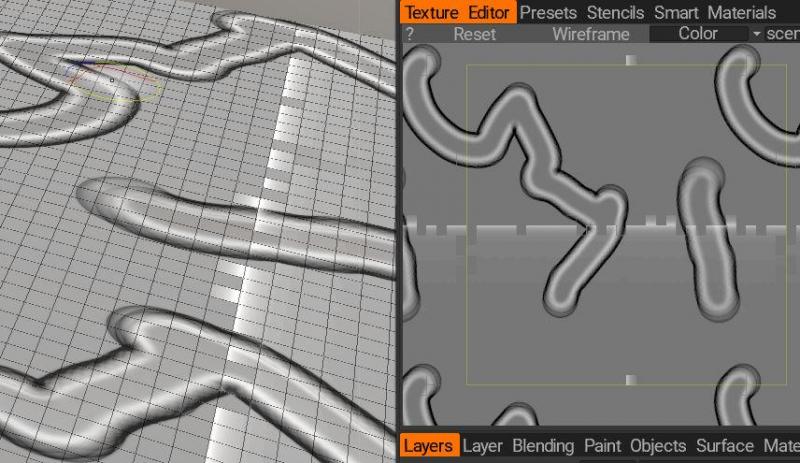
I have an issue when calculating curvature, it shows artifacts on the default 3Dcoat tiling plane (new scene, Paint UV mapped mesh). These artifacts seem related to the tiling planes polygons (3Dcoat's default object, or imported one, same issue).
https://imgur.com/UZJESMM
https://imgur.com/dLARzKS
Any suggestions?


Blender Applink
in 3DCoat AppLinks
Posted
that would be wonderful!