


AbnRanger
-
Posts
8,239 -
Joined
-
Last visited
Content Type
Forums
Calendar
Gallery
Posts posted by AbnRanger
-
-
On 8/3/2022 at 3:37 AM, mlmckenzie said:
I have not heard from anyone on this issue yet I have purchased the newest version and had hoped that perhaps the full version would perhaps fix this problem but alas it continues. The direct interaction with navigating the view via the mouse and the Alt key has absolutely no effect. I do have a 3D Space Mouse and that does allow me to Rotate, Pan and Zoom the scene but I am still very unhappy that this problem with the mouse remains. I hope that now as an actual paying customer someone will take a look at this problem
Are you in Orthographic view when the Viewport seems unresponsive? Andrew basically enabled the application to make use of a 3D lock (in orthographic mode), without a user needing a 3dconnexion device to do so. It is not a problem on my 3dconnexion device, so it will probably take some troubleshooting on Andrew's (support@pilgway.com) part.
-
On 8/14/2022 at 2:43 AM, WickedInsignia said:
I had vertical sync on, which would explain the frame-rate shown in that video.
I tried turning VSync off, as well as rebuilding the 3DCOAT directory as suggested here and neither resolved the issue.I have uninstalled/reinstalled 3DCoat 2021/2022 a few times on this PC across the last year or two, wiping all traces of 3DC including the 3DCOAT folder in Documents. At no point did this resolve the issue for me.
Peculiarly, this issue does not occur in the Retopo, UV or Paint rooms. The 3DMouse movement is perfectly smooth in those rooms, the issue shown in the video only occurs in the Sculpting room.
Understood. Yes, that is weird behavior. Can you try one more thing, before contacting support@pilgway.com? In the sculpt workspace, if you go to the GEOMETRY menu, toward the bottom, there is an option to enable INCREMENTAL RENDER. Turn that off and test to see if that helps. That can sometimes cause minor viewport glitches. Having it on is supposed to help performance, but with a GTX 1080, I doubt it is noticeable, and therefore I turn it off. If that doesn't help, contact support so Andrew can try to assist you. There is a way to go back to the older (4.9) 3dconnexion API, in the PREFERENCE panel (3D Mouse tab). Have you tried that, yet?
-
13 hours ago, SonK said:
The procedure is cumbersome that is why I dislike it, I prefer a mesh centric workflow instead of room centric. Also computer resources are only increasing(more RAM, CPU core, Faster GPU) we'll be able to create more complex/interesting 3D apps.
In this proposal you can still use 3DCoat like you're currently used to, the steps are abit different:
1. You create/add a Sphere(or any polygonal primitive) to the Scene.
2. Add a Voxel modifier(this is literally the Vox Tree in the current version of 3DCoat), automatically convert the Sphere to Voxel . All new layer, delete, etc.
3. Use all the sculpting(voxel/surface)tools within the Voxel modifier. This is the destructive approach.
 Have you tried using Adobe Substance 3D modeler Beta? It very basic but does things very well, we have similar tools in 3DCoat but the workflow is not as great or thought out as Adobe Substance 3D modeler Beta.
I am all for this, too, but I wanted to point something out regarding your original post. 3DCoat's UI was completely redesigned from the ground up during the V3 Beta period, and because it was then more of a 3D Texture Painting application, users requested that Andrew make it follow the Photoshop convention, so everyone would be more familiar with it from the start. So, a completely restructured UI may not be feasible for Andrew. I think he wants to stick to the Photoshop style layout, but within that basic structure, there could be a lot of improvements. One that I recently suggested was to make the Activity Bar (upper right corner of the UI) match Photoshop's panel icons (inside the right column, where the user can quickly expand or collapse them), so new users (already familiar with the way it works in PS) would know how it works in 3DCoat. He agreed that would be a good idea, but said he was currently too busy on other major projects to get to it, right away.
An Outliner panel (to possibly replace the different mesh/object panels in various rooms) would be a welcome addition, for sure.
-
14 hours ago, Carlosan said:
... but have access to the same data...
This is where all the spaghetti started.
Unlike all the programs we are used to, which are mesh centric: the major hierarchy is the model and from there modifications are added, 3DC is room centric where the major hierarchy is the Room that has different tools for each task.
This design was good when the way of working was linear, and separating the tasks by rooms allowed a better optimization of the computer resources.
As the rooms do not allow the addition of tools from other rooms, this design currently has limitations when you need to make modifications at some step of the task.
Paint+ tweak+uv use one type of mesh, retopo+modeling another and paint+sculpt (surface or voxel) are separate entities with certain interchangeable characteristics.
3DC solved this by creating bridges that allow interconnecting the different room-meshes, but for the user not used to this workflow the procedure is cumbersome.
Yes, I think a consolidation of the Tweak Room and Retopo/Modeling room would help eliminate much of this confusion and need for switching workspaces. Paint Objects would then be directly editable in the Retopo/Modeling room and soft selection tools in the Tweak Room would be carried over to the those rooms. The UV tools in the Retopo room would be unnecessary and would then be removed, so that the UV room was for all UV work.
-
 1
1
-
-
13 hours ago, Elemeno said:

so i want a square pattern around pot that has to be sharp... so i freeze the area

then i want to smooth it but the freeze just falls apart...
Can you send Support a quick email (support@pilgway.com) about this situation, in case Andrew doesn't see your posts in this thread. He monitors this thread a lot, but if he gets busy on something, he may not have the opportunity. I will try to send him a message about it, too.
-
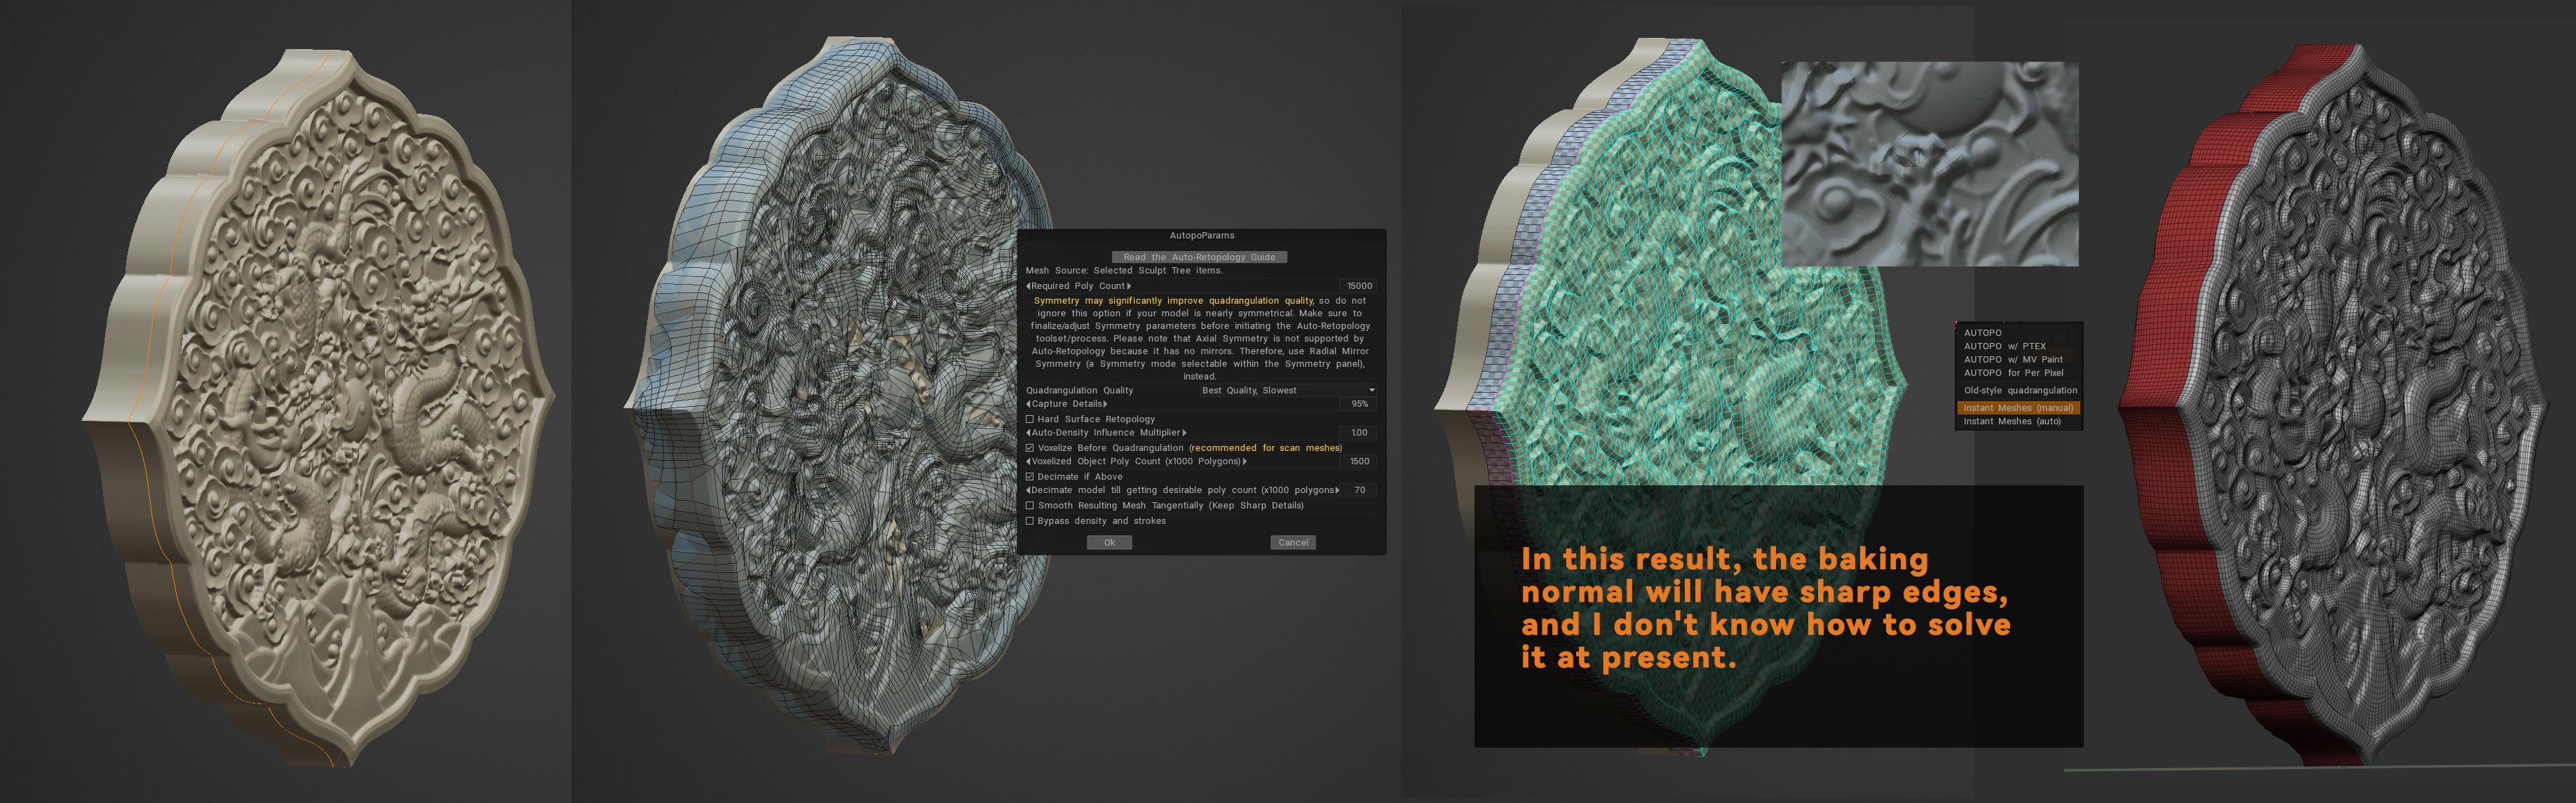
On 8/8/2022 at 9:03 AM, Tubor said:
I think there is still a lot of room for optimization in automatic topology. The results obtained by topology under complex textures are not ideal. Please refer to the picture.
Setting the number of auto-topology surfaces too high will geometrically increase the time. You can only wait patiently. Zremesher results are also attached. Topology results are much faster than Auto Topology.

There is a LOT of detail inside the object, so it's much harder for an auto-retopo algorithm than you think. So, what I would try to do is create a "dumbed down," much lower resolution duplicate of your voxel (Sculpt Tree) layer > Auto Retopo that > hide the duplicate voxel layer after you get the Auto Retopo results you want > bake the sculpt details from the original, high poly version.
-
3 hours ago, WickedInsignia said:
BUMP. This is still present in 2022.37
This is strange and hard to pin down, because I am using a SpaceMouse Enterprise and have not been having any problems like this. What is a bit weird is that your FPS (in the lower left part of the UI) is neither low nor high (in the video you shared). On a simple object like a sphere, a GTX 1080 should be running well above 100 fps....assuming Vertical Sync is turned off in the PREFERENCES panel (under the VIEWPORT) tab.
Can you try something and see if this will help? Go to your MY DOCUMENTS/3DCOAT directory and rename it (temporarily), then restart the app. This will cause 3DCoat to create a new directory to replace it. If this is because of some corrupted .xml file, then this step will reveal that.
-
14 hours ago, gerykats said:
Hi all,
i got a 3070 and would like using more my graphic card than CPU...have you got a script please..??? thanks
There is no script for switching between CPU or GPU. Tools are written (hard coded) either with one or the other.
-
On 7/29/2022 at 7:59 AM, Sqwert said:
Well the links to access my free updates for 1 year only work up to the 7 month period , after that the links are all dead and do nothing.
I find it deceptive to allow updates past the expired period, then declare "you are now on a learning" licence without warning.
And then to add insult, on trying to get the latest version one has payed for , find the links are dead.
Pilgway is as fair as a company could be. If you only got 7 months of a 1yr license, then please notify the Sales/Licensing office at Sales@Pilgway.com. They will get it resolved and you will never be short-changed by them.
-
1 hour ago, welcomerobots said:
No, I love retopo tools, and it is my curiosity to use it for modeling for a long time now. It is just a temporary fall back for solving this problem otherways.
I use add/split in this case only as a weld tool to weld pre-existing vertices, I could do it with move tool. To get to a proportionally correct hard surface low poly for the numberplate I used modeling tools. I've added the number circles with boolean and tried to refine geometry before projecting it to the curved surface of the sculpt mesh with selecting all of the faces and using relax tool with snap turned on, to shrinkwrap the geometry onto the sculpted object.
In lots of cases it is a viable hardsurface workflow that leads me to a nice proportionally correct mesh.
The other option would have been to create a 'fake' plate to snap, with sculpt room import tool (without voxelization as surface object) what is identical with the retopo mesh, and could catch/grasp snapping vertices.That actually works pretty well. 3ds Max has some tools that kind of act as if there was a mesh beneath it, constraining the movement of edges and verts.
-
3 hours ago, welcomerobots said:
Thank you, I finish the model in ZBrush zmodeler.
So, unhiding the Voxel object beneath was not an option, then? If you need precise movement of a vertex in 3D space, you could always just select the vertex > RMB (or hit a Hotkey for) > choose the TRANSFORM tool. Again, the ADD/SPLIT tool was designed to work with a Voxel object/Hi Poly Surface mesh beneath it. It was not designed to be used as a freeform modeling tool. There are other tools in the tool panel for that. Even in Zmodeler, if an artist tries to use tools outside their designed purpose, they will run into issues as well. So don't let this one instance color your opinion about the Retopo/Modeling tools. It's a really powerful toolset, and like in any app, one has to know what tool is best to use in a given situation.
-
 1
1
-
-
51 minutes ago, Dave_ah said:
So what is the procedure when view ZOOM goes in or out into infinity and will not fit view or reset to camera to default?
I keep getting into this. When I am zooming out or in, all of a sudden everything disappears. Fit view (to object) does not work. Neither does Reset camera. The screen remains blank.
Adding new object, like box, then fit view , likewise does not solve view issue.
Restarting and reloading scene does not resolve. I have three scenes files that have been 'bricked' due to this. I use WACOM, but also a mouse.
Why does this happen? Is this user error? If this is useer error what can I do prevent it. As all I am doing is zooming in and aout using alt mouse button for navigation as in Maya, Houdini, and Blender.
BTW, I am looking forward to exploring Blender-3dCoat live connection. Wish there was 3dCoat-Houdini live connection. But it is not critical.
Dave, try moving your cursor to the upper right corner of the viewport, click on the Camera icon, and choose (bottom section of the list menu) ROTATE AROUND CURRENT PICK POINT. That should be a default behavior for Perspective view, as a user will normally want to rotate around the point where they are working. However, when you go into Orthographic view (NUM 5 is the toggle for Perspective-Ortho), you would probably want to use ROTATE AROUND WORLD or BOUNDING BOX. This way, when you use hotkeys to switch to front, side and top/bottom views, the model always stays centered in the viewport.
If this does not help, you should be able to click the little House icon in the center of the Navigation bar (just to the left of the Camera icon), which resets the camera to the default position. If that still doesn't help, please try to:
1) Update your graphic card drivers, if you haven't already done so in the past few weeks or so. Sometimes this may help because driver issues can cause display related glitches. I vaguely remember having this kind of issue at one point in the past, but I don't remember exactly what I did to get a resolution.
2) Temporarily rename the My Documents/3DCoat folder and then restart the application. Changing the name will make 3DCoat regenerate a brand new 3DCoat directory in your MY DOCUMENTS folder. It is possible that some .xml file got corrupted. This can happen sometimes from crashes or sudden system shutdowns/restarts with a scene open.
3) If none of these help, please try to screen record this problem and send a link (or attach in the email) to support@pilgway.com...so they can better diagnose the problem and help you get a quicker resolution.
-
4 minutes ago, welcomerobots said:
Yes, there is a hidden sculpt object for further modeling reference. and lots of other unrelated hidden objects. it is the numberplate of a vintage phone.
snapping is turned off for that reasonOkay, that explains a bit. In the Retopo room, the tools were mainly designed to snap to an underlying mesh/voxel object. Trying to use ADD/SPLIT to snap in 3D space can be kind of hit or miss, as nothing beneath it is constraining the vertex. Try unhiding the voxel/surface object beneath and make sure Auto Snap is enabled, or the MOVE tool, which has automatic snapping enabled in it.
-
1
-
-
19 minutes ago, unity2k said:
Today I was presented with a license request as my updates stopped a week or two ago according to my license for 2021. When I reloaded that old license, I'm still in Learning mode. What happened to my purchase being for a permanent license? I get 3DC asking me if I want to upgrade but why have I been downgraded?
This is a question better directed to the Sales/Licensing staff (Sales@pilgway.com) as they are the only persons who can rectify the issue, and they will get it straightened out.
-
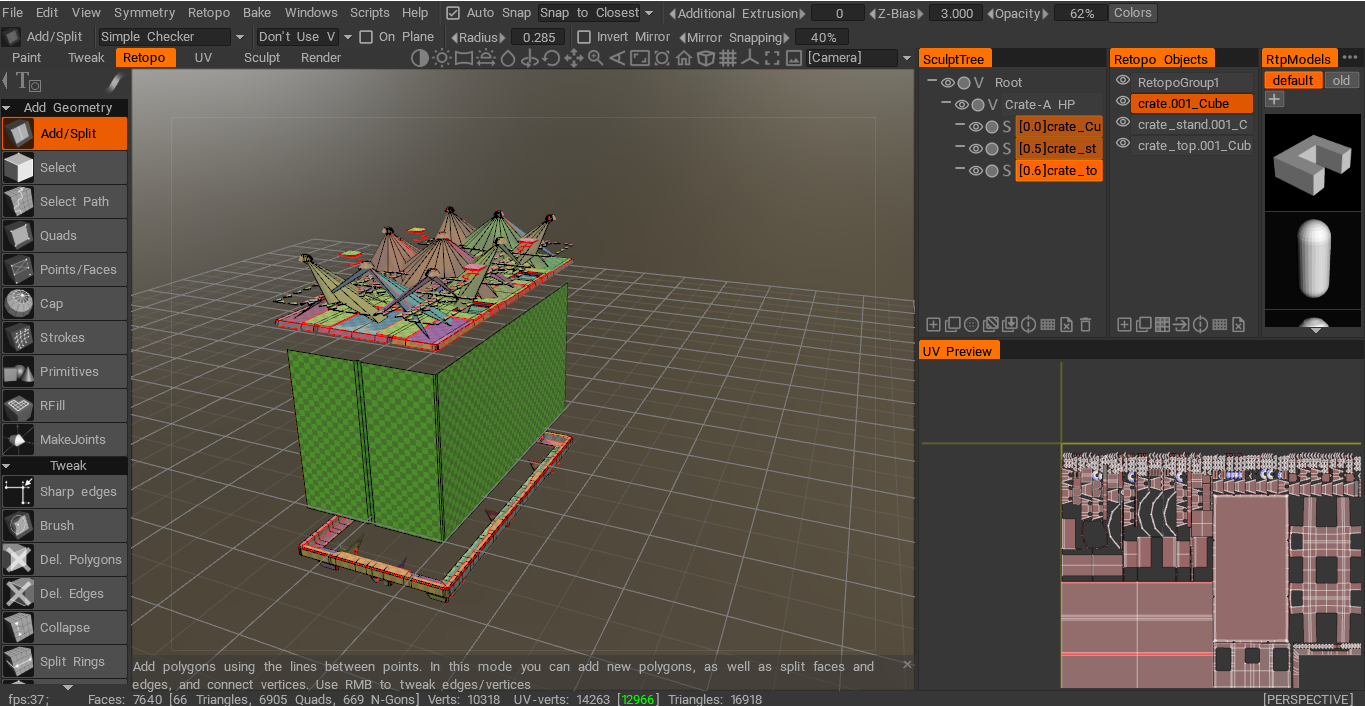
2 hours ago, welcomerobots said:
retopo room add/split tool messes up unseen parts of geometry - causing chaos
no symmetry no snapping active, just plain chaos.
Is there a model (Voxel/Surface object) underneath it, and if so, is the visibility of object toggled off (in the Sculpt Tree panel) perhaps?
-
On 7/25/2022 at 11:04 PM, Elemeno said:
quite possibly the worst way of doing things...
i use about 20 different softwares ranging from 3d to 2d to video,music and illustrator
they need a drop down box in the paint section.. i cant remember all these hotkeys.. , to be honest what 3dcoat does have i need and there for use it regularly especially if im concept sculpting and cant be asked with topology,
but the ui seriously need a rework and needs to have the basics in place to make workflow more efficient
when i need to work on something i need the fastest possible results.... cycling through numbers to get what i need isnt good enough.. they dont show exactly what im looking at, and you can only see roughness,metal and color... be nice to see normal,height, curvature and ambient occlusion etc.. and even though it would be nice to spend more time with the software ... the software doesnt explain itself very well..
zbrush is the most complicated software ive ever used and i feel more comfortable with that software than this one.You do actually have a drop list menu to cycle between the different maps/channels. It's in the upper right corner (just to the left of the UV Maps list menu) of the TEXTURE EDITOR. So, Henry was correct, that the easiest way is to use hotkeys, but if that isn't sufficient, your preferred method is also available.
-
This Series is using Blender as the host app, but the workflow inside 3DCoat is roughly the same when importing external assets.
-
45 minutes ago, Water said:
I tried it, but yet to no avail. The baking is still not working properly, even for basic models such as a bevelled cube. I really appreciate your efforts, AbnRanger and i'm still open to trying other techniques
Can you possibly screen record the process where it seems to fail? Perhaps we can spot what the issue is, by seeing it happen.
-
46 minutes ago, Water said:
Hello and good evening. I discovered this wonderful software called 3D Coat; I love the texturing and uv mapping workflows, but I can't seem to get a handle on the baking phase. I've tried several bakes, but each time the results are the same. Could somebody tell me why my bake looks like that and what I need do? I paid close attention to both the outside and interior cages. I've watched several tutorials, but to no avail. Help, what should I do to fix this?

Is the problem having to do with snapping problems? Maybe some step caused all of these and it would be good to turn off AUTO SNAP at the top of the UI to keep this from happening. Snapping can go haywire when the vertices are right up against the edge of a mesh or opening of a mesh. That is why it is good to know how to avoid these kinds of issues.
-
On 7/14/2022 at 6:41 PM, Earbuckets said:
I did not know where else to post this, its not urgent. I upgraded 3DCoatV4 Amateur to rent to own 2022 Individual and it says my Lic is terminated, Ive sent two emails from the contact page on the pilgway website and have not received an answer for some time.
Not sure why my rent-to-own was terminated, i cant even select the old lic to just buy the upgrade outright not sure why or what my options are. Any help would be appreciated.
Thanks in advance!
Please try to send/forward your email to Sales@Pilgway.com, so it goes directly to the Sales/Licensing staff. Support@Pilgway.com goes to the developers, for bug reports or feature requests. They get so many of those, that it's sometimes possible for them to forget to redirect a licensing email to the sales staff.
-
1
-
-
On 7/14/2022 at 12:57 PM, vididoll said:
Foremost, thanks for your time
") , but seems it's a right challenge
, but seems it's a right challenge
Yes, of course I tried that too, but as you can see in the pictures, that's not all.
Can you now fill this VOX layer to create a boolean that fit out exactly the size of the other head with a smooth inner wall?
I think it is really difficult in 3D Coat.
But I'm not giving up hope that someone will master this.
I self have no Ideas more.Keep in mind, you can control how thick the Vox Layer and how much (if any) you want to offset the layer from the Surface.
Is it Step 3, from your original post, that you cannot seem to achieve in 3DCoat? If so, let's try what I think is the easiest and quickest way to get a nice hair cap...after you have gone through the Vox Layer (basically the equivalent of the Extract tool in ZBrush) step.
1) Import the replacement bust model (Step 4 from your original post), and create 2 duplicates (there is a DUPLICATE icon at the bottom of the SculptTree panel). One duplicate will be Merged with the new hair cap. The other will be used as a Subtractive Boolean object.
2) Make sure both the Hair Cap layer and the Duplicates are in Voxel Mode (if the current layer has an S on the Left side of the Layer, that indicates it is in Surface/Geometry mode. You can click on the S icon to switch to Voxel mode. You will then see a V icon, indicating the layer is in Voxel mode)
3) RMB click the Hair Cap layer in the Sculpt Tree panel > at the bottom of the RMB list menu, choose MERGE WITH (one of the Head duplicates). This will fuse/merge both objects together. However, since Voxels are Volumetric, we need to account for any internal gaps/bubbles/voids this leaves...such as the space between the hair cap and the top of the head.
4) RMB the layer with the merged objects > choose FILL VOIDS. This makes the model completely solid all the way through. No voids are left inside the volume. This is precisely what we want in this situation.
5) Now we want to use the other duplicate as a cutting object for a subtractive boolean operation. You could use the same RMB method to do this, but a quicker way is to move your cursor to the right side of the Head duplicate (cutting object) layer in the Sculpt Tree...when you see a MOVE icon appear, LMB click and drag while holding the CTRL key. Drag this onto the Hair Cap-Head Merged layer. This will leave you with a hair cap that is perfectly smooth and conforms exactly to the Step 4 head model.
I hope this helps.
-
3 hours ago, vididoll said:
Thanks for wanting to help me
There is no a Layer "Hair". I want to mask the Hair and extract from this figure and want to fill it for making a boolean operation with another mesh
See the picture how this work in Zbrush and I want to make it in 3D coat, but how ?Try using the COPY tool, when your Sculpt Tree layer is in Voxel Mode. You can brush select the area you want to copy. In this sense, it is like masking the area and extracting it. Vox Layer or Coat tool also work based on a FREEZE (mask) brush selection, to extract a copy. COAT lets you manipulate the created copy after it is generated.
-
When you Remesh to a lower poly quad mesh, you don't need to decimate anymore. You can Bake the details down to the lower poly mesh, in the Retopo Room (via BAKE menu) > export it directly from the Paint Workspace afterwards. When you go through the BAKE menu, choose MV (Microvertex) because it will let you export with the displacement baked into the mesh on export. To do this, your baked copy of this lower poly quad mesh will be in the Paint Room. From there, go to the FILE menu > EXPORT > EXPORT HIGH/MID POLY MESH
-
1
-
-
23 hours ago, Staglaitor said:
Hello
While retopo i use add/split tool and when i press shift button and move mouse i see strange result as if retopo mesh is duplicated but i can't do anything with it - what is it - how can it be useful?
Thanks
When you pressed SHIFT, what were you intending to do with that hotkey? Clone?


[Solved] Stuttering Viewport with SpaceMouse
in New Releases, Bugs Reports & Development Discussion
Posted
Yes, that is a good idea. I will pass it on to Andrew.