


SimonWM
-
Posts
34 -
Joined
-
Last visited
Content Type
Forums
Calendar
Gallery
Posts posted by SimonWM
-
-
If you have not SD , you can use DAZ Studio for Rendering. It has the iRay Render on Board and is Free.

Yes I'm aware of that. But like Substance Designer recognizes integration of Iray to people wanting to have Iray as their target renderer is a must in the application you are using to CREATE your textures. It would be a BIG PLUS to people that create textures using 3D Coat for applications that render with Iray.
-
 1
1
-
-
How do I move a model when in Paint room. I want to have a obj next to another one for texturing reference but the obj get placed one on top of the other. I don't see the transform gizmo being available in the Paint Room??? I just want to position one of the models a bit to the left side so both can be visible at the same time.
-
Is 3D Coat integration with Iray being worked on? That would be awesome!!!
-
As those are old videos working with older versions of the applications they are no good to me. The problem is that my workflow broke when using DAZ Studio latest version with 3DCoat latest version.
-
I haven't used 3D Coat to work on DAZ Genesis textures since several 3D Coat versions ago. I remember I used to import the model as OBJ using the "Model for Per Pixel Painting" option. On the current version when I import the model and try to paint on an area the stroke occurs in multiple parts of the model due to overlapping UVs. How can I fix this?
-
Never mind after installing 3D Coat v3 I still had the same problem, so I blamed DAZ Studio, installed an older version of Studio and still got bad seams. So the culprit was traced to the exported OBJ I was working with. This is not a bug of 3D Coat 4.
-
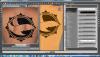
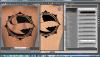
When working on 3D coat V4 to produce content for DAZ Studio I'm getting a visible seam that I didn't use to get with V3. I try to use padding but even with padding the seam is not perfect. See images. See the dragon tattoo that was made using 3D coat version 3, there is a perfect seam and didn't have to use padding.

-
OK it sort itself out after closing and reopening the program so I was able to register.
-
I just upgraded my V3 license to V4 but I'm not able to register my license. I get a loop with the UnabletoDetectServer error. I thought it was that I had to Uninstall my License to version 3 first so I went ahead and did this. Now both version 3 and 4 have the same error, I can only run both on demo mode. Please help.
-
There is a little toggle in the upper right hand corner of the brush pallet. Click that and choose "Default."
Thank you, I already tried that but it doesn't returns them to default, maybe because I have added some using the plus sign icon in the default folder. How can I clean the default folder without having to go to each of the non default brushes and delete them one by one?
-
Sorry if this has been answered before but I can't find the search function of the forum. How do one resets brushes? I'll be using several brush sets from Photoshop and I want to be able to reset the brushes to just the few default brushet as I switch from set to set. Thanks in advance.
-
I'll try to explain this. I find that the smudge tool is very unpredictable and weak. After some time it starts burning your color and it stops smoothing. It starts showing the color underneath too sharp. I've link a video below so you see what I mean.
-
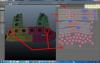
Right the seams are marked with green lines, but there aren't any in between all those polygons.
Right, I guess I'll have to go back to Hexagon and delete the corrupted studs and create two new ones and see if that gets the UV straightened out.
-
If it does the same thing in Hex I would really think it's something with the model, you didn't answer about the welding / merging of points, and have you checked that?
It is one solid stud in Hexagon even though like you said it looks segmented in the UV. The seams in my picture are marked in green lines.
-
That's odd, how did you mark the seam? Also where did the model come from another app? In that case are you sure the points were all welded / merged in the other app?
I marked the seams selecting the edges in UV in 3D Coat. I modeled in Hexagon. I extruded a circle various times until I did one stud, then copy and pasted the stud several times and layed them all out on top of the harness. I modeled one half and then mirror it and then welded both parts together, I guess that's why both corresponding studs have the same problem. It does the same thing when I tried to UV Map in Hexagon so I thought maybe 3D Coat would have a way to merge the little pieces and fix this.
-
As you see from my picture there are two studs in my harness that are breaking into a million pieces and screwing up my UV map. How can I fix this? Any help will be appreciated.
-
By the way, can someone please explain what is in the "Extension Pack" that was supposedly added months ago. I try to use it every once in a while, but I never have any luck accessing it. I downloaded and installed it, and try to access it from the file menu, but it's like there is nothing there.
Where can I download the "Extension Pack"?
-
Hey all, I posted a new video today. It's a work flow related video, from LW to 3DC and back again. I cover the creation of morph maps in 3DC and then for use in LW. Rather simple, but there are a few nuances that should be known for the process. Anyway, enjoy. This was a fun video to do.
LW<>3DC Workflow: Sculpting Morph Maps for LW
Direct download: http://www.pilgway.com/~javis2/3-2_Vids/Misc/LW-3DC%20Workflow%20SculptedMorphMaps.mp4
I was wondering if just as this video shows you creating a morph on a layer you can load different morphs created in another program into 3D coat as layers and work them further being able to toggle between them using layers?
-
If you want to work the opacity/transparency in your hair interactively in 3D Coat you need to load a mask in your viewport. Make sure your model is against a transparent part of the mask that is projected in the viewport. That will make your transparency layer active. Remember you gotta also link your blending for your hair texture and layer 0 (the model) with your opacity/transparency layer.
-
I have a shirt I modeled in 3D Studio Max that has 2 materials. The trim and the shirt. It has been already UV'd but I want to take it to 3D Coat for further UV Map work. But the materials come as different sets of UVs. I need to have just one set of UVs to work with. Is there a way to have both materials display as a single UV?
-
Does any obj file can be use for the snake function or it's special object inside the prog?
My try with it

How do you use this function? Is there a tutorial?
-
I'm loosing my retopo mesh when activating symmetry across X. Is this a bug or am I doing something wrong. Seems straightforward just selecting symmetry but my work just disappears plus the plane seems to be uncentered.

-
The most easy way is to install no-CUDA version. Anyway it will work faster on your setup.
Installed the no-CUDA version 64 bit. The Direct X still doesn't works but the OpenGL version did start. I finally could start to test 3D Coat. All I can say is WOW!!! Very intuitive interface. So far I've been playing with the retopo tools and they are a joy to work with!!!
-
NVCUDA.dll comes from Display driver, CUDART.dll comes from CUDA tookit, it won't hurt to try installing it again.

akira.
Can you tell me where did it installs in your computer? What's the path? Are you running Vista 64?


[Solved] Upgrade from version 4.5.37
in General 3DCoat
Posted
Is the latest version a free upgrade if my last version is 4.5.37?