

cuffins
-
Posts
226 -
Joined
-
Last visited
Content Type
Forums
Calendar
Gallery
Posts posted by cuffins
-
-
Does seem to be much faster, but after some work on a landscape, when clicking the icon in the voxel tree to revert back to voxels, I was sitting for 20-30 min waiting for something to happen and ended up having to nix 3DC in Windows Task Manager. That's the one thing I hate about this program...you don't know if it's hung or if it's still trying to calculate. I'm not aware of anyone having to wait 30 min+ for Mudbox or ZBrush to mull over a decision. That just kills the whole workflow when you have to go get a cup of coffee and come back and it's still not done....go use the John and it's still not done.
Can we not fix this?
Yes I'm with AbnRanger...it's no benefit when you can sculpt high speed in surface mode and at the end you have to wait a long time 'til it's transferred to voxels...needs the same amount of time in summary...also a progress bar would be nice...
-
can't find the fill nor the freeze tool in surface mode...

[edit]
aaaaahhhh, you have to press the surface icon in Vox Tree to get this to work...thi scommand should also be visible in Voxel mode under surface tab...
-
I'll have to look at the manual or something. I couldn't figure out what the circle was for.
unfortunately you will get the whole Blender magic with shortcuts only...try SHIFT+c - this will snap the 3dCursor to the center of the grid. Then press SHIFT+s and choose selected to cursor and voila the currently selected object will be centered (if it was'nt before). Only one usage of the 3dcursor...
-
Hi Phil,
this all can get changed (was available long before 2.5 actually).
So one can set in User-Preferences to select with LMB instead of RMB and one can also
use Standard Transform Widgets if one can not get accustomed to Blenders default transform
style.
yes, left mouse click selection is possible but...then you lost your Maya or Lightwave like navigation (press Alt+left Mousebutton to rotate view) Nevertheless 2.5 alpha0 is a great update and if you're familiar with right click selection it works very well...
@Philnolan3d
jepp, those little red circle was stressing my nerves alot at my first time in Blender. After a while you will find it very useful! You can place it in 3D space where ever you want and align objects or manipulators to. Give this tiny circle a chance...

greez, Rene
-
I think he was making a joke.
definitely...

-
Hey gogolo,
thx alot for sharing!!!
nice ones
René
-
Unfiied skining is available in zbrush since verison 1.5, long before 3D coat.
I know...and I know that ZB uses voxels as a computing basis to build unified skin via marching cubes algorithm...we had a discussion a while ago about the new features like Zsketch here on this forum and if they're voxels or not...with the new boolean functions ZB has implemented one of the killer features of 3DC to seamlessly cut and melt objects. Let's pray ZB Programmers never get sculpting without polygon limitations to work (whereby Zsketch is very close to it)...
-
No doubts... fresh from ZB WIKI:
"ZBrush uses its Unified Skin technology (based on voxels) to create the model."
Description of the new Remeshing tools...
-
I got my new copy of ZB 3.5 R3 (what a ridiculous versioning!) tonight, and have played a bit with it. For me, THE BIGGEST improvement are the easy, high-quality Boolean operations -- it's now, finally, possible to model a face and its hair separately, and then merge the two subtools into one, so I can smooth the hair flawlessly into the head. This has always been impossible before in ZB, so this is a huge step forward. I was also able to work with models with about 33 million polys, without undue slowdowns -- though it's still a 32-bit-only app, alas. So, there are some good news in ZB land!
I guess this is a direct reaction of 3DC's workflow of seamlesly boolean operations...at least the new chrome shader in ZB looks very familiar to me...
 Nice to see both applications pushing forward each other...have to try the new features tonight...
 -
No prob, I didn't even notice that button until someone else mentioned it in another thread. I tried it myself and it worked wonderfully.
I know this button, but it would never had occured to me doing the job...

-
You know there's a new function, Make Mesh Closed, that fixes that?
BTW the Lucy model in my video that I posted above started as about 28 million triangles. The voxels shown in the video is about 7.4 million and moves just as easily as a 6 poly cube (recording the video made it appear a little sluggish, but it's not). You could increase it further and might get slightly sharper quality, but I don't think it's really needed.
No I don't know that Make Mesh Closed will fix that...have to try it! THX for the tip!
-
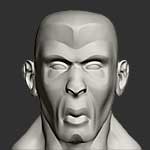
another tip from me...sculpt the eyebrows in the right angle (see image below)
-
@James Thornton
very good explanation of the workflow!

@Taros
sure importing into voxel room is a possible way, but if you ever tried to import an object into voxel room that has some holes (like eyesockets) in, you will see that's not practicable. I'm always getting artifacts in such regions...
-
A couple of points:
At Demeter - please try to use an english that is actually conveying some information that others can understand. Your cryptic little attempt was totally useless but thanx anyway - hmmmmm?
At Nemo - you just quoted the other guy - did you want to add something?
To the guy that actually said something helpful - that is OK and I will go my own way thanx.
I have not bought this program = I am using the demo to see if I WANT TO BUY IT.
I have a lot of stuff to do and I wanted to get a simple tut that runs thru a general workflow that would be indicative of production use. I am not asking for a big thing here as it is common with most other proggies. So please do me a favour and post stuff that responds to the question and leave the attitude out.
Thanx.
Not the right tone to get some help...

-
So maybe instead of guessing around it's better to ask Andrew
-
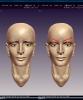
Much better proportions !
Did you use spheres on a separate layer to build the eyes around?...if not, you should try. For me it's much easier to achieve the right look and proportions by adding two spheres in the right scale and sculpt the eyelids with toothpaste or muscle tool.
greez, Rene
-
the surface is a representation of the voxels. the voxels is really just a 3D image...
so, when you blend nearby surfaces together you're actually merging them.
while for some operations (as you were referring to them pressing up against each other)
it's a prohibitive curse of the concept of voxels. but it's also what allows you to build with complete topological freedom,
connecting and disconnecting areas, etc. because you're not limited to an original topology, or surface.
The work a round is to construct separate parts. You can retopo over multiple voxel objects too, in fact anything visible in retopo.
in addition to being able to make things press up against each other, you can also have areas of tighter/finer detail, and areas with lesser detail.
Also this concept of making multiple parts allows you to copy say, a piece of tight clothing, and use it to subtract away from the flesh of the body,
then smooth gently. creating a really nice indentation/buldge around the clothing.
the copy/clone brush allows you to clone material from other objects which will allow you to blend into them and clean up the interface between.
adding material up to, and removing material down to, the neighboring surface (copy/clone has a zBrush analog,
although I can't remember what it's called it looks like a gridded sphere and cube I think, in the brush thumbnail)
anyway... short answer, the stickiness is inherent in the voxels. don't be afraid to break your models apart.
also, you can use the hide brush (not cell hide) , and then voxel -> separate hidden part. the hidden part is still in the original part,
but you just created a separate part from the hidden material. it makes it really easy to part out your voxels... at least I think so.
good luck! hope this helps.
very nice explanation!
-
Well done! I see much improvements in your sculpts over time.
Small crits:
- Chest is a little bit to big especially from side view
- Face looks a bit flat in eye region
Keep up!
René
-
Hm. If you want to reach the reference, than you are right, the current result don't looks like the bust on the photo. It looks more like a charicature, currently.
Be creative
Chris
right...I think the mouth is a bit to wide compared to your starting point.
Anyhow, well done!
-
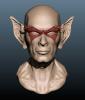
so...I love it!!! (I hope, retopo, Textures and render?!!)
I think I will practice anatomy of human body first...then put a body and some real Batwings on him...
-
excellent!
 I don't know...a superhero?
my interpretation of batman...

-
guess who...

-
But the free version didn't have all of the features like real time shadows etc....
-
amazing development speed as always! Thx!


Guybrush Threepwood
in Archived: Gallery of Finished Works
Posted
nice one!