


Silas Merlin
-
Posts
860 -
Joined
-
Last visited
Content Type
Forums
Calendar
Gallery
Posts posted by Silas Merlin
-
-
17 minutes ago, tokikake said:
I like to test beta, but one small issue is when I use windows un-install aprication (from windows menu), it usually remain old beta version coat data.. And I can not remove those orphan data from this menu any more.
I usually use the tool (windows offer) to un-install many beta versions app, then it run un-install exe,and remove most of files. and directory. but each version of 3d coat remain there.
(eg in this pic, I actually un-install most of beta version 3d coat use, un-install.exe of each version, but windows keep to show it as remain, and can not remove it)
So if you offer correct way to clean un-install, I keep try to install new version.. (recently, remain those old orphan data is somehow annoying for me)
if you describe clean un-install way for betas (to up date new one) and windows (for my case), I appreciate.
I used CCleaner to remove early 2021 builds :
-Tools > uninstall
-then > registry > scan for issues > review selected issues > no > fix all selected issues > close
-after that, folders remain in start menu. To remove them, go to c:programs and delete folders of old builds : they will vanish from start menu -
3 hours ago, Andrew Shpagin said:
BackSpace deletes hotkey.
And I also was not able to reproduce.... If you have crash.txt in documents, please send it to me.
creation date of the file above corresponds to when this happened
EDIT :
I used backspace now to delete hotkey.
restarted, did the steps again and no crash, sorry :/
-
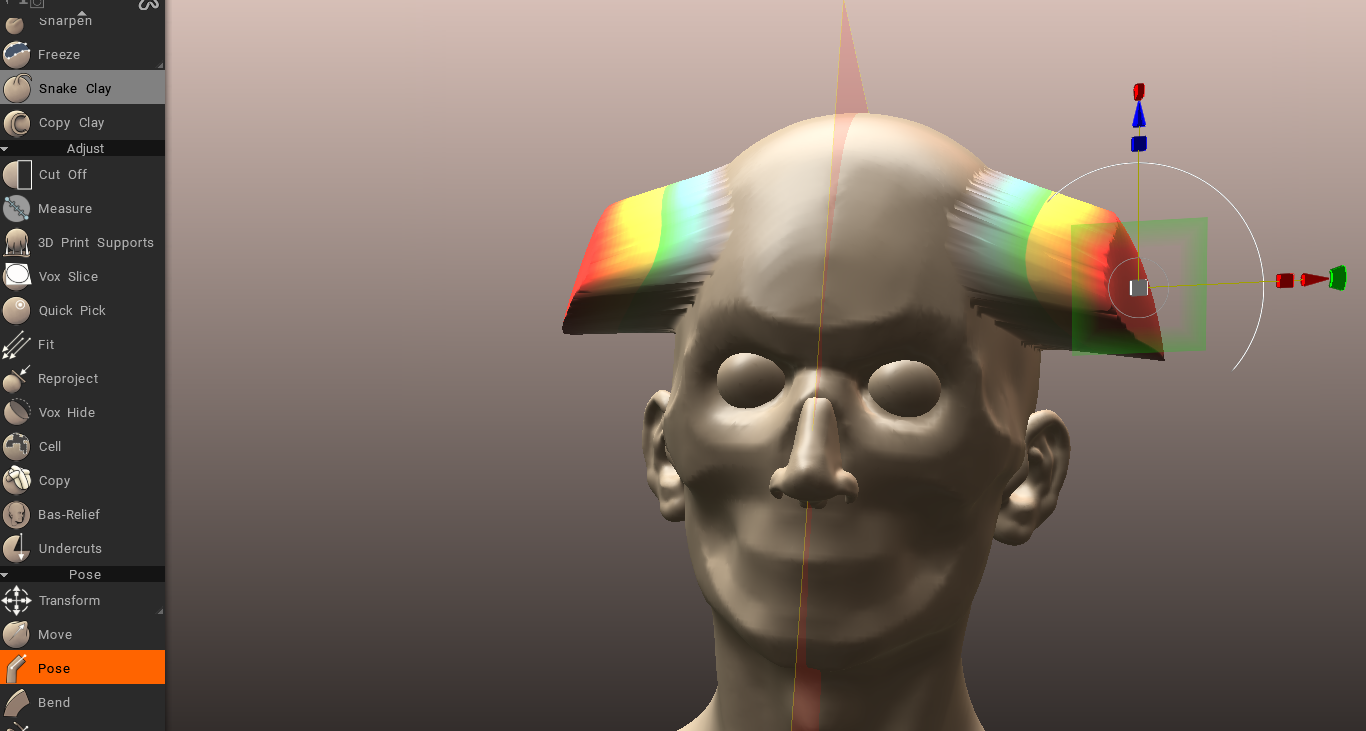
3 minutes ago, Elemeno said:
also ... not sure if this is possible but pose tool doesn't use symmetry?
was we ever able to use symmetry?
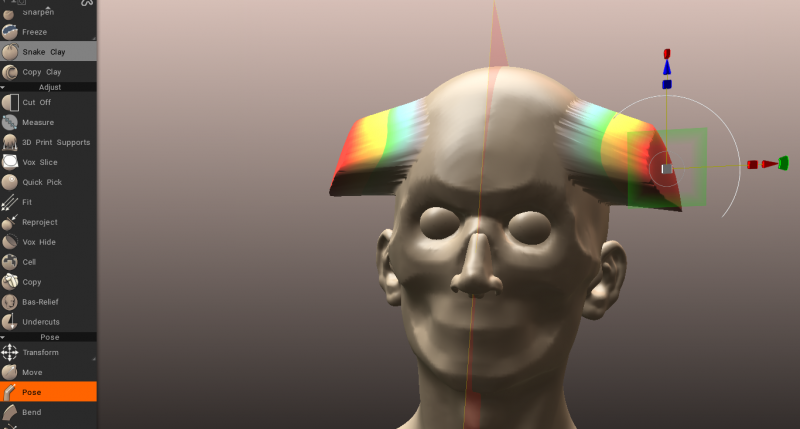
Pose tool works with symmetry here
-
 2
2
-
-
1 hour ago, Andrew Shpagin said:
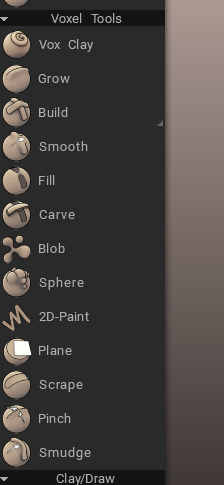
- Snake/muscle/toothpaste tools streamlined and polished - more accurate stroke, smoothing, snapping now has sense, huge values of smoothing - as well (if need almost straight line). Muscle was renamed to Tube/muscle and has now two additional profiles - Bar and Alpha.
the following does not truly bother me but I find it does not really make sense :
Why are the tool options for the muscle tool on the top bar rather than in the options panel like for (most?) other tools ?
The Bar profile looks quite interesting, as for the alpha profile, I think it is brilliant and opens new possibilities.
It is still so very frustrating that there is no way to prevent the muscle tool from snapping to a distant object.Radius pressure still has no effect on muscle tool.
What is "points to polygon" doing there in the sculpt room ? (look at end of video) It would make sense if it were a "temporary" retopo layer, with options in the tool options panel to import it as surface, or as voxels into the current layer with thickness, or as cloth, and a button to delete the temporary retopo layer.
1 hour ago, Andrew Shpagin said:- UI problems of voxel brushes solved, better defaults, possibility to "Restore default".
Build tool does not have "restore default" (only "restore default ordering")
-
First thing I wanted to try with new build caused a crash.
I tried to capture it in video but could not (no crash after restart)
Steps :
-choose voxel sculpting on splash screen
-choose bust
-right click build tool > duplicate
-hover over build > end key > CTRL+1 (to assign hotkey)
-hover over new copy of build tool > end key > CTRL+2
-press CTRL+1
-press CTRL+2 > instability warning > save > 3dc closes
upon reopening 3d-Coat the hotkeys are still there, they work correctly, no more crash.
I could not start over because new problem : it seems that it is not possible to remove a hotkey (I expected del key to delete my temporary hotkey).-
 1
1
-
-
9 hours ago, roentgen said:
1. In step-2, is it a spec that baking includes an environment?
2. After step-3, a reflective term still remains on the volume despite non reflective shader's applied. Is it a spec? (at least I didn't see this in 4.x)
2 : If you wish to bake light without environement, use "light from render room" instead of "BAKE_LIGHT_AND_REFLECTIONS"
(you could also still bake with reflections but disable the environement as source of light in the render room. Set up your own lights instead (not tested but should work)
3 : you have painted the object with a smart material, therefore now the shader you select in sculpt room has little to no effect. (if a shader uses a normal map this will still show at least)
-
1
-
-
54 minutes ago, Andrew Shpagin said:
Hover build - see airbrush. Please show settings that are closest to original build.
And you may duplicate any brush and construct airbrush as a different version of build.
I should have said "closest to the original build tool the way I use it" which can't be true for everyone.
Anyway here is what makes the difference : "Use buildup", depth and opacity pressure, 3rd default alpha
New problems I saw just now :
-right click build > duplicate > rename > click ok >> nothing happens, the duplicate tool does not appear in the left tool bar.-defaut E keyboard shortcut for strokes mode panel has no effect (panel does not appear)
-when you change keyboard shortcut for stroke mode and make it work, there is a discrepency in the display as to what is the active mode
-when you close Coat and reopen, the build tool reverts to default alpha despite having these options ticked in preferences :

-
12 hours ago, Andrew Shpagin said:
28.07.21 2021.15
- Build tool in voxels replaced with Build based on VoxelBrush engine. It is as accurate and smooth as the original Build but has better control, settings, and speed. Airbrush still remains, but I see no advantage in it, build does the same, but better.
With default settings I found Build tool to act more like Extrude, but after some tweaking I did manage to get something similar to the old build tool and it felt nice(r).
I don't see Airbrush tool, where is it located ?
As for the usefulness of having airbrush in addition to build, I don't know if this can save the tool, but here is how I personally use it in 4.9 :
I don't like presets, I prefer to use the tools in the left tool bar by themselves, and I combine them with strips or whatnot manually when needed.
In this scenario, I find it useful to have different tools with different stroke mode that I do not need to change constantly.
sometimes, I need to ptoject a stencil on the whole voxel object from camera. For that I like to use Airbrush which I set up permanently with the rectangle tool.
So, in my case, it has a single, limited, yet useful function.
What do others think ?
-
2
-
-
1 hour ago, roentgen said:
Thanks. But this may be not same to an issue of me.
"No" of "NoEmotion.net" is colored red, color must not be produced by normal map.
So I tried to find the message in its reflection.
My voxel volume may have some reflective shader(I can't remember where/when it is applied).
And found it in F:\Program Files\3DCoat-2021.15\UserPrefs\Panoramas\27646443.dds.
Oh wow, good job, yes, that's one of the environement map hdr's and I see it too.
sorry I totally failed to understand the problem, there were enough hints in what you said ("depending on camera angle", and later "painted black", but some words threw me off course (painted with shader, voxels (as soon as you paint on high poly it ceases to be voxels and becomes surface mesh)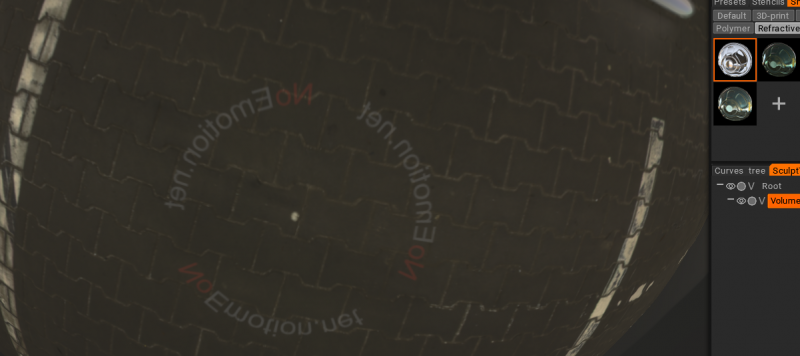
-
1
-
-
36 minutes ago, roentgen said:
I tried make it simple, color is black, no see paint layers. And suddenly the message gonna be sharp as I check 'Modulate color by texture' off.
NoEmotion.net, that was the watermark.
Ok, I can reproduce the issue but I don't get the noemotion message. Instead I get a list of characters.
I think the following video should be enough to show and reproduce the issue and hopefully fix it. It must be like you said, there is no default normal map texture set for those shaders, but when that is the case why does 3d-Coat pick a totally irrelevant one instead ? -
32 minutes ago, roentgen said:
Yes it is one of the defaults.
I can't remember I've painted by which of the default materials but may be ColoniaMarple, I doubt it.
CaloniaMarple:But... this is a shader, not a smart material....
you can't "paint" with a shader -
3 minutes ago, roentgen said:
In paint room, I see some creepy message on a voxel object which be filled by smart materials.
The message is appeared like as an watermark depends on viewport camera's angle, can read 'Emotion.net'? but be flipped.
I hope you understand. In the center of viewport, there is dead man's message crosses perpendicularly at the screen.
I've never written such a message.
Is it with one of the default smart materials (I doubt it)
look for the folder which contains the smart material and inspect the textures, you will likely find the message there. -
1 hour ago, Andrew Shpagin said:
Gradually every voxel tool will be remade because VoxelEngine is really flexible and nice for both - users and programmers. Today I remade Carve and Build and it works really much better.
How about a more customizable sphere tool ? Afaik the only ways to modulate it at present are :
-via jitter in brush options which is random (and jitter radius does not seem to work anymore)
-via tapering curve, which is too much "set in stone" so to speak.
I am curious to see what would be possible if it could be made to work with strips.
Also, the Muscle tool lacks a "Draw from first point" tick box, which would be really, really nice to have.And Radius pressure does not seem to work with muscle tool at the moment.
-
11 minutes ago, tcwik said:
I love how FAST updates are done ;] but maybe we need some auto-update for that 200 BMP 3dcoat heartbeat metrum? XD
Please no :/
-
1
-
-
1 hour ago, Andrew Shpagin said:
Ok, reproduced it, will fix it in build 12. There is a workaround. It happens if you use surface tools and then go to cutoff or unhide. Switch to any native voxel brush and then go to cutoff/unhide. But there is the part that is impossible to fix - if you use surface tools over voxels, voxelize, and then use "unhide all" then the small, but the visible border between hidden and visible parts is unavoidable because voxels structure was changed essentially.
How about this :
When there is hidden geometry on a vox layer, disable all surface tools (including Move if "voxelize immediately" is unticked) -
I am pretty sure that stacking uv islands is quite common, don't worry.
also, generating such uv's is built into the retopo room in 3d-Coat.
(you need to unwrap before you apply symmetry, and the islands will be automatically mirrored and stacked. you can also do it manually island by island with the copy uv / paste uv tool)-
1
-
-
1 hour ago, Callak said:
, but I have tried it on early upload tests to SL, and it seemed to look correct to me.
If it looks correct in SL then that is all that matters, I think ?
As for the crashes, I don't know. Could it be something else ? Always save incrementally while you work, often. If you crash reopen the last one and do the same thing. If the crash occurs again then you could send the file to support because it means the crash can be reproduced.
Personally, when I work with overlapping uv's, I only export the diffuse.
in my tests, my issue was with visible seams at the symmetry line. At the time I did not think of a solution for that (making the normal map blank at the symmetry line).
but to be honest I never thought of the normal map facing the wrong way on the other side, which must happen for sure. Play with a light inworld on your model, and you will surely see that it is the case. (I mean, not from experience, but it ought to look strange)
The default avatar does have mirrored/overlapping uv's on the foot and arm. It works, but it doesn't have materials, only diffuse. -
1 hour ago, Andrew Shpagin said:
24.07.21 2021.11
- Materials/stencils control panel cleaned up, looks better, more compact, icon-based. I hope you like the new design. Also, stencils keep scale and states when you switch between them. But CTRL-click acts as before - then settings from the previous stencil will migrate to the newly selected. Pay attention to "Uniformness" and "Extract Bump" in extended settings.
Here is a problem that persists since 4.9 : in "from camera", the stencil position changes relative to the 3d scene when you change rooms
(AND within a room when you change the style of the left tool bar).
-
8 minutes ago, Andrew Shpagin said:
24.07.21 2021.11
- Materials/stencils control panel cleaned up, looks better, more compact, icon-based. I hope you like the new design. Also, stencils keep scale and states when you switch between them. But CTRL-click acts as before - then settings from the previous stencil will migrate to the newly selected. Pay attention to "Uniformness" and "Extract Bump" in extended settings.
So far the only way to save a stencil position for later (after saving an reopening) is to save it in a preset.
presets are a mess imho and too difficult to use for that purpose (how you you find your stencil in a huge list of presets?)
I think there was another way before, or was it always presets ? because the other thing I remember is that when you did this, it created a huge file in the document folder for each stencil.
Anyway, I think it would be good to be able to bring back a stencil in a given position, because they work well with the projector feature.
Say you set projector from stencil and sculpt with that.
When you save and reopen the file, all you have left is the projection.
The stencil is useful in addition to the projector because you can sculpt detail directly with the stencil. (once you have found the shape by sculpting, you set the voxel resolution higher and then use the rectangle stroke mode with for example the airbrush to add surface detail to the basic shape).
there are things you can do to help restore the stencil position of course, but it is never 100% precise because the scaling tool in the stencil "control panel" is/was not that precise.
one solution that I think could be convenient (ask others) would be to store the stencil in saved view (CTRL+up)
-
1 hour ago, Andrew Shpagin said:
And at least I got my 4K monitor)
That is nice because the top looks wide enough for a cat to sit on.
-
10 minutes ago, Silas Merlin said:
Like this ?
Edit 1 : Oops I forgot to turn on screen space illumination and screen space reflection. I don't know if it would make a difference ?
Edit 2 : No, it does not seem to make a difference. For instance the white streak (representing Tinker bell) was emissive and its light did not get picked up by the bake as far as I can see.
-
1
-
-
On 7/21/2021 at 2:57 AM, Carlosan said:
@Silas Merlin a detailed video showing "bake shader" workflow will be very welcome
")
Like this ?
-
1
-
-
//edit
Post deleted by author's request
-
 2
2
-
-
After further tests, the "bake shader" tool is really excellent beyond belief !
BUT.
-It doesn't work if the normal map is flat.
-Just like the regular light baking tool, the "Intensity" has to be set to around 400 to get something close to the lighting you have in the render room, instead of the default 100

3DCoat 2024 development thread
in New Releases, Bugs Reports & Development Discussion
Posted
Oh !
I notice just now the "soft scrape" tick box for the scrape tool !
This is fantastic, because that means you can leave Cuda on in geometry menu and untick "soft scrape", instead of constantly having to disable Cuda when you (I, at least) want to use Scrape tool.
Yet, I have this question again, like for the muscle tool : why are the tool options for those tools on the top bar where you could fail to see them for months or years, instead of in the tool options panel ?