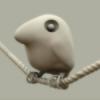
Advanced Member Eric Dandoy Posted December 11, 2008 Advanced Member Report Share Posted December 11, 2008 Hi, starting here a new topic where I'll post my non-volumetric works. Let's start with Renart (Reynart) First sketch using volumetric tools (see my topic "Ric's volumetrics" in the proper section). Then retopo and UV's (nice and easy tools, thanks Andrew!) And finally painting and... voilà! (rendered in Carrara, some minor adjustments in Photoshop) Hope you like. Comment and advices are always welcome. Quote Link to comment Share on other sites More sharing options...
Contributor tree321 Posted December 12, 2008 Contributor Report Share Posted December 12, 2008 Hi, starting here a new topic where I'll post my non-volumetric works.Let's start with Renart (Reynart) First sketch using volumetric tools (see my topic "Ric's volumetrics" in the proper section). Then retopo and UV's (nice and easy tools, thanks Andrew!) And finally painting and... voilà! (rendered in Carrara, some minor adjustments in Photoshop) Hope you like. Comment and advices are always welcome. Eric that looks really nice.Can you give us some tips on how you did the textures? Quote Link to comment Share on other sites More sharing options...
Advanced Member Eric Dandoy Posted December 12, 2008 Author Advanced Member Report Share Posted December 12, 2008 quote name='tree321' post='12336' date='Dec 12 2008, 03:26 AM']Can you give us some tips on how you did the textures? Of course! Thanks for your interest. Unfortunately my last version crashed before saving a .3b file, so I will explain the process using the previous one, nearly the same. 1. I began to fill the bottom layer with a monochromatic brown 2. Then painted with a stroke brush using a few lighter (and lighter) brown-orange color, with a bit of bump (more and more for each lighter color, between, let's say, 5 and 9, additive drawing unchecked) and some specular (same process as above) 3. Now the area around the mouth, at first with the default brush, then with the stroke brush as above (same process with bump and specular) 4. The tongue and inside mouth were painted on the 2D texture editor, since I didn't try to get a hand on the drag points tool. 2 or 3 coats here for color variations 5. The lips are painted with a dotted bush, nearly black (no total opacity, as in most of the work, making easier to keep control on the whole process). Slight specular, a stronger spec added later on the "fat" part of the lips. 6. Now the eyes on a new layer 7. And the ears inside\outside, as well as the nose, the latter with a dotted brush with a lot of specular 8. I finally painted the black spots of the mustache with the brush (all the rest was made with the spray brush, I forgot to mention it) with a huge decay 9. Then I made a few layers adjustments on depth, bulging, blending, opacity,...of the layers before exporting the model with textures This is not what you can call a tutorial, because I 'm not sure this is the best way to do, but it's always interesting to compare the workflows. Hope it helps you. If you need I can send you the .3b file of this version. Have a nice day Eric Quote Link to comment Share on other sites More sharing options...
Contributor tree321 Posted December 12, 2008 Contributor Report Share Posted December 12, 2008 Thanks for sharing your techniques Eric,that's a good work flow.I think this is a good enough tutorial to place in the tutorial section.If you want you may even upload the .3b file there so people can see how everything is layered.It's up to you.Thanks again for sharing.Keep up the good work. Quote Link to comment Share on other sites More sharing options...

Recommended Posts
Join the conversation
You can post now and register later. If you have an account, sign in now to post with your account.
Note: Your post will require moderator approval before it will be visible.