


The Candy-floss Kid
-
Posts
698 -
Joined
-
Last visited
Content Type
Forums
Calendar
Gallery
Posts posted by The Candy-floss Kid
-
-
He used Lightwave. His problem is that the exported OBJ had n-gons which werent correctly triangulated by 3D-Coat. Isnt there a option to convert n-gons to triangles in LW?
There is. The quick dirty way is select > ngons > Multiply > Subdivide > Triple
-
Great video Eric. Many thanks for sharing.I often use the snake tool to make carved effects and found your video was very inspiring for the creation of controlled effects.
Is there a curves dedicated thread area on the forum. There should be and this little gem of a video would be a must include.
-
Hi Rich,
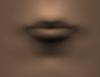
the edge of the lips marks the transitional planar directional change of the form.
The light changing at this transitional edge creates the line of the lips.
A tool I would recommend for this is strangely the Fill tool with cntrl held down to flatten the transitions.
Make sure you create the edge by angling the model in the window to the direction you wish to create the transition.
In sculptural terms 3D Coat is all about moving the angle of the form to the chisel rather than the chisel to the form as in real world sculpting.
Other effective tools are the scrape tool as well as the flatten tool in surface mode to create these transitions.
You should be able to lock these forms down also at low rez.
I've attached a very quick example to demonstrate the Fill tool to mark the edges of the lips on a low rez mesh.This transition can be tightened/sharpened on a higher rez mesh as works proceeds.
Cheers.
-
Pen strokes worked fine here for this, I just tested it. Are you sure you have your pressure set high enough (the red line in the cursor)?
Oh Dear. Phil you were right. The pressure was defaulted to being set way down. Now it works.
Many Thanks.
-
Can't seem to get Sf Freeze to work /show?
No steps to reproduce - consistent.
-----------------------------------------------------------
Further investigation tells me I cant apply sf freeze by brush/pen stroke but rather only smooth the sf freeze mask by brush +shift.
Is this now the default for the tool , i.e the mask can only be applied by other methods such as ellipse ,rectangle, spline but not a pen stroke?
-
Thanks for posting the link Phil. Good to see Newtek creating a tv section too.
Let's hope they steal the best bits of Luxology/ Modo back :-)
-
Joyful news. Blessings to you and your family Andrew.
-
I think some of these frustrations underline a need for some clarity on the benefits of working with 3DC as well as it's comparative weaknesses.
New users need workflow analogies - scenarios where 3DC saves time for the creative artist as well as honest appraisals
of workflows where 3DC would not be the best choice.
Most of these frustrations are born from users finding these things out themselves.
The what is from the what it isn't needs to be delineated.
ZBrush too suffered from this in it's early inception with many similar irate outbursts.
Perhaps a pinned thread on such matters would be useful to avoid mud slinging - one that is regularly updated and keeps abreast with 3DC's fast development?
-
I'm just a voxel junkie but I'm guessing that you go into pen options and adjust the spacing down to the lowest setting 10%.
-
Interesting, but can you create and import your own assets?
Yes I believe you can.
Sadly I can't as I run a Mac :-(
-
Glasgow-based DA Group have created Muvizu 3D, a new animation package powered by Unreal Engine 3 that lets users of all skill sets create 3D animations with no animation experience required.Users can work on their own or share in community based projects. A fantastic approach for opening up story telling and 3D animation to all people. Great potential here.
The philosophy of Muvizu 3D is for content creators to put less energy into animating characters and more effort into directing them onscreen. The goal is to foster collaborative film making by uniting people with contrasting skills through Muvizus virtual workspace and storyboarding capabilities.Windows only.
-
Great to see you here Glen.
Yes bathing with your socks on , writing with a quill pen on custard, or beating a rice pudding up a hill with a stick :-)
Voxels do require muscle memory as you say but once you're used to voxels I've found it to be the virtual equivalent of a digital media feeling like an actual material with it's own qualities of response.
Look forward to seeing what great work you do - for you surely will.
-
Great results. Love them :-)
For the eyelids try using the clay brush in stamp mode with a soft brush. It pops shapes forward sweetly and by increments if your subtle.
It takes a wee bit of practice getting your angles correct but once you try it you'll feel your way very quickly to get the results your looking for.
It's also a great way of getting subtle but large deformations if you require it such as cheeks , bulges to the forehead etc etc.
Stamp mode is a great ally in avoiding that over sculpted feel and suites the translation of how an artist actually draws a form.
For caricatures especially I've found that keeping the eyes as separate higher resolution voxels from the main face sculpt are also a nice way to add higher detail sometimes required for the sharpness of the eyelid to give that nice crisp effect against the slower curves of the face.It makes the eyes "pop". Using the draw by spline method is a great way of delineating the eyelids from the eyes and separating them to different layers to get the initial areas of transition - then merging them back together at a rez high enough to keep that sharper edge as the lid curves over the orb.
Crisp edges - high rez, slow curves - low rez. That's the mantra I chant :-) If you wanted to sweeten up the edges of the lids as part of the main sculpt sometimes just upping the resolution when you've finished everything else is another approach - saving versions as you go.
You're definitely going about it the best way with 3DC. You're great results are testament to that. Keeping the main shapes initially to low poly is by far the best way to work with speed and good tool response as well as avoiding over pinching/marking the surfaces - stepping up in resolution only when absolutely required.
I'd also experiment with surface mode over standard voxel mode to see which gives you what your looking for with regard response and finish.
-
Ryan Kingslien in tandem with 3D world Magazine offers a free download. A ZBrush workshop on sculpting and painting a bust of the Greek monster Medusa.
ZBrush you say, isn't this meant to be a 3D-Coat forum?!!
Ryan demonstrates the use of sculpting and defining forms by their planes and all the techniques with the sculpting are transferable to working in 3DC.
If your new to 3D these "ways of thinking" will benefit your technique in any application.
If your also a ZBrush users you may pick up some great techniques too.
It's free so no harm in taking a look :-)
-
There are some new video tutorials that show the workflow using Ptex...whether it's straight to an external 3D program, ready to render, or bake the result in 3DC to an image map on a model that already has UV's laid out (meaning you still get the advantage of using Ptex to get local subdivision when painting, and have the flexibilty to edit the result further in Photoshop later, if needed). To me using Photoshop Extended's 3D painting would be similar to stepping down from painting a 2D image in PS to work on it in Microsoft Paint. Why do it? I can understand wanting to use some of PS's filters and such on a flattened 2D image, but it's 3D capabilities are far more crude and limited than 3DC's.
Many thanks Don for your reply.
So Ptex is uv format that can be read by all 3D software that handle uv's on meshes?
I see your point about there being little point in using PS Extended with regard it's painting facilities.Great advice and tips. Much appreciated
My interest really stems in trying to think of a way to continue to utilize the enormous speed advantages of working in voxels on certain jobs rather than polys and using PS Extended for proxy shapes with textures that could be composited back over voxel renders. At the moment I've been experimenting using this technique using Lightwave to texture proxy shapes/forms (or quadrangulated exports) and camera matching to the original render from 3DC but wondered whether going the photoshop route may be quicker. At the moment I'm just reviewing the options and as yet haven't invested in PS Extended but rather currently investigating the merits of going this route.
One of the things when your a 3D artist creating renders for print rather than animation is that traditional routes of texturing and uv'ing can be very time consuming when you ultimately may only see a small part of the textured mesh facing the camera. In that respect I always found ZBrush's pixols a clever approach to fast texturing i.e only texturing surfaces facing the camera but lacking in the respect of being able to change views other than marking objects and redesigning a scene from a different views.
If any of you use PS Extended I would appreciate any feedback on how you've found it for such tasks.
Many thanks
-
Hi Folks,
I wonder if anyone knows whether Photoshop Extended can read the ptex uv format on an exported .obj from 3D-Coat?
Is Ptex something only a few render engines and software can use at the moment? I'm a bit fuzzy on this.
I'm so taken by the speed of 3D image creation using 3D-Coats voxel technology that I've been considering buying Photoshop Extended to roughly match textures /image composite over renders of voxel sculptures from 3D-COAT.
Still not sure how far away painting or texturing the actual voxels is away in the development of 3D-Coat?
Is it something that would be possible in the near future?
Any way I do hope some of you folks can help or offer advice on this topic.
Many thanks
-
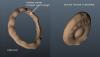
Another feature that I would find extremely useful is for the option to be able to quickly select the inverse with the marquee tools as well as the rectangular ,oval marquee and spline brush tool.So if I want to cut off outer edges quickly using the clay brush for example with cntrl depressed it's quick and easy rather than trimming the outside using other methods.
I realize you can invert voxel parts using the Hide tool but this doesn't give the required effect.
I've posted an example of the hide tool to show what I mean when inverting using the hide tool.
You'll see in the example that there's a straight through cut/hide but when inverted the inverted voxel's edges are beveled and and not straight through in a singular direction.
-
I would definitely wish to see a repeat last stroke for the brushes.
-
-
Hi people,
I've been playing lately with 3dc as a painting application.(plane (planar UV projection)
Nice post. Thanks for sharing your findings too.
-
At the moment we have global transforms that "Apply to whole curve" but I'd love the ability to be able to transform grouped curves or all curves.
-
I seem to remember reading that you can reverse/invert the pose tools area of selection.
The where and how elude me and I wondered if some kind soul could shine a little light?
Many thanks
-
Best to combine 3dcoat with another regular 3D software.
Thanks Spacepainter - for the time being I think I'll have to work around the inability to be able to move the light with a few composting cheats and multiple renders.
-
I'd like to create a voxel render within a room environment rather than a global outdoor setting.
Whilst I can modify the height and rotation of the light I can't modify it's x or z position in relation to the room.
I'm wondering where the default light position is in relation to the grid as there is no visual feedback on it's exact position as far as I can see?
Also are there any plans afoot to allow the light to be moved?
Many thanks
-
 1
1
-


primative-cube filleted edges
in General 3DCoat
Posted
You may find that using the sketch tool to extrude cubic shapes etc with a softness setting for edges may be a fix?
Experiment with that and see if that does it for you.
Using the hide tool in orthographic front view with for example a cubic marquee set to invert hidden and cutting out shapes from voxel forms can also give beveled edge fx but the sketch tool may be your best bet. This solution doesn't work quite so well because it will bevel the edges facing toward and away to the front axis of the cut/"hide" but not those running parallel with the direction of the "hide".
Trying to bevel edges manually using the planar or scrape tool for can be a bit iffy for global bevels but can be fine for local bevel fx.
And finally - the smooth all command will give you rounded edges globally albeit not an angled bevel.