Contributor Tony Nemo Posted July 5, 2011 Contributor Report Share Posted July 5, 2011 Apparently, I retopologized a new mesh over an old one which lingers on demanding some of the action (two super-imposed UVs). It is urgent that I learn how to delete the older mesh. In the Paint room, the two share equal billing. In the Retopo room, the new mesh is visible and in the UV room, it is the older version. There must be a means of deleting short of a back door through the Voxel room! Quote Link to comment Share on other sites More sharing options...
Advanced Member Grandmaster B Posted July 6, 2011 Advanced Member Report Share Posted July 6, 2011 You can delete retopo objects in the "Groups" popup using the trash icon and paint objects in the "Objects" tab by using the red cross. Was that your question? Quote Link to comment Share on other sites More sharing options...
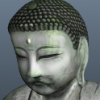
Contributor Tony Nemo Posted July 6, 2011 Author Contributor Report Share Posted July 6, 2011 You can delete retopo objects in the "Groups" popup using the trash icon and paint objects in the "Objects" tab by using the red cross. Was that your question? Thank you for your reply. The operation you refer to was done after "Move selected faces to current layer" was invoked. In my view, I had deleted unwanted faces. In the UV room, this is what I see: How to clear this UV is what I need to know. Selecting all the faces and using "Clear" doesn't actually clear them. Quote Link to comment Share on other sites More sharing options...
Contributor Tony Nemo Posted July 6, 2011 Author Contributor Report Share Posted July 6, 2011 The solution I found was to export from the Retopo menu to get the desired UVs. Unfortunately I had over written my carefully created textures with a hideous mixture of both UVs. Quote Link to comment Share on other sites More sharing options...
Contributor Tony Nemo Posted July 6, 2011 Author Contributor Report Share Posted July 6, 2011 Having discovered for the first time, that the UV editing window in the paint room permits choosing among the extant UV sets, so I was able to save out my textures after all. The only problem was displacement on Layer 1. It created a flat white map showing no displacement. Quote Link to comment Share on other sites More sharing options...
Advanced Member Grandmaster B Posted July 7, 2011 Advanced Member Report Share Posted July 7, 2011 Now i see I believe you need to "Autopo" to microvertex instead of per-pixel to have a displacement map, otherwise you only have a normal map. Mentioned here: http://www.3d-coat.com/wiki/index.php/3.1_Per_Pixel_vs_Microvertex Quote Link to comment Share on other sites More sharing options...
Contributor Tony Nemo Posted July 7, 2011 Author Contributor Report Share Posted July 7, 2011 Interesting suggestion, thanks. What I am doing, is painting my own displacement map and discovering how easy it is to exaggerate features. Quote Link to comment Share on other sites More sharing options...

Recommended Posts
Join the conversation
You can post now and register later. If you have an account, sign in now to post with your account.
Note: Your post will require moderator approval before it will be visible.