Search the Community
Showing results for tags 'surface'.
-

3dCoat Surface Sculpting Noise Feature Clarification
isengupt7817 posted a question in Questions & Answers
I am a little confused with the noise feature/brush available in the surface sculpting room. In the options panel for the feature it displays an option to load a noise but when I open the feature, it only allows for "noise" type files to uploaded (not .jpg, .png, e.t.c.). Is this a file type I am not aware of, specific to 3dcoat, or is this an error with my program? Any reply is greatly appreciated. -
 so i am trying to split up an object, I prefer using surface mode as opposed to voxel mode, however in this case Instead of having the arms on one layer that I can symmetrically edit, it creates each arm as a new object. is there a way to split the arms, but keep them both as one object in surface mode. Your help is critical
 -
auto subdivide mode issue... ver.2022 video
-
I just wanted to create a thread here dedicated to hard surface sculpting/modeling in 3D-Coat. Feel free to post any tips, tricks, tutorials, or whatever you know about it so as to help the community out. I'll start by adding a nice timelapse video I found on Youtube. I saw some useful techniques used here that I thought were worth sharing. Enjoy! http://www.youtube.com/watch?v=3AVERcG9Qy8
-

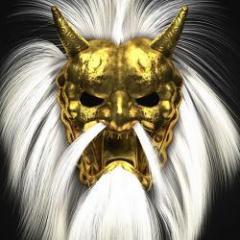
From the album: Designing Massive Mech in 3DCoat - Tutorial
-
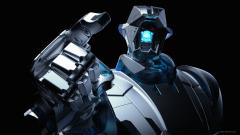
From the album: Designing Massive Mech in 3DCoat - Tutorial
-

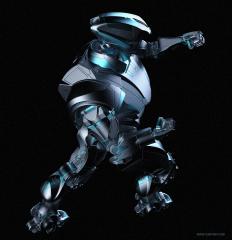
From the album: Designing Massive Mech in 3DCoat - Tutorial
-
From the album: Designing Massive Mech in 3DCoat - Tutorial
-
Hi ! I am a noob here... I started painting this after I model it in surface mode. In some points including all the grass the texture is very bad looking. The images that I am using to texture are 2048x2048 pixels or bigger. The preview looks awesome... I read the topic about the preview and understand that they will not look the same. But as you can see there are some points with very big difference. I marked the with red. I want to obtain the quality from the preview if possible or at least the good zones (marked with blue). Is a bad mesh surface or something ? (for me it looks like the surface is the problem, what s the best tool to divide the surface ?... or something like that). I imported it from rhino exported as .STL and has over 50 million triangles. Thank you !
-
 Please move to bug forum as I'm unable to create posts there for some reason. I used the Sculpt Room Primitive tool, I selected a cube from the models tab where alphas and such are for brushes. I enabled Click to Place, Scale to Brush Radius, Use Stroke Direction. I place the primitive on to an existing surface(eg another cube), it looks correct, I can keep placing it. If I change my mind and choose a different model(or just click the same cube model again), the latice deforms. To correct this one must click reset axis(or reset primitive), then select the model to load again, the latice will be corrected, which avoids distorted mesh, although orientation was lost(I'm not sure why orientation was changing slightly in the first place). You may notice that the reloaded mesh/model had grown in size, this is a 2nd bug, just keep clicking the model icon to reload it, it will grow in size progressively to a certain point(not sure why there is a limit). This 2nd bug occurs when scale has been altered(only seems to affect smaller scale not larger than original scale). So altering scale via transform/lattice toggle or Scale to Brush Radius cause this error. 1st bug is related to Use Stroke Direction. Using Transform/Lattice Toggle and scaling/rotating the model, repositioning it with Click to Place and reloading the model doesn't appear to distort the lattice, but slight rotation offset can be noted of the lattice from the model, this fixes itself(applies incorrect lattice transformation to model) when transforming or repositoining the lattice/model(Click to Place or Transform/Lattice toggle gizmo). I noticed no difference with Use Stroke Direction(just testing now). It was when the scale was made smaller like Scale to Brush Radius setting when enabled that the lattice distortion was more evident from a rotation. No rotation, just click to place with Scale to Brush Radius and small brush radius, then reload the model, the lattice has enlarged but model stays original size, use Click to Place without scaling to the brush or use gizmo to move/transform the shape and it will then apply the lattice to itself, if you load another model in again instead of a transform, it will also apply the lattice(increase scale), then grow the lattice again with the model being replaced with larger size model. I have tried with Use Stroke Direction on different sides of the cube I was attaching the primitive model to, the lattice behaves differently(no orientation via Use Stroke Direction, and just Click to Place and Scale to Brush Radius results in lattice growing equally all lengths), on the top face I was noticing only scaling in the y axis, it also adjusted the orientation on that axis.
 -
Sometimes when doing boolean operations they fail, the error is long and usually about intersection. Adjusting and trying again(especially with say muscle brush) this can be frustrating process... Any tip on how to resolve? Is it just bad geometry or lack of or too much triangle density/difference between the two volumes?
-
I try to change normal sampling value to minimal = 5 - but it not change behavior of the brush. It begin change it angle to surface similar to normal sampling = 100 as soon as the edge of brush cursor touch the vertical surface - the brush begin change its tilt. But when normal sampling is = 5 - tilt of the brush must change when center of brush cursor will approach to vertical surface - but not edge of cursor. Only in Flatten tool - normal sampling work good I already reset Options-files in Documents/3D-Coat - it dont help( How to fix this problem?
-
 How can I copy smart-material from one Surface Layer to another (Voxel Room)? I created custom Smart Material - but it was made in another computer. Now I have not acces to that computer. And now when I open this scene in my current computer - custom Material does not present in Material Library - it exist only on object. So how i can copy this material from one Surface Layer to another, or how to save it in Material Library?
 -
In Mudbox you can use the grab brush to move two fingers or legs when they are close together, because it is selecting based on surface instead of volume around the brush. Can 3D coat do this?
-
Hey everyone, Is there a post / video / list / ... which explains in detail how the sculpting tools compare. The tool-tips are nice but many of them feel like they can produce the same results and i would like to have an idea of there individual purposes. For example in Surface mode, when should i use the draw, clay, buildup or extrude tool? I'm trying to optimize my workflow and i understand that there probably isn't a tool specific for a single purpose but at this point i worry that i might "ruin" sculpts or get a better/faster result by choosing the most optimized one. Grtz, Ruud
-
When running the Geometry menu and choosing close holes, the popup is aware of 50+ holes. I ask it to close them, some tiny holes that were not easy to spot such as single triangle become large, however, hole fill appears to have failed. Can I some how highlight the holes instead or cycle through them with camera aligning to the hole with previous and next buttons to navigate? As it is surface, the mesh have some areas that might be considered a hole but is not, eg window or door cavity with no thickness . Perhaps this causes the failure. I could manually repair actual holes if coat could show me where they are.
-
I cannot post to bugs forum yet, please move to there. When pressing shift or shift+ctrl to switch to one of the alternate brushes like smoothing, reduce or anti-bump, presumably it is not meant to take on the behaviour/effect of the active main/primary brush in use?(brush sizes/alpha etc yes, but not the properties that make a brush unique from others, like pinch or flatten) Copy Clay when using either alternate brush will apply it's effect(sample or stamp mesh data to volume) then apply the alternate brush effect, such as smooth or add detail. Most tools don't seem to behave this way, so presumably it's a bug. I noticed with Freeze brush, hold shift to toggle brush like reduce which clearly is not smoothing, it will smooth out any mask selection, actual intention of the alternate brush doesn't happen(neat that you can smooth freeze like this but caused some confusion of how these alternate brushes with shift/shift+ctrl weren't working), similar behaviour with Surface Hide, however it doesn't toggle hide/unhide with alternate brush modes, which is what I'd expect, hence I think Copy Clay is behaving incorrectly.
-
Unable to post in bug forum, please move there. I used some live clay and made detailed sculpt area, then use Copy Clay tool to sample and apply elsewhere on the mesh, I noticed that once I sampled this data 3D Coat become quite laggy/stuttering on Intel skylake i5-6500(quadcore 3.2GHz 4 cores/threads). While bit difficult due to very low FPS, if I navigate mouse to tool options and clear data the CPU usage for Coat dropped down from 70% to 10-15%. I also tried hide the layer, no effect. It turns out that Blend being enabled caused the high CPU load, if disabled, CPU usage is still higher(averaging about 20-25%), clear data will be equivalent of changing tool which brings CPU usage back to normal(unless return to the tool). When changing tools sometimes I noticed the sampled mesh data appear in grey like when using import or primitives tool. I imagine while it is not visible when using the tool, perhaps 3DC is interactively moving this mesh around still, so the denser the mesh data sampled, the more intense on the CPU? Any reason to do this, if there is no interactive preview, then perhaps the tool should not have high CPU usage doing whatever it is doing non-stop and just apply when user clicks? I imagine the CPU usage is higher for blend enabled because it's interactively blending in advance before applying when clicked? The brush only seems to apply by single click, not applying multiple instances along a brush stroke, so it seems like this is a bug to me.
-
Using the flatten tool on sculpt room surface volume, I finally get hang of controlling the plane(but it'd be really great if there was way to control more precisely the plane with transform tool?). What I don't understand is that the flatten effect has a certain depth/volume like area of effect. If I have flat surface and protruding shape, I can set the plane to the flat surface and brush through the protruding object. I notice that it may only flatten to a certain depth/height. The depth setting of the brush does not affect this nor does the brush alpha seem to matter. If I increase the brush radius/size however, now the unaffected surface area is flattened too. Is there a way to control this so I can use small brush size but still affect a large height/depth? Also why is the polygonal lasso tool not available for brush like this? (same with the clean clay tool when wanting to remesh/decimate specific region). They both seem to be affected by the effect being related to the brush size/radius, I imagine that is why.
-
If you have a hole that is not a usual hole shape(eg an L or U, a line shape hole if you will) these seem to have problems closing, especially so if you have a ring shape hole with outer and inner surface(within the same volume) and you want to merge/connect them as a single mesh, understandably this is something tools like fill holes and poly remove(with remesh after) seem to struggle with. In addition to that, if I have a surface with the edge chipped of, like... ___n___ where the n is missing data, I have noticed poly remove with remesh enabled also can struggle here. How do you go about closing/extending? I have tried booleans in the past with varied success, the muscle brush has worked the best requiring some extra cleanup work after, but struggles in some situations giving failed boolean operation often.
-
I have been using the clean clay tool with reduce/decimate/remesh to control triangle density in areas. Recently I have sharp edge that I'd like to keep the hard edge(I create with using flatten tool) but the current approach I use doesn't seem what settings I try, the triangles get reduced but it cannot seem to reduce keeping the hard edge shape(90 degree like a box).
-
Poly Remove sometimes fails to remove some polygons although they appear to be selected(sometimes it fails to select too). Cut Out while it usually works, I later found out was cutting not only forwards into the background, but also backwards behind the camera where I later noticed I'd damaged the mesh quite badly(I've tried playing with settings here but not had much luck). So far the best way I've found is to use freeze tool to select polygons and hide them, then "Geometry->Delete hidden" Is there a better way?
-
Hi everyone! I'm new to 3DCoat, and in 3D art in general, and I'm looking for a good workflow. I've already worked several times in Blender, creating very low poly meshes, and I've sculpted high res meshes in ZBrush and I'm now starting with 3DCoat! I can do a blockout for a weapon or a base mesh for a character, and I've found no problems in importing the second in surface sculpt mode, subdiving/voxelizing it and sculpting the details. Ridiculously, I'm having more issues with the hard surface. The most common workflow in the world is creating a basic geometry in Maya/Blender and importing it in ZBrush/3DCoat, subdiving it, and sculpting details on the surface. I do like creating blockouts in Blender - mostly because I can control very, very good every face, vertex, and edge. Being a newbie to the software and having seen some videos around, my questions are: - Which workflow do you reccomend in general, or for a specific task like character/hardsurface and why? Do you use a blockout made in Blender/Maya/Etc or do you sculpt directly with voxels? - Does the voxel sculpt mode some particular cons? How good is the control over an hard shape/surfacem how does it feel? Would you compare it to an absolute, precise control like the one you have when you block out? - Does voxel sculpting give particular problems when it comes to retopology? Most people use a blockout to have a retopology mesh almost ready (never made a retopo before, so sorry for the ignorance about the topic)! Well, that's all for now (I've few other super-nooby questions to be honest, but they'll be for later)! All of this came because I've noticed that in voxel mode you can make crazy details with lightspeed and with great freedom, but also that if I import a blockout mesh and voxelize it, instead of starting with a voxel mesh, it'll create annoying voxely artifacts (apparently, 99% on inclined edges) that I can't make go away with Res+ and I don't know how to polish! I'm also wondering if it makes sense to NOT use voxel mode, considering the great advantages it offers even on a dynamesh... but to know that, I must wait for your response! Thanks to everyone in advantage for the help, I promise I'll annoy you more with silly questions on geometry and sculpting soon!
-
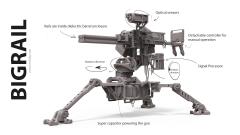
From the album: Bigrail
Railgun turret fully done in 3D coat and rendered in Keyshot. I share my techniques on my channel - https://www.youtube.com/c/AntonTenitsky -
 hello, I have to raise this topic once again... after installing the WinTab drivers, I did just a quickt test with the build brush - pen pressure worked great. Aftrer a while, I returned to 3D Coat to do a complete project, from A to Z (sculpt, retopo, UV, texture) - but I noticed, that some brushes do not work (have zero effect) and this is (among others) the smooth brush (as seperate brush or when pressing shift = the same). Smoothing does absolutly nothing on my model, I tested the same 3b.File on my desktops and smoothing works, as expected.... Also not doing anything: Fill (and "Planar" does not show a "Plane") I plugged a mouse into my book and - smoothing still doesnt work (!) How can this be? Is there some setting, I´ve overlooked? I am on a fresh 4.7.24 DX install... Thanks!