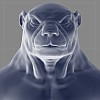
Member howitzer Posted September 5, 2008 Member Report Share Posted September 5, 2008 Hi everyone, I'm new here and here is my first serious 3d Coat textured thing. It's the head of a character I modeled for a short film. His name is Cable and he was actually modeled twice. The first time I kinda over did it and made him too dense in order to impress people in a certain community. I textured the first model using a complicated method involving Blender, Gimp, and some stock textures from a magazine. It took forever but the results were kinda nice. Here is the first character model. I had to remodel the character though. After I decided to make a short film with it I realized I would need to have a certain congruent appearance to all of the characters, and I couldn't make every character the same way I made the first Cable without burning out. After remodeling the character (here is an image), which didn't take long, I realized I'd need a program to texture it with. My previous method was just too difficult to do repeatedly for all the characters. ZBrush was too expensive and I didn't want anything holding me back from selling my work in the future if I had to get the student license. But I knew about 3D Coat the whole time. I wasn't sure about it until now. So here is what I did with it: Quote Link to comment Share on other sites More sharing options...
Andrew Shpagin Posted September 5, 2008 Report Share Posted September 5, 2008 Good character! But I think that skin details should be more deep (it is rhino like!). Also cavity painting could be applied to skin over deeper details to get more realistic effect. Quote Link to comment Share on other sites More sharing options...
Member howitzer Posted September 6, 2008 Author Member Report Share Posted September 6, 2008 Thanks! I'm not using displacement mapping or stuff like that, just normal mapping to keep him simple while at the same time nice looking. This is to ease the work in the rest of the short because there are a lot of characters. BTW, what is a cavity map? Quote Link to comment Share on other sites More sharing options...
Advanced Member PoopaScoop Posted September 6, 2008 Advanced Member Report Share Posted September 6, 2008 BTW, what is a cavity map? It's pretty self explanatory. If you don't know what a cavity is you should use a online dictionary or google it. Personally I think everyone should google everything. It's even in the video section:- http://www.3dcoat.com/features.html Please take some initiative in future. I'm pretty sure this dudes a busy man. Quote Link to comment Share on other sites More sharing options...
Member howitzer Posted September 6, 2008 Author Member Report Share Posted September 6, 2008 Yeah I saw the video. When I first heard of Cavity maps from the zBrush forum I googled it. I think that might have been my source of confusion. Is it safe to say that a cavity map is a high detailed bump map that you add on top of a displacement map? And that cavity painting in 3D Coat is painting in the creases? I think my mistake was thinking it was all the same. Quote Link to comment Share on other sites More sharing options...
Advanced Member PoopaScoop Posted September 8, 2008 Advanced Member Report Share Posted September 8, 2008 Well, universally cavity tools mask off areas so that only the cavtiy areas are effected. So I asume cavity maps allow the user to paint while only effecting the cavity areas - the areas that dip-in. Quote Link to comment Share on other sites More sharing options...
Advanced Member PoopaScoop Posted September 8, 2008 Advanced Member Report Share Posted September 8, 2008 How you apply it is up to you. It's generally exported and used as a layer in photoshop over textures to popout details. I cavity map may look roughly like a displacement and you may get away with using a modifeid displacment map as a cavity map. But using a cavity map as a displacement map would yeald unholy ugly results :P Displacements simply take the dark/light values from a bipmap to calculate a surfaces details Ye, I check the video. You can see that he's only effecting the cavities of the geometry, take another gander. Quote Link to comment Share on other sites More sharing options...
Advanced Member Oliver Thornton Posted September 10, 2008 Advanced Member Report Share Posted September 10, 2008 Yeah I saw the video. When I first heard of Cavity maps from the zBrush forum I googled it. I think that might have been my source of confusion. Is it safe to say that a cavity map is a high detailed bump map that you add on top of a displacement map? And that cavity painting in 3D Coat is painting in the creases? I think my mistake was thinking it was all the same. Making a cavity map in 3D-Coat is easy. Follow these easy steps: -Fill layer with white (spec and depth turned off) -Change color to black, set masking to More on Cavity. -Use preview window to adjust cavity settings to your liking. -Fill or paint black into layer using the cavity settings you chose. If you want to adjust it further you can sharpen or smooth your new cavity map or even add another pass at a different opacity/different cavity settings. You can also apply a different layer blending mode to see how the map affects your existing texture. Without depth on your model it's hard to say how the cavity tool will work on your model. I would suggest painting some actual depth even if you only output it as a normal map. A few wrinkles around the eyes and mouth will make a huge difference in bringing life to a model. -Oliver Quote Link to comment Share on other sites More sharing options...

Recommended Posts
Join the conversation
You can post now and register later. If you have an account, sign in now to post with your account.
Note: Your post will require moderator approval before it will be visible.