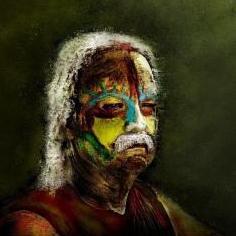
Reputable Contributor digman Posted May 12, 2010 Reputable Contributor Report Share Posted May 12, 2010 I gave the 3DCoat default creature a makeover in the voxel room. Quadranqulation was used and then the model was merged into paint room for ptex. Still more work to be done plus retopo for the external uv map. The skin was created using background textures and default brushes. Screen grab from the paint room... 1 Quote Link to comment Share on other sites More sharing options...
Member iangregory Posted May 12, 2010 Member Report Share Posted May 12, 2010 Looks great! That's the stuff nightmares are made of. Quote Link to comment Share on other sites More sharing options...
Javis Posted May 12, 2010 Report Share Posted May 12, 2010 Very awesome, creepy stuff. I love it. Quote Link to comment Share on other sites More sharing options...
Advanced Member michalis Posted May 12, 2010 Advanced Member Report Share Posted May 12, 2010 I love this too. I also find it rathe cute, not a nightmare stuff. Quote Link to comment Share on other sites More sharing options...
Reputable Contributor digman Posted May 16, 2010 Author Reputable Contributor Report Share Posted May 16, 2010 I'm learning LuxRender inside Blender This is just a Generic preview render of about 16 minutes (using low settings.) I paused the rendering to get a picture Normal map (see---edit) with no subdivision at about 10,000 polygons using auto seams and quadranqulation. Next rendering will be using a displacement map. More renderings as I get better at it... Edit: I had assumed LuxRender supported normal maps,but it that is not true. It just used my color texture to bump the surface. So in the future will make a bump map. Lux does support displacement mapping which will be my next go at it. Also a glossy material surface is chosen by default. http://www.luxrender.net/wiki/index.php?title=LuxBlend_tutorial:_Displacement_Map Quote Link to comment Share on other sites More sharing options...
Advanced Member michalis Posted May 16, 2010 Advanced Member Report Share Posted May 16, 2010 for blender users there is a much better way than displacement. Just export the low def model and a high def one. Import the two of them in blender (same position, same scale). Subdivide the lowres model as much as you need. Now use the 'shrinkwrap' modifier to convert them to a multi res model. Much much better don't you agree? Quote Link to comment Share on other sites More sharing options...
Advanced Member polyxo Posted May 16, 2010 Advanced Member Report Share Posted May 16, 2010 for blender users there is a much better way than displacement. Just export the low def model and a high def one. Import the two of them in blender (same position, same scale). Subdivide the lowres model as much as you need. Now use the 'shrinkwrap' modifier to convert them to a multi res model. Much much better don't you agree? Hi Michaelis, I am not much of a Blender user but what you say sounds interesting. I assume you are referring to Microvertex-Painting from the Paint-Room with an object which has already been all Quads when imported or Voxel-Sculpted and then quadrangulated and painted? Or how else do you get a Quadrangulated HiPoly Mesh exported... I'd be glad if you elaborated a bit further. Quote Link to comment Share on other sites More sharing options...
Reputable Contributor digman Posted May 16, 2010 Author Reputable Contributor Report Share Posted May 16, 2010 Michalis, I working through all the ways to set materials and render, I have not got to the "shrinkwrap" modifier yet. Lots of new stuff to learn. I went on a self-taught 17hr crash course on all three, Blender, LuxRender and YafaRay. The sun was almost ready to come up when I went to bed. I made some mistakes and assume somethings that were not but have learned a whole bunch of fun new stuff and will enjoy learning more and increasing the quality of the renders. My old standby Carrara,I know how to work it but as I saw you talk about Blender etc, I knew it was time to increase my knowledge of other software again... Quote Link to comment Share on other sites More sharing options...
Reputable Contributor digman Posted May 16, 2010 Author Reputable Contributor Report Share Posted May 16, 2010 A new Blender shot using a normal map with the default Blender 2.49 renderer. These are learning wips as I come to grips with new software, so they are not meant to be artistic with proper scene lighting and material settings. That means I might be making mistakes or not getting the correct settings all the time. Edit: The eyes are place holders till I make an seperate model for them... Quote Link to comment Share on other sites More sharing options...
Reputable Contributor digman Posted May 16, 2010 Author Reputable Contributor Report Share Posted May 16, 2010 Polyxo, One way to get a high polygon quad model exported that has the same uv map as the low polygon version is to use the export function under the file menu in the paint room and export a high polygon quad model, You will be presented with a selection of how many polygons you want in your exported model,of course the higher your poly count the more you will capture the details. When importing or merging your model into the paint room choose a high carcass level as this will enable you you export a higher polygon mesh. As far as I know, the exporter in the paint room gets the details from the displacement map plus voxel model so the highest resolution texture map that is created the better. So set the highest texture size your video card will handle when importing or merging into the paint room. This might not be quite the way it works on getting the details on the exported model but hey it works that is all that is important... The picture is of the high quad polygon model merged into the voxel room just to show the capturing of details. obj model was app. 2.6 million quad polygons when exported from the paint room. Quote Link to comment Share on other sites More sharing options...
Advanced Member polyxo Posted May 16, 2010 Advanced Member Report Share Posted May 16, 2010 Hi digman, thanks for you reply! Polyxo, One way to get a high polygon quad model exported that has the same uv map as the low polygon version is to use the export function under the file menu in the paint room and export a high polygon quad model, You will be presented with a selection of how many polygons you want in your exported model,of course the higher your poly count the more you will capture the details. When importing or merging your model into the paint room choose a high carcass level as this will enable you you export a higher polygon mesh. Yes I am familiar with these options. This whole approach which Michaelis refers to - which gives him back Subdivision-Levels - can only work with Microvertex-Painting or Ptex, right? Quote Link to comment Share on other sites More sharing options...
Advanced Member michalis Posted May 17, 2010 Advanced Member Report Share Posted May 17, 2010 Hi Michaelis,I am not much of a Blender user but what you say sounds interesting. I assume you are referring to Microvertex-Painting from the Paint-Room with an object which has already been all Quads when imported or Voxel-Sculpted and then quadrangulated and painted? Or how else do you get a Quadrangulated HiPoly Mesh exported... I'd be glad if you elaborated a bit further. Exactly so, similar to the 3DC to zbrush workflow (thanks to artman). Now you just need to export the low def model too. Shrinkwrap is easy to use. Just multires > subdivide the lowres model so to have enough resolution (something close to the hires). Then select it, open shrinkwrap modifier and write the name of the hires model there. Thats it, apply. Another way in 3DC is to subdivide and export the retopo mess, but this is killing the app after two or three subs. Good to export a ~ 50-300k only. Having some nice normal map for details you don't really need a more than 3-4 subdivisions model from 3DC (except of going to zbrush for more sculpture and baking) A third way is to export the low res model as above and the decimated triangulated mess from voxel room. Do the shrinkwrap process again but expect some artifacts due to tris. You always can edit these in blender sculpt mode. Not the best but its interesting. In every case blender keeps the UVs from the topo quad mess, textures of course. @digman This new render is better of course. Now do some more decent three lights studio setup. See pictures. Use AO, its important, see picture. BTW try some nodes (defocus of camera). See picture. Nodes are important because soon you'll ask me about SSS Now I feel ready to write a '3DC to blender' tutorial. I'm not sure what is the appropriate topic to post it because most of these have to do with blender. Quote Link to comment Share on other sites More sharing options...
Advanced Member polyxo Posted May 17, 2010 Advanced Member Report Share Posted May 17, 2010 Exactly so, similar to the 3DC to zbrush workflow (thanks to artman). Where can I find that one? I had no luck with a Forum-Search... Now you just need to export the low def model too. Shrinkwrap is easy to use. Just multires > subdivide the lowres model so to have enough resolution (something close to the hires). Then select it, open shrinkwrap modifier and write the name of the hires model there. Thats it, apply. So - also if the workflow is different - the outcome is pretty similar to reconstructing Subdivisions inside Zbrush, however with the possible advantage that this happens inside a SubD-Modeling-Application. Thanks a lot for the additional hints! Now I feel ready to write a '3DC to blender' tutorial. I'm not sure what is the appropriate topic to post it because most of these have to do with blender. One might consider to add it here http://www.3d-coat.com/tutorial/connection-with-other-apps That's where Artmans tutorial also belongs (after it has been found) Quote Link to comment Share on other sites More sharing options...
Advanced Member michalis Posted May 17, 2010 Advanced Member Report Share Posted May 17, 2010 Artman just tried to help me here. Thanks artman. http://www.3d-coat.com/forum/index.php?showtopic=5152&view=findpost&p=40148 Zbrush reconstructs subdivisions being quads. Blender shringwrap works more as retopo and snap in 3DC. Its the usual process to import decent zbrush models too. Multi res is superior to displacement maps. You can rig and animate the low res model and in the same time render the high res. I prefer to export a subdivided model from retopo room though. Here's why: In retopo room (without any model in sculpt or paint room, if there is already one please delete it). We use only the voxel model). 1. export the low res model without textures. 2. subdivide 2-4 time (it depends), now its time to bake normals and colors with AO. Now in blender (after shrinkwrap process) we have a 2-4 time multi res model and most importantly, a normal map from this point of subdivisions. If we had the normal map (baked from low res model in 3DC) then an over detailed model will be rendered. Its essential for good renders. We have to write a nice tutorial for all these essential secrets of 3DC. Quote Link to comment Share on other sites More sharing options...
Advanced Member polyxo Posted May 17, 2010 Advanced Member Report Share Posted May 17, 2010 Thanks Michaelis, looking forward your Tutorial! Quote Link to comment Share on other sites More sharing options...
Advanced Member chris_solo Posted May 17, 2010 Advanced Member Report Share Posted May 17, 2010 Very nice work digman!!! It is true that it sorely lacks clear tutorials to explain how to do the normal maps, and the AO and know better to export to a 3D app... So thank you in advance Michalis for this next tutorial! Quote Link to comment Share on other sites More sharing options...
Reputable Contributor digman Posted May 19, 2010 Author Reputable Contributor Report Share Posted May 19, 2010 Two images, One is a test of using a normal map and displacement map together in Blender. I am pleased at how well they work together in Blender... Nothing fancy on the render just lighting to be able look at the maps. Second image is a concept render (Carrara) with some post work in Twistedbrush. In Carrara I can not push the displacement map or normal map as far I can in Blender... Quote Link to comment Share on other sites More sharing options...

Recommended Posts
Join the conversation
You can post now and register later. If you have an account, sign in now to post with your account.
Note: Your post will require moderator approval before it will be visible.