Search the Community
Showing results for tags 'normal maps'.
Found 17 results
-
Hi, I'm working on my first project in 3dcoat and i'm struggling getting the paint room to work after i've done retopo and uv maps. Here is what i've done so far: 1. I sculpted in zbrush then I uploaded the model to 3d coat as an obj file as reference mesh. The model shows up in the paint room and the retopo room as a white model but it doesn't show up in the sculpt room, not sure if this matters. 2. I went to the retopo room and retopologized the model. I marked the UV seams then I unwrapped. 3. The UVs don't show up in the UV tab which from the videos i've watched, I don't think it's supposed to show up there anyway. So then I went to bake -> bake w/ normal map. I included a picture of the baking settings I chose in this link: https://imgur.com/a/7TnX2rb and to show that the outer shell is covering the model. The inner shell is on the inside of the model. 4. I then clicked ok and the next box pops up for "import object for per pixel painting" where the only box I have checked is the "treat materials as separate textures". Then I pressed ok and let it bake. 5. Then I went over to the paint room and it looks like there are two models. One gray one and one white one, and they overlap and look like the picture in this link: https://imgur.com/a/7TnX2rb I am able to paint on the gray model but I have the overlap of the white model. Did I do something wrong? Which model should I be painting on? If i'm supposed to be painting on the gray, I don't see a way of hiding the white model. I don't know if i'm at the right place or if I made a mistake somewhere along the way. From the videos I watched, I only see them having one model in the paint room. Let me know how I can paint correctly. Thank you for your time!
-
Hi, I've recently been working on some 3D models for use in Unity, and I would like to paint textures with Smart Materials. For each texture that I wish to paint with, I have the albedo texture + a normal map. These normal maps work great in Unity, however I am unable to use them as a "depth" map in 3D-Coat. Is there a way to utilize these normal maps as depth maps?
-
http://3dcoat.com/forum/index.php?/topic/19525-3d-coat-47-beta-testing-thread/&do=findComment&comment=139854 This issue is still not resolved. I try not to despair but I'm failing sorry.
-
Hi everyone, I'm noticing some issues when it comes to importing normal maps baked in Xnormal. Notice that there are rendering artifacts? This artifacts do not appear in Substance painter nor do they appear in Unity 5.6. They render perfectly. In the preferences, I've checked to ensure that the Tangent Space Standard is set to MikkTSpace. The normal map baked in 3D coat looks ok, thou. Am I missing something? I've ensured that the obj model is triangulated and is smoothed before exporting. Thanks for your time.
-
Hello 3D Coat! I've recently dove into PBR in general and I decided to go with 3D coat since I already own it and can directly upload to sketchfab. I've viewed some tutorials and I've decided to make my own smart materials to learn the workflow instead of using default ones. I've made some progress but one question I have is that there is the smart material preview window and while it is handy I like to use the paint bucket to fill an object so that it has whatever smart material I'm working on even outside the preview and I don't have to wait for it to render. However, it would appear that once you fill with the paint bucket it keeps the parameters of the smart material at the time and that even if you adjust them later it won't reflect the new ones. That's fine, as I suppose you just fill the area each time you want to update the material (and then use the preview window to view the material as you work on it). However, one thing I noticed is that normal maps seem to be "permanent". Here's an example of what I mean, I'm working on a rusty metal texture, and there is an edge scattering texture and a normal map to give a scattering of rusty and some bump so that the rust isn't flat. So there is the metal latch with the original texture, however if I paste a different smart material... The new material is applied but the rusty normal map remains! This is unlike any texturing program I've encountered as the texture seems to affect the object permanently, which definitely makes me hesitant to experiment and try new textures. Is this normal or is there a way to prevent this? I've seen the "fill with freeze" option in the paint bucket tool which has been suggested but I'm not sure what that does and all it seems to do is fill the area with a checkerboard texture. Ideally I'd like to be able to be able to work on smart materials within the preview window and fill each area when I'm happy with the results. Thank you for your time and please let me know if you know of a solution.
-
Hi everyone, New user here on the final days of a try out, I really want to buy 3dcoat as I think it would be good for our future projects and have been very impressed with its capabilities. I have a quick question that i'm having problems with though that i would like to sort before going a head, i sure its just down to my inexperience with the software. Going from 3dcoat to unity, I'm getting a 'stepping' effect on the normal maps i export that i'm not seeing in the 3dcoat view, it looks like some result of the voxel process i'm an guessing by the pattens it make. My work flow was sculpt with voxels, Went over to surface mode, done a little work there, smoothing etc Rough auto retopo, default settings painted where I wanted detail etc paint room, whole layer filled with a metallic look export mesh and texture, unity settings in unity using stander shader added the normal map Also i'm on mac if thats anything i've added some screen shots of what i mean, please note the unity one is the stander shader with just the normal map applied I'm sure its just me being rubbish, any help to get me in the right direction would be really cool. I've really been enjoying my time with 3dcoat, and look forward to nagging all my artist friend to get it
-
I've looked for a solution to this but haven't found one yet. I'm not sure if it's a bug or an error on my part so I hope someone can shed some light on it. Thanks! If I import a normal map which was baked in Maya, this map looks fine. However, when I save and re-load the 3DCoat file the seams become apparent because the normal map has been modified. I'm guessing it's 3D Coat performing it's padding operation. But it seems the it's generating incorrect padding info for the a normal map somehow. I'm using version 4.7.06 DX64
-
I want to use 3dcoat to generate normal maps. I have been able to sculpt a high poly mesh, retopo it to a low poly mesh, bake the normals, color, depth, etc. My question is where are these maps. I want to use these maps in blender and unreal engine, but I cant seem to find them anywhere. Or find a way to save them to someplace. Can anyone help me? Thanks Mike
-
 Hey Guys, I just wanted to let you know about a new tutorial I just released for creating Sci-Fi Normal Maps in 3D Coat for use in DDO (3D Texturing Plug-in for Adobe Photoshop). http://www.learn3dsoftware.com/dDo_for_lightwave_users_vol_3.htm Table of Contents for Volume #3 Chapter 1- Intro Chapter 2- Creating Input Normal Maps Using Other Software Packages Chapter 3- Creating Normal Maps in 3D Coat for DDO Introduction Chapter 4- Painting Normal Maps in 3D Coat for DDO (Part One) Chapter 5- Painting Normal Maps in 3D Coat for DDO (Part Two) Chapter 6- Painting Normal Maps in 3D Coat for DDO (Part Three) Chapter 7- Painting Normal Maps in 3D Coat for DDO (Part Four) Chapter 8- Exporting Normal Map from 3D Coat Chapter 9- Exporting Normal Map from 3D Coat Chapter 10- Loading Input Maps in DDO Chapter 11- Testing Normal Map with Smart Textures Chapter 12- Normal Map Error Chapter 13- Normal Map Input Fix Chapter 14- Exporting Textures in DDO Chapter 15- Testing Final Textures in Lightwave Chapter 16- Final Running Time: 3 hrs. 0 mins. High Quality (Screen-Res 1920 x 1080 pixels)
 -
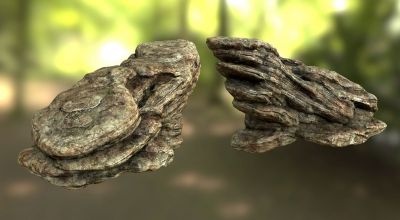
From the album: Fantome artwork
Hello, here is a rock study I did entirely in 3D-coat. The final render was done in Marmoset. Thank you for watching! -
I am creating a test voxel model and going through the autopo (for per-pixel) process. Everything is great within the paint room. But i'm struggling to find out why my normals are appearing like this inside my 3d app (modo) All other maps Dfiffuse, spec work fine. Just totally confused. On occasions where I have created a tests and the NM come out fine and other similar tests with no changed settings where they appeared corrupted in my 3d app Any info painters would be appreciate
-
Hey Guys, Just wanted let people that I released a new Get-Started Trainng Series for 3D Coat Version 4 for beginners or people who are new to 3D Coat. http://www.learn3dsoftware.com/3dc_4_bundle_pack_I_Vol_1_to_12.htm This collection of 12 Volumes of Tutorials contains over 28 hours of 3D Coat Version 4 Training. An ultimate get-started guide for new users of this amazing software package. This 3D Coat bundle contains the following titles: 1) 3D Coat 4- Volume #1-Getting Started 2) 3D Coat 4- Volume #2-Getting Started II 3) 3D Coat V4-Volume #3-UV Mapping I 4) 3D Coat 4- Volume #4- UV Mapping II 5) 3D Coat 4- Volume #5-Retopology I 6) 3D Coat 4- Volume #6-Retopology II 7) 3D Coat Version 4- Volume #7-Voxels I 8 ) 3D Coat 4- Volume #8- Voxels II 9) 3D Coat 4- Volume #9-Voxels III 10) 3D Coat 4- Volume #10-Voxels IV 11) 3D Coat 4- Volume #11-Voxels V 12) 3D Coat 4- Volume #12-Voxels VI
-
Hey Guys, I just want to let everyone know we are having a Summer Sale at LEARN3DSOFTWARE.com -All 3D Coat Tutorials are only $9 Each!! -We have training for 3D Coat Versions 3 and 4. We also have Lightwave, Zbrush and Modo Tutorials as well. We have close 100 Video Tutorials to choose from!! Come Visit Us at: http://www.learn3dsoftware.com
-
Hey Guys, With 3D Coat Version 4 being released I've a created a super discounted 3D Coat Version 3 video training bundle. http://www.learn3dsoftware.com/3dc_version_3_complete_collection.htm It come with all 15 titles created in 3D Coat 3.5 to 3.7. Hours and hours of detailed training covering: Voxel Sculpting, Retopology, Autoretopology, Normal Maps, Displacement Maps, Color Maps, Painting with Photos, Paint Tools, Brushes, Alpha Brushes and full Project Based Tutorials. The Project Based Tutorials include: Dinosaur Detailing, Voxel Sculpting a Dragon, Elephant Detailing, Female Character Texturing and Sci-Fi Detailing a Space Fighter. The ultimate collection to get you started using this powerful piece of software.
-
New Tutorial- 3D Coat 3.7-StarFighter Detailing Volume #2 -Color Maps http://www.learn3dso..._color_maps.htm In this training video Instructor Adam Gibson shows how to detail a Spacefighter model that was created in Lightwave using 3D Coat's powerful normal mapping and painting tools. Learn how to take simple models and create complex surface geometry like Sci-Fi panels, vents, pipes, rivets, and all kinds of gadgets and nurnies. In this second volume on Color Maps you will learn how create realistic looking weathered down hull along with battle damage. Grunge, Dirt, Corrosion, Dirt Streaks, Laser Blast /Battle Damage. Tips and tricks on how to use the different brush types along with alpha brush collections is covered in great detail. The concepts learned from this video can be used for all sorts of other projects like machinery, vehicles of all types, and architecture. Great for detailing hard surface models, but not limited to. You can also apply what you learned for organic objects as well. Also included is a Free Alpha Brush Collection created by Lightwave Artist "Kevin Phillips". This a Grunge and Weathering Alpha Brush set that is perfect for Sci-Fi detailing. Table of Contents for Volume #1-Normal Maps Chapter 1- Intro Chapter 2- Adding a Base Metal Layer Chapter 3- Adding a New Paint Dirt Layer Chapter 4- Paint Brush Alphas Chapter 5- Layer Blending and Layer Emboss Chapter 6- Paint Chipped Panels Chapter 7- Painting the Vents Chapter 8- Dirt Between the Panels Chapter 9- Blaster Tip Burns Chapter 10- Dirt Streaks Chapter 11- Stains Chapter 12- Blast and Damage Marks Chapter 13- Corrosion Chapter 14- How to Export Color and Normal Maps from 3D Coat Chapter 15- Importing the Spacefighter into Lightwave's Layout with all Maps Chapter 16- Final Render in Lightwave Running Time: 3 hrs. 53 min. High Quality (Screen-Res:1920 x 1080 pixels) MP4 Video Level: Beginner & Up
- 1 reply
-
- 1
-

-
- starfighter
- spaceship
- (and 6 more)
-
Hey Guys, I'm having a MOVING SALE!! All our 3D Coat and other Software Video Tutorials are on sale for $10 Each (Almost 50% Off) -Over 65 Titles!! http://www.learn3dsoftware.com/quick_pick_list_10_dollar_moving_sale.htm All our videos will be on sale for only $10 Each until we have reached our goal of 500 videos sold. Don't forget to check out our Free Model Packs (Windows Collection Vol.#1 and #2) and our Youtube Channel with hours and hours of free video beginner 3D training. Have a Great Weekend:) Learn3DSoftware.com
-
3D Coat 3.7- StarFighter Detailing Volume #1 -Normal Maps http://www.learn3dso...1_norm_maps.htm In this training video Instructor Adam Gibson shows how to detail a Spacefighter model that was created in Lightwave using 3D Coat's powerful normal mapping and painting tools. Learn how to take simple models and create complex surface geometry like Sci-Fi panels, vents, pipes, rivets, and all kinds of gadgets and nurnies. Tips and tricks on how to use the different brush types along with alpha brush collections is covered in great detail. The concepts learned from this video can be used for all sorts of other projects like machinery, vehicles of all types, and architecture. Great for detailing hard surface models, but not limited to. You can also apply what you learned for organic objects as well. Table of Contents for Volume #1-Normal Maps Chapter 1- Intro Chapter 2- Importing Model into 3DC and View Modes Chapter 3- Hiding Parts Chapter 4- Polygonal Tool and Eraser Tool Chapter 5- Top Fin Base Panels Chapter 6- Top Fin: Adding Detail Part One Chapter 7- Top Fin: Adding Detail Part Two Chapter 8- Top Fin: Adding Detail Part Three Chapter 9- Wings: Top Base Panels Chapter 10- Wings: Bottom Base Panels Chapter 11- Thruster Casing: Top Panels Chapter 12- Thruster Casing: Bottom Panels Chapter 13- Thruster Casing: Front Panels Chapter 14- Thruster Casing: Back Panels Chapter 15- Thruster: Inner Bevels Panels Chapter 16- Cockpit Panels Chapter 17- Hide Tool Chapter 18- Thrusters Main Panels Chapter 19- Long Gun Casings Chapter 20- Rear Long Guns Chapter 21- Front Long Guns Chapter 22- Alpha Brushes: Intro Chapter 23- Alpha Brushes: Detailing Chapter 24- Exporting Normal Map Created in 3DC Chapter 25- Importing the Spacefighter into Lightwave http://www.learn3dso...1_norm_maps.htm Running Time: 6 hrs. 42 mins. High Quality (Screen-Res 1440 x 900 pixels) Quicktime Video Level: Beginner & Up