Member Blaster Posted January 23, 2016 Member Report Share Posted January 23, 2016 FINALIST ajz3d http://3dcoat.com/forum/index.php?app=gallery&album=185 Blaster https://sketchfab.com/models/3a1d51afc73a4e71b4c968f841c2f151 Tony Nemo --------------------------------------------------------------- Tin Toy Challenge Deadline 4/25/2016 Todays toys typically start out in a cad program or other modeling software before going into mass production. In a world full of plastic toys its easy to forget that toys were not always made this way. Tin toys were first produced in the late 19th century and continue even to this day. Lets go back in time and honor the artistry and craftsmanship that were once put into these tin toys. Rules.Start with some references of your favorite vintage tin toy and share it with us.Model, texture, and render your asset using 3d coatdemonstrate your understanding of the tin properties of the toy.pay attention to how the tin was crimped together to create folds, seams, and bends in the metal.Submit one large final render of your model by 2/23/2016Give frequent updates and share your progress.Have fun! ProcessSculpting - model your tin toy using only 3d coatTexturing - The majority of your texture work should be hand painted in 3d coat. A painting program such as Photoshop can be sued to assist you.Shading - Use 3d coats PBR materials for your finished model, Lets see some nice details of paint, tin, scratches and so on....Props - other assets may be used if its directly associated with your toy. The toy box, a price tag, or any accessory that makes sense is allowed.Rendering - You may render your final image in any software you wish. Remember to ask the community questions and share your process with others. Good luck everyone! 5 Quote Link to comment Share on other sites More sharing options...
Contributor Michaelgdrs Posted January 24, 2016 Contributor Report Share Posted January 24, 2016 (edited) AWESOMEEEEEEEEEE challenge Blaster. Although my schedule is FULL (and i am happy with that lol) i will take part on this challenge and try to create something AWESOMEEEEEEEEE. One of my personal favourites , http://www.puccimanuli.com/pages/products.php?cat=12&content_id=54 I believe i will go with this one. Edited January 24, 2016 by Michaelgdrs 2 Quote Link to comment Share on other sites More sharing options...
Advanced Member Grimm Posted January 24, 2016 Advanced Member Report Share Posted January 24, 2016 (edited) That's an awesome tin toy you're doing there Michael. I'm a bit hesitant on trying to do this as I just don't have much free time. but I will try a much simpler toy tank from the 1930's here: I even found a picture of the toy in various states of rusting, so lots of options. Jason Edited January 24, 2016 by Grimm 1 Quote Link to comment Share on other sites More sharing options...
Contributor Tony Nemo Posted January 24, 2016 Contributor Report Share Posted January 24, 2016 The challenge for you, Jason, is creating the image for your model. I suggest painting on the image editor in the paint room or do it in PS so you can use guides. 1 Quote Link to comment Share on other sites More sharing options...
Advanced Member Grimm Posted January 24, 2016 Advanced Member Report Share Posted January 24, 2016 Thanks Tony, that is a good idea. I need to get more familiar with Krita anyway. 1 Quote Link to comment Share on other sites More sharing options...
Contributor Michaelgdrs Posted January 25, 2016 Contributor Report Share Posted January 25, 2016 Very nice old time classic selection Jason. Tony you in too bro? Quote Link to comment Share on other sites More sharing options...
Advanced Member Grimm Posted January 25, 2016 Advanced Member Report Share Posted January 25, 2016 (edited) Thanks Micheal! Here is the model so far, although I haven't quite figured out a good method to put in the tabs. Jason Edited January 25, 2016 by Grimm 1 Quote Link to comment Share on other sites More sharing options...
Advanced Member Grimm Posted January 25, 2016 Advanced Member Report Share Posted January 25, 2016 Heh, got it figured out easy-peasy. Jason 1 Quote Link to comment Share on other sites More sharing options...
Contributor Michaelgdrs Posted January 25, 2016 Contributor Report Share Posted January 25, 2016 Sorry missed that. Looks gooooood. Quote Link to comment Share on other sites More sharing options...
Member Blaster Posted January 25, 2016 Author Member Report Share Posted January 25, 2016 Off to a good start everyone. The tank and dragon toys are great reference and a good challenge. Keep it up everyone. Quote Link to comment Share on other sites More sharing options...
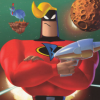
Member Blaster Posted January 25, 2016 Author Member Report Share Posted January 25, 2016 I am thinking of doing a buck rogers tin toy. What do you guys think? 2 Quote Link to comment Share on other sites More sharing options...
Contributor Michaelgdrs Posted January 25, 2016 Contributor Report Share Posted January 25, 2016 hahhhahahahhahaahhah great idea love it Quote Link to comment Share on other sites More sharing options...
Contributor Tony Nemo Posted January 25, 2016 Contributor Report Share Posted January 25, 2016 Very nice old time classic selection Jason. Tony you in too bro? Sob! I'm waiting on a replacement video card plus I'm a sub-hobbyist performer with a backlog of characters to make. Good idea, Blaster! Again, a texturing challenge. Quote Link to comment Share on other sites More sharing options...
Member Blaster Posted January 25, 2016 Author Member Report Share Posted January 25, 2016 Tony the more toys we get the better. I would love to see what you come up with. Hopefully you can get your video card up and running in time to join us. Quote Link to comment Share on other sites More sharing options...
Advanced Member ScrotieFlapWack Posted January 25, 2016 Advanced Member Report Share Posted January 25, 2016 I think that I may actually have a go at this, I want to start of with something simple though as I don't really have much time to spend on this. Think I might go for something like this: I want to go for a used look though, rusted, battered, scratches in the paint 2 Quote Link to comment Share on other sites More sharing options...
Member Blaster Posted January 25, 2016 Author Member Report Share Posted January 25, 2016 that's a neat tin toy scrotie! Adding the rust and scratches will really make this cool. 1 Quote Link to comment Share on other sites More sharing options...
Contributor Michaelgdrs Posted January 25, 2016 Contributor Report Share Posted January 25, 2016 Rust and scratches , AWEEEEEEsome 1 Quote Link to comment Share on other sites More sharing options...
Contributor Tony Nemo Posted January 26, 2016 Contributor Report Share Posted January 26, 2016 Okay, I found a tin toy left behind by a grand-daughter and will make a stab at reproducing it in 3DC. No scratches or rust but it did have a light coating of dust with which I hope to embellish the model. Tally ho! 2 Quote Link to comment Share on other sites More sharing options...
Contributor Michaelgdrs Posted January 27, 2016 Contributor Report Share Posted January 27, 2016 AWWWWWWWWWWWWESOME Old time classics , and i see it many times on Japan guitar / metal videos Quote Link to comment Share on other sites More sharing options...
Member Blaster Posted January 28, 2016 Author Member Report Share Posted January 28, 2016 Thought I would share a link of a really well done 3d tin toy. Its actually similar to the buck rogers toy I was going to do so I think I will change my tin toy to something else. Anyway this is really well done and I was hoping some of ours might turn out just as good. Quote Link to comment Share on other sites More sharing options...
Contributor Michaelgdrs Posted January 29, 2016 Contributor Report Share Posted January 29, 2016 Really nice. Quote Link to comment Share on other sites More sharing options...
Advanced Member ScrotieFlapWack Posted January 29, 2016 Advanced Member Report Share Posted January 29, 2016 I've found some time to start this challenge, I've been blocking out my basic shapes. Once I have that I'll be adding in the little details like at the bottom of my reference image the edges snake off from the base shape, there is holes and clips for the box area where the conductor sits and the top roof has a nice curved shape. All hail the pose tool xD 4 Quote Link to comment Share on other sites More sharing options...
Advanced Member ScrotieFlapWack Posted January 29, 2016 Advanced Member Report Share Posted January 29, 2016 (edited) One quick question. What would be the best way to create the edges you see on the bottom of this tin toy. They snake out from the base and have a really nice curved effect but I don't know the best way to go about it. Same goes for the nice curve on the top of the roof of the toy. Ahh the joys of still being a 3DC noob haha! Edited January 29, 2016 by ScrotieFlapWack 1 Quote Link to comment Share on other sites More sharing options...
Advanced Member Grimm Posted January 30, 2016 Advanced Member Report Share Posted January 30, 2016 Looking good so far. Doing the bell curve on the bottom might be a bit tricky. I would try to use the "cut & clone" tool to cut a thin slice off the bottom. Then scale it up a little so it sticks out like the original. After that use the "fill" tool to fill in the curve, then smooth it out until it has the curve you want. When you are using the "cut & clone" tool just make sure that you are in orthographic mode and looking at your model from the sides or front/back. Otherwise your cut will be along the view angle and it will not work very well. Hope this helps. Jason 3 Quote Link to comment Share on other sites More sharing options...
Contributor Michaelgdrs Posted January 30, 2016 Contributor Report Share Posted January 30, 2016 Or make a 3d model |_| the U shape on a new 3d coat file. Import this to models tab. Then use the curves tool with this 3d model and you are done 3 Quote Link to comment Share on other sites More sharing options...
Member Blaster Posted January 30, 2016 Author Member Report Share Posted January 30, 2016 I'm Going with the Robby space car robot tin toy. 4 Quote Link to comment Share on other sites More sharing options...
Contributor Michaelgdrs Posted January 30, 2016 Contributor Report Share Posted January 30, 2016 I like it a lot , bring it on. Quote Link to comment Share on other sites More sharing options...
Advanced Member Grimm Posted January 30, 2016 Advanced Member Report Share Posted January 30, 2016 @Blaster, that is an awesome tin toy, very cool! Here is an update on my tank: I had to fight the curve tool all the way though. It's impossible to use with symmetry turned on, lots of other settings are broken with it as well. At least with version 4.5.23b. The ribs are too deep but I don't want to try and fix them with the tool in the state it's in. 1 Quote Link to comment Share on other sites More sharing options...
Member Blaster Posted January 30, 2016 Author Member Report Share Posted January 30, 2016 Thanks Grimm! Your tank is coming along nicely. Maybe I will stick with version 4.5.23 if your having problems. I am going to start modeling tonight and was looking forward to using the curve tool for some parts of my toy. 1 Quote Link to comment Share on other sites More sharing options...
Advanced Member ScrotieFlapWack Posted January 30, 2016 Advanced Member Report Share Posted January 30, 2016 Thanks for the advice guys. I think making the part separately and using the curve tool may work a bit better. I will try out your suggestion thouh Grimm, only because I've never really used the cut and clone tool xD Awesome tank by the way, keep going with that one. Love the vibes in this forum very collaborative even though we are all working on our own pieces. I think this will be an interesting challenge 3 Quote Link to comment Share on other sites More sharing options...

Recommended Posts
Join the conversation
You can post now and register later. If you have an account, sign in now to post with your account.
Note: Your post will require moderator approval before it will be visible.