pgson
-
Posts
72 -
Joined
-
Last visited
pgson's Achievements
Neophyte (2/11)
9
Reputation
-
Looking for Advice on the best method to Detail Models
pgson replied to pgson's topic in Finished Projects
Thanks, ajz3d -
Looking for Advice on the best method to Detail Models
pgson replied to pgson's topic in Finished Projects
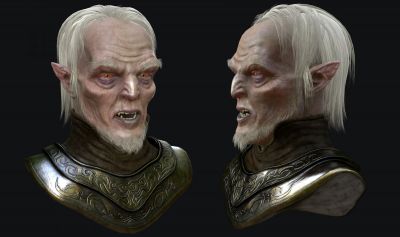
Since this sculpt started heavily in 3D-Coat, I thought I should post where I am at on it. Human Kain's progress: Just the blocking on most of the pieces before I retopologize it all and refine it. And here's his detailed sculpt with where I am on the diffuse texture: Hair is Fibermesh right now. I'm trying to block out some stubble for him, too. It's a work in progress and feels too much right now. The head and body with the arms separate. Most of the arms are never seen, but I want a cohesive form to work from. His body is only going to be used when he's turned into a vampire. Detailed hands: Without the paint and hair: What I am hoping works, as I've seen online is hopefully possible, is to take the Fibermesh and export it as Maya curves, then convert the curves in Maya to polygon strips/cards for the various hair sections, so I can render his hair in something like Cryengine. I wonder if anyone has attempted this, or can think of a better way? Anyway, his skin is mostly done. I need to further add moles, splotches, scars, and tweak it out. I'm shelving him for a bit right now, though, because I'm doing a Lieutenant Raziel sculpt for the 15th anniversary of Soul Reaver 1 that's coming up in a couple of weeks. At least I hope to have the preliminary sculpted features done by then. -
No to both. Haven't had any issues with retopology prior to this. Thanks for the suggestion, though. Thanks. I've sent you a pm with an obj of one of the tries at this. I've gone ahead, though, and taken the retopoed mesh into 3Ds Max to uv it. No issues there. In 3D-Coat, I was able to select the faces with no problems. I am thinking it might be due to the vertices being so close together, even if they aren't directly overlapping, as this is a tiny mesh with a very tiny edge to those nails, since they are fingernails, and it's that edge that's been the issue in adding seams. I know 3D-Coat (at least it used to) had issues with making really thin meshes. Maybe it's just having a hard time with that edge. Edit: I should add, the mesh I sent doesn't have polygons for under the nail like my other tries did, which would be why I would need to add a seam to separate that portion. However, if you add a a seam anyway along the edge, the crash should eventually happen, and unwrapping the mesh, with or without seams, should still show the utter mess it becomes.
-
Same result. For a moment there, it seemed like it might be working better; 3D-Coat didn't crash, but the uvs were still screwed up. A second attempt at opening it and unwrapping caused it to immediately crash. I was thinking maybe the reference mesh was the problem. But, it happens when I bring in just the retopoed mesh by itself.
-
I'm having a major problem with the retopo room in 4.1.09c. I'm only doing some tiny nails for a character's hand. A few polygons each. It not only won't break into uv islands right, it crashes 3D-Coat when trying to add seams/unwrap every time. I've tried this three different times, in three different, simpler ways. Same problem: Uvs attempted to be applied: Only one pair of them looks remotely right. The checkerboard island breakdown on the model shows the others are all screwed: Even floating the mouse around in the menu causes crashes: Adding seams eventually crashes fully it: Pretty crazy. I've retopoed similar tiny/thin pieces before without any issue on previous versions, like multiple buttons and rivets. I just tested again adding seams to another mesh and unwrapping and it worked fine. Windows 8.1 AMD 6300 processor ram 12 gb Radeon 7700
-
Brand new to modeling. Using 3D-Coat, Zbrush, some Maya and Max, texturing with Photoshop. I'm currently aiming to do next gen animations, recreating the cutscenes of one of my favorite game series, the Legacy of Kain series (Soul Reaver 1 & 2; Blood Omen 1 & 2; Defiance).
-
-
 Great model and textures
 -
 Thanks. When I started this model months ago, I had some major issues. This is my first model, so I wasn't prepared for them. Not sure if I would have been even if I had more experience. On the previous build of 3D-Coat, the brushes like crease clay were adding just way too much dynamic tessellation and the polygon count of my model was soaring. Other issues like holes and tears in the mesh became unbearable to deal with. Trying to close/fix them would lock up the program for a half an hour, or more. I did a first version of this model where this happened, and I was given some advice on how to better prepare the model in surface mode, which I did, and yet it still happened a second time, so I had no choice with a model over 36 million polygons on just the head and upper torso (something like 100 million for all parts), but to chop it up and finish it in Zbrush, where I'd have control over what division level I was at. Decimation in 3D-Coat, at least on those builds months ago, did not preserve the detail to my liking. The other reason ties into this, in that I always was going to have to take it into something else to texture it, because I wanted to go higher than 2k textures on this and my license for 3D-Coat is an education license. I don't have the money for the full license, unfortunately.
 -
Looking for Advice on the best method to Detail Models
pgson replied to pgson's topic in Finished Projects
Thank you very much Heh, ah so more fun to look forward to, eh? -
Looking for Advice on the best method to Detail Models
pgson replied to pgson's topic in Finished Projects
Yes, that is coming next. I need to rig him and put the sword in his hand, once I'm done the sword. Yeah, I am taking away from it all that I jumped into the pool head-first, basically. I never modeled before, and this was a completely new world I stepped into and there was a lot to learn. I didn't pick an easy starter project, either. I probably am still doing some things the hard/wrong way, but hopefully I'll avoid the huge pitfalls I stepped into with this going forward. There was one moment I did almost quit this. When I finished the sculpt and the polypaint on the head and body, then found out that Zbrush didn't like me going into HD Geometry so late, and so it crashed every time I attempted to get any map other than the diffuse out of it. I searched and searched for how to solve this. Anyway, after all of the other problems, this was about the last straw. If I couldn't get the model out of Zbrush, it was worthless to me. I figured someone was trying to tell me to forget it. But, anyway, it worked. I never, ever, ever expected it to take anywhere near this long, though. Thanks, man. -
Kain GlyphX model full Recreation resized 2
pgson commented on pgson's gallery image in Finished Works
 Thank you very much
 -
Looking for Advice on the best method to Detail Models
pgson replied to pgson's topic in Finished Projects
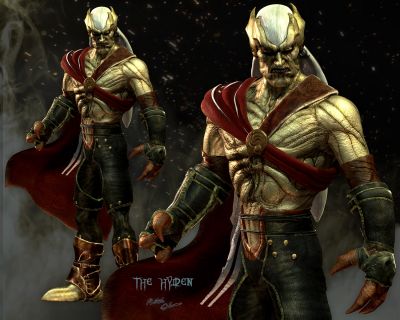
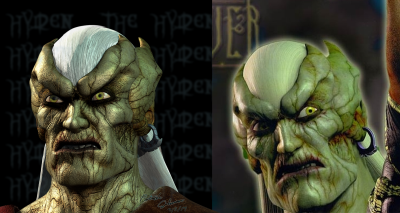
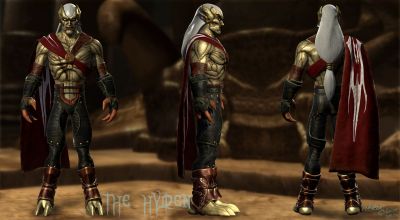
After feedback from fellow fans, many final adjustments made. Shrunk the neck, his crown pieces, worked on his face. Worked on lessening his skintone saturation, worked on hue. Altered proportions on his guantlets, his pants, elongated his legs so he's a full 7 heads tall, modeled an entirely new cape to be more folded over up top, wider at the bottom, fixed his earring's shape and color. Final renders: Final comparison shots to the original games' model: And with that, this model if finally DONE. I can finally add him to the finished work gallery and move on. I'll finish his Soul Reaver sword and pose him with it. Thanks for the help along the way, and sorry again for so many large pics. Here's to greener pastures from here on out -
Looking for Advice on the best method to Detail Models
pgson replied to pgson's topic in Finished Projects
Thanks a lot One final bit of tweaking left to go, hopefully. -
Looking for Advice on the best method to Detail Models
pgson replied to pgson's topic in Finished Projects
Thanks -
Looking for Advice on the best method to Detail Models
pgson replied to pgson's topic in Finished Projects
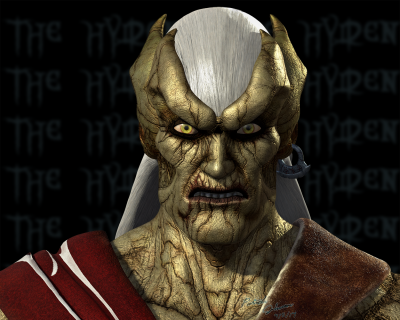
Updating this. I wound up having a major hard time trying to get this all working. Chopping the model up in Zbrush, I went about trying to get it pieced back together again. Had a crach course in Zbrush's issues, used Zremesher and 3D-Coat to retpo it, then back to Zbrush to reproject the details. The highest I could go in subdivisions still wasn't enough to reach the detail level I had in 3D-Coat. I discovered the projection brush in HD geo mode could do it, though a painstaking process. It would not come back to haunt me until much later that I followed the description in their online Doc, rather than the video. In the Doc, it basically tells you to go into HD Geometry divisions if you can't go any higher on normal, but it doesn't specify to go into this earlier in your divisions, like the 1-5 million point, as the video tutorial says. So, memory issues, crashes, and inability to get normal and displacement maps is what I wound up with far later after painting and uving the model. It then took me quite a time to figure out how to get the maps, which program and methos was best to get the maps, and all of that. It's been an experience... I'm about done. I thought I was, or fooled myself to thinking I was. However, the proportions on his face aren't quite right, and the skin is a little too saturated golden. So, this is almost done... Just thought I'd update since it's been dormant forever. Finished the model in Zbrush, retopoed and uved in 3D-Coat, some with Zremesher, smoothed normals in Maya, polypainted, then Photoshop for tweaks and other maps, metalness (or specular, depending on the item), gloss, etc. Rendered in Marmoset Toolbag 2: Final Sculpt in Zbrush: Little barrage covering months of banging my head against walls :p I need to fix the face, then maybe this can finally be finished...