Search the Community
Showing results for tags '3dcoat'.
-

From the album: Alemar 3DCoat Gallery
© Marco Alemar
-
- 1
-

-
- character creator 3
- 3d
- (and 2 more)
-
The Plane tool's Pick point & Direction (Local) mode is broken.. when selecting a surface (by right clicking the surface) to project the local direction, the local projection isnt aligned correctly to the surface, it rotates slightly making the tool useless to flatten surfaces or expand an already flat surface as it will slowly diverge from the initial local direction of the surface. if you hold right click and drag over a slanted surface that is 100% planar, you will see in the Tool Options Menu that the Normal cords will shift around, this indicates that the surface isnt Planar as the Normals are changing from one point on the flat surface to the next... this only happens when a surface isnt 100% XY or Z projected, ie - a boxes surface that is rotated. The only way to currently get an aligned projection to the surface is to change your brush to something like the clay brush, hover your brush over the flat surface and press the (*) button to align your camera to the surface, than pick the "Pick point & Forward Direction" option in the Tool Options Menu and right click the surface. in the first image i uploaded, you can see the red plane is sliced in half indicating that its not local to the surface, i got this result by turning a box and res+'ing it once. the second image is how the first image should look, and in this one i aligned my camera to the surface than right clicked with the "Pick point & Forward Direction" option. i cant think of any practical reason for the local mode not working so it must be a bug, this is the newest update and i dont know how this has gone undiscovered for this long but i hope it can be resolved.
-
I know this is the wrong section, but the feature request was disabled for posting? I'm working on mapping some bread to low polly loaf shapes, I've been shooting photos of each side stitching together onto a 2d plane and then mapping orthogonal views to each side and then stamping (cloning) out seams, they look really good (SEE ATTACHED SCREENSHOT OF FINAL). I've been jumping back and forth between substance and 3DC bc technically for what I'm doing they pretty much do the same thing, BUT when I need to tweak alignments and such I have to jump to photoshop and liquify and then bring back in and I know substance has live layering and 3DC also does from projected views to use this a work around. Ultimately, it would be awesome to see a liquify toolset in 3DC and i would never use another program again! Affinity Photo has an even better live liquify capability and dozens of other photo softwares out there have the included toolset, so to think an added plugin to 3DC wouldn't be too unrealistic. With a UV set it could easily bring in the UV set to a separate window with the generated pixels from the specific layer selected (Merge all could be used to capture entire work area, or isolate a specific layer selected) and liquify tools to help adjust would be simply amazing and very functional. Smudge and other tools just deminish quality completely, but to have a functional less diminishing option similar to photoshop liquify would be magic! In addition, TRANSFORM would be amazing, to take a layer and transform it to move across the 3d plane on an object, scale, rotate, etc..would be equally as great.. If 3DC did nothing else between now and V5 that would be an amazing add on that would just be texture paradise in my opinion. I come from 15 years of retouching, and I may be bias, but ultimately textures are super important and to add a few essential retouching tools to the 3DC toolset would be a great overall improvement, and leave SP in the dust in my opinion. Now that Adobe has their future in their hands, it's not long before similar strides are probably met on that end. Ultimately, these may just not be able to work into the program, but in my head they seem to and I would love to know why they wouldn't if so. LASTLY, I know there is the TRANSFORM/COPY tool which isolates a selection to transform and copy again, which is nice and does come in handy, I am proposing a transform layer option in addition to that tool, which essentially you take the current layer and can rotate and transform live across the 3d plane, for example you paint a smily face with height and color so you have a bit of a raised smily face, you can then freely drag it rotate it scale it across the plane while still keeping that layer isolated and nothing changes except the UV coordinance. I know a work around and similar method would be a smart object with an alpha mask and then painting in, which is nice and works. But if I'm cloning small pieces and want to slide up or over or copy and move again and have these all isolated to layers individually, this is my goal and dilema. Thanks! I love 3DC and just want to keep making it more awesome. SD
-
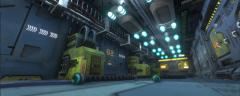
From the album: Sci Fi Concept
-
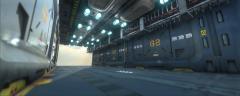
From the album: Sci Fi Concept
-
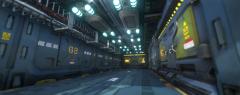
From the album: Sci Fi Concept
-
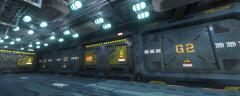
From the album: Sci Fi Concept
-
From the album: Sci Fi Concept
-
From the album: Sci Fi Concept
-
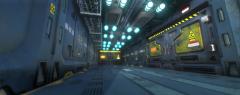
From the album: Sci Fi Concept
-
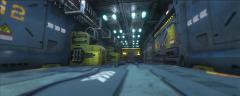
From the album: Sci Fi Concept
-
From the album: Sci Fi Concept
-
From the album: Sci Fi Concept
-
From the album: Sci Fi Concept
-
From the album: Sci Fi Concept
-
I've been editing an existing retopo and saving my progress along the way. However, when I reopen the file, it is showing only the original version. My edits aren't shown until I use "delete edge" on it or click the retopo layer "hide" and "unhide" it. I'm not sure how to export my edited version. Any advice would be great, thanks
-
 Hey Everyone! I'm trying to use Falloff to try to control Alpha's MidValue. I know that falloff is not for that. The result is a surface inflated inward or inflated outwards. To apply detailing on a character is virtually impossible, because there is no way to control the alpha on the surface of a flattened way, ie only the detailing on the surface without inflating and deforming the the surface of the character. If you do not use Falloff, the alpha will look rectangular step inward or outward. From what I know, there is no control to solve this within 3D-Coat. It is very complicated for an artist to use alphas to detail a character without having control of how the alpha will deform the surface of the mesh. If the user does not have a control similar to MidValue, it will be very difficult for the artist to perform his quality work within 3D-Coat and this will cause the artist to try to do his work in another program. And more complicated is the artist who has no knowledge of trying to fix the alpha in an external program just because of MidValue. Sometimes alphas textures (displacements) bought on websites when they are used inside 3D-Coat have the same IMAGE effects as I did (above picture) because there is no function inside 3D-Coat that controls Midvalue. And to be very honest with you, I do not know how to fix the Alphas in an external program, even though I know that 127, 127, 127 (gray) is the point of no deformation. I know it's annoying to say that, but unfortunately if I do not figure out a way to detail my characters inside 3D-Coat, I'm going to have to use another program for that. This makes me completely sad because I would like to do all my work within 3D-Coat because 3D-Coat is my main program. At the moment, unfortunately, I do not like to say this, but I have to agree with many other artists that I listen to that they use the competing program to detail their characters because they have the means to do so. The image bellow I'm trying to show the importance of MidValue to fix possibles problems with the alphas: I made this video to demonstrate to all of you why the MidValue function is essential and important. In the video, I show the difference of this function between ZBrush and 3D-Coat. Please watch and if you want to speed up the video so you do not get bored, just be aware of Midvalue values. In Video, in this example , when midvalue has a value of 0 in ZB it has the same result as FallOff of 3D-Coat with a high value, which results in the out-inflated surface. I already researched and I've done thousands of tests with the alphas to try to solve the MidValue problem and I could not. It knocks me down. Please, if anyone knows how to control Alpha MidValue within 3D-Coat, share it with everyone. Or point out a way to fix these alphas in an external program. Thank you for your attention and sorry for anything. I already sent emails to Andrew talking about Alpha's MidValue and whether there would be a possibility for users to have a similar function to control alpha. Please, if you agree with what I have said and demonstrated, send @Andrew Shpagin an email (support@3dcoat.com) asking for something similar to the midvalue function. This is very important.
 -
This is a 3d rendering of Brom's concept artwork "Strik" for his card game "The Dark Ages". Modeled in 3D Coat and Blender. All Texturing was done in 3D Coat using smart materials. Some baking done in Blender and some in 3D Coat. Rendered using Cycles, and posed using Rigify addon (Nathan Vegdahl, Lucio Rossi, Ivan Cappiello) inside of Blender.
-
Hey everyone, I wish I could use a 16-bit alpha in 3D-Coat. Before importing the 16bits alpha to 3D-Coat, I checked it and it really is 16 bits. Remembering that I saved this alpha in Tif format. So I created a cube of 500,000 polygons inside the Zbrush and exported the obj. I imported this cube into 3D-Coat. I used the same alpha in ZBrush and 3D-Coat. The result of this alpha in ZBrush is better than the result made within 3D-Coat as you can see in the image. Does importing the alpha (even if in tif) into 3D-Coat, will the program automatically convert the 16-bit alpha into 8-Bits? I can not understand this difference that is happening in the picture. I believe there is an error or bug happening in 3D-Coat when I right-click the alpha, a menu appears with options, when I choose "edit in Ext. Editor", I realize that the alpha is no longer 16 bits and yes 8 bits in the external editor. And when I choose the "Edit the 16-bit Tif" option a reading error occurs and instead of the alpha appears (no alpha) a dark square. I have already tested on Gimp 2.10.8, Krita 4.1.7, Photoshop CS2 and it always happens the same thing. Please, I would like to know what I could do to actually have a 16-bit alpha inside 3D-Coat? I'm attaching the cube and the alpha. Thank you alpha_and_cube500k.rar
-
I recently bought 3D Coat and I've been having fun with it. The fun lasted until I exported the textures to Blender. The results I'm getting in 3D Coat are not the same I'm getting in Blender. The textures look stretched and the details are not there in Blender. I tried using Eevee, unwrapping in different ways and tried different export setups. Soo this is how it look on 3Coat and this is on Blender UVs and nodes and here is the export setup I hope is something I'm doing wrong and someone can help me out because its been frustrating
-
Hi! I have made a 3d scan of a starfish using the real sense camera SR300. I used 3D System Sense software. It outputted an .obj and an .mtl filetype. I used blender to clean up around the model. Then, I exported it from blender to 3dcoat as an .obj filetype. In 3Dcoat, I fixed up the mesh and the texture. I exported it as an .obj file type and put it into unity, but the texture is missing. The texture is visible on the mesh in 3dCoat, but it is not accessible through the Texture editor. I am at a loss. Can anyone help me figure out how to recover my texture, so that I can export the mesh and texture into unity? texture editor doesn't show the texture.. XOif I turn off layer 1texture visible in 3D coat, but not accessible..... ;/ I would be REALLY grateful if someone can help me out! Thanks! Leona S
-
Been a while since posting. Model was done and rendered in Blender as well as smoke FX. All texturing was done in 3D Coat.
-
Hello guys, I love using 3D coat to retopo, UV and texture. I just have an issue on 80% of the models I work on with "symmetry". It will be working great, then out of nowhere later into the project it seems like all the polys snap to the symmetry axis plane... What causes this to happen, how can I prevent/stop it from happening and how can I fix the retopo after this happens. Once I turn off symmetry, the original half goes back to normal, but I can't use symmetry on it again unless I export, import. Did I just answer my question or is there another way? Thanks!
-
 So I'm using the Strokes tool: and I'm drawing lines with my mouse/tablet pen like this: Now sometimes I accidentally make a straight line by clicking OUTSIDE the object and dragging but I want to do it within the bounds of what I'm retopo-ing. How is this done? Note: I know to use Shift for 45 degree and straight lines but this isn't what I want in this particular case!
 -
Hi guys, I hope the question doesn't sound too silly, in that case, pardon me for my noobness! As you know I'm still relatively new to the software, and in these days I'm studying the smart materials abilities of 3DC. My two questions are very simple and straightforward: - Can I create smart materials/materials in Substance Designer and then import and use them in 3DC? - Does it make any sense? I mean, does 3DC smart materials editor has any flaws or lack, or I can just craft the craziest, cartoonish or hyperrealistic materials? Thank you for your time! ^-^