Search the Community
Showing results for tags '3DCoat'.
-
Hello, i was wondering could someone help me i have been paining my maya model in 3d coat and its just that the colors i apply look so fake or just weird. i know the model is not fully colored i stopped due to the weirdness/oddness of the colors and came to here for help. So basically im asking how to make the color look vaguly better and not fake or like they were applied by a bucket.
-
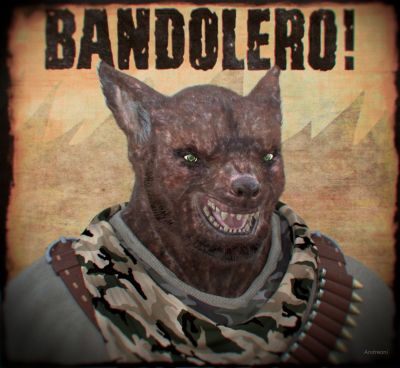
From the album: Carlosan
Old project redone, all the sculpt, polypaint base, retopo, bake and texture paint done at 3DC. Hair, shaders, light and render at Blender cycles. Comp and postpro at Gimp.© @CA
-
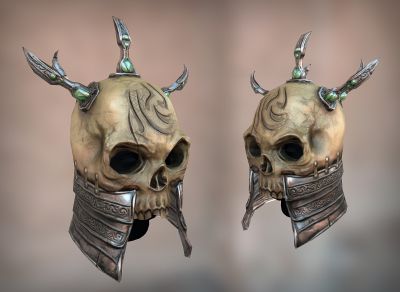
From the album: Fantome artwork
Rendered in marmoset. -
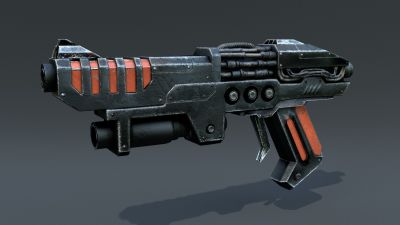
From the album: Malo
Sci Fi Gun. Modelling - 3d Coat Texturing - Substance Designer Render - Blender Cycles© Malo
-
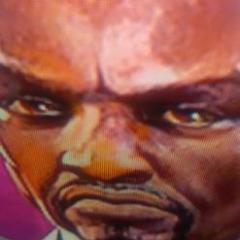
Здравствуйте жители форума, профессионалы и уважаемые творцы, представляю вашему вниманию мою новую работу, которая полностью оттекстурированa в "3D Coat", большая часть работы проделанa именной в 3д соат. ССЫЛКА НА ВИДЕО http://mybestworks.webs.com/apps/videos/videos/show/18594194-cbc-reinsurance-company-logo-animation DIFUCE - хочу отметить, что эта не текстура, которая взятa и налепленa просто нa модели, 90 % это рисованная текстура, с помощью 3Dcoat и VACOM intuos. в 3д соат есть уникальные возможности для этого. остальные 10 % скачанные из инета, например, кирпич и железные стойки. BUMP - да ,я нашел способ получить бумп из 3D соат, несмотря на то, что нет прямого экспорта, все-таки есть возможность получить BUMP, когда рисуешь на модели с включeнным нормал мап и создаются вмятины и выпуклости, рельеф, нужно экспортировать как нормал мап, a потом c помощью CrazyBump открыть нормал мап, но при открытии указать Open us Normal map. и отрегулировать spelulariti вкладку, как ни страно, нормал отлично конвертируется в Bump, и нa модели получаю именно то, что я рисовал в Coat с помощью включенным нормал. потом можно миксовать в фотошопе с дисплейсмент мап. (сейчас появится у вас вопрос а почему бы не создать бумп в фотошопе, а потому что когда ресуешь вместе c нормал при экспорте получаешь толкo цвет но не выпуклости ) SPECULAR | CAVITY | тоже получены из 3д соат, с помощью разных манипуляций. DISPLACEMENT - кстати, что-то дисплейсмент барахлит, когда выпускаю в фотошопе, открывается нeправильно черно-белые точки без градации. помогают следующие действия, открываю в паинт, нажимаю сохранить, а потом открываю в фотошопе и потом все правильно отображается. вообщем, судите строго ПС: от тех людей, которые (неадекватно) комментировали (совершенно не понятным мне причинам удалили) мой старый пост про 3Dcoat. LOGO комментарии от них не принимаю!!! мне они не интересны. просто обходите стороной. комментарии от адекватных людей внимательно прочитаю и приму все ваше замечания. спасибо зарание _____________________________________________________________________________________________________________________________ PS: those people who (inappropriately) commented (completely incomprehensible reasons and delete) my old post about 3d Coat LOGO. comments from them do not accept! to me they are not interesting.!!! so please do not comment here. Thanks.
-
Dear 3d coat team, I have another idea, something that I believe is missing for your programme to officially compete with the likes of zbrush when it comes to creating character models for games, and these tools are the following. Rigging System, this tool would allow you to create a character rig inside of 3d coat negating the need to export the character into another programme getting rid of the need to compensate for the differences in both programmes used and all other checks you need to perform and the act its self of exporting the character model, overall speeding up peoples creativity and allowing people to create their models quicker and get them into the game engine fully complete faster. for this you could utilize the curve tool just like zbrush does with the zspheres, and if you include spheres 2 functionality you could create the rig first then paint over the rig creating the base mesh or if you have already got the base mesh use this tool to create the rig. plus if you create the rig first then the base mesh, the rig would automatically spend itself to the rig it is being drawn on but if you are creating the base mesh first then you have to append the rig to the mesh of your choice by hand. Weight Painting for character animations to work or should I say to be able to create character animations, the mesh needs to know how to behave when a bone moves that is in the local area, the way this is achieved is by weight painting the mesh, this could be done inside the paint room, currently you are able to paint, colour, normal/bump, specular/highlight, and emission, this would allow you to weight paint the mesh for character animations, a way to see how the changes affect the movement in real-time when the corresponding bones are moved would also be a nice addition, this would mean that you would not have to constantly move the character between rooms to see if the changes are any good, it would greatly improve speed and accuracy of the results and the fun factor, I do believe it would make the tedious task of weight painting more fun and therefore a task more manageable within 3dcoat which would be a good marketing ploy and win over some zbrushers, and since you can do all of your game character completely within 3dcoat with this improvement, why would you want to have any other programme other than this and the specific game engine of choice. it would become the perfect companion of game developers. the last point is character animations, the ability to create character animations inside 3dcoat so that you can create fully complete game characters inside 3dcoat, through applinkz, you could include support for other character animation tools in other applications that currently support applinkz therefore the person is not just restricted with creating character animations in either one or the other but can actively switch between the two programs to create character animations in both 3dcoat and his other animation too of choice whether that is blender or 3ds max. thank you I do honestly believe that this would be huge, and would definitely be the programme for the artist, just a note if you need to export something, then the programme is not finished and not artist friendly, any tool that allows me to do both inside the same application is a god send.
- 13 replies
-
- 1
-

-
- characteranimations
- 3dcoat
- (and 3 more)
-
Right now I'm creating a character, 3d Coat has been amazing. I love being able to paint my textures, move the forms around in 'Sculpt', back to 'Paint', and edit and apply uvs in the other tab, all in one software! #winning. One thing that came to mind was that I didn't like some of the actual topology of my model I was painting. I really wanted to Merge/Weld two Verts together. It would of fixed everything!! ;P Is there any 'Merge Vertices' tool somewhere, in the 'Sculpt' tab? I looked in the retopo tab, but it looked like there was just retopo whole mesh tools, using my model as a reference. I want to edit the reference though. Hook meh up! <3<3<3
-
Hi all, I'm currently on a bit of a mission adding several new 3D Coat related tutorials per week to my youTube channel:- Here's a link listing all my 3D Coat tutorials:- https://www.youtube....sources+3d+coat Hope you find em useful!! Please fav/rate, comment & ask any questions you like. Thanks, Psionic
-
Hi everybody, We want to show you a part made with my ENVISIONTEC AUREUS in RCP30. This part have been done with an scanning of a woman made with a DAVIDSCAN SLS-1, and slightly retouched with 3DCOAT (used basically for put a ring rail and make the part empty inside). I hope you like it Regards. HISPANATEC - TECNOLOGIA HISPANA Albert Gracia
-
 Hey Guys, I'm having a MOVING SALE!! All our 3D Coat and other Software Video Tutorials are on sale for $10 Each (Almost 50% Off) -Over 65 Titles!! http://www.learn3dsoftware.com/quick_pick_list_10_dollar_moving_sale.htm All our videos will be on sale for only $10 Each until we have reached our goal of 500 videos sold. Don't forget to check out our Free Model Packs (Windows Collection Vol.#1 and #2) and our Youtube Channel with hours and hours of free video beginner 3D training. Have a Great Weekend:) Learn3DSoftware.com
 -
 Do you think it would be possible to add a function for increase the quality level used when editing in rapid projection (outside of 3Dcoat) just like BlackSmith 3D ? This mode is really usefull and work perfectly, but the quality loss is too large if the resolution of the projection remains in the screen resolution. Just to explain quickly if you don't known how work BlackSmith3D, you can choose from 100% to 1000% of the current screen resolution to work with the external projection mode, working in the 1000% mode if just perfect, because the projection has virtually no loss. I hope you understand, and sorry for my very bad English; i'm French
 -
Happy New Year to All, Those of you who are interested in some Free Beginner Tutorials for 3D Coat, Lightwave and other Software Packages can visit our You-Tube Channel for hours and hours of mini-tutorials at the link below. http://www.youtube.com/user/Learn3dSoftware ------------------------------------------------------------- We are also have a New Years Special at Learn3DSoftware.com All training videos are only $10 each until Jan.15th http://www.learn3dsoftware.com/10_dollar_new_year_special.htm ------------------------------------------------------------------- Also don't forget to check out our FREE MODEL COLLECTIONS for some nick-nacks you can use in any of your 3D projects for free. http://www.learn3dsoftware.com/window_collections.htm Happy New Year!!!
-
Tiling Engine 'Sandbox Tiler' - Fill with Voxels ***Please support this idea on Trello*** I have had this idea of a system whereby we can create easily Tiling textures using Voxels ever since Andrew started working on the Alpha for V3. The easiest things to compare it to are Zbrush's Tiling Canvas or Corel's Painter Pattern making function where you paint and your brush will go off the edge of the canvas and wrap around to the opposite side. Therefore creating easily tiling textures without worry. The difference here being that you are using actual voxel geometry in 3DC instead of on just a 2D canvas. I mocked up 3 images using Silo & photoshop to help demonstrate what I mean by this. It should work in theory very much like the Tiling Grid from the start up screen if you've ever used it. Advantages for using Geometry instead of painting bump (the two can be used in conjunction - paint high detail bump at the end of the process) -You can get a much nicer normal map that works better with game lighting engines. -You can extract an exact tiling 32Bit Displacement map for high resolution rendering. -Visualising the placement of objects in 3d space (e.g. overlapping bricks, grout, moss in cracks on different layers etc.) -works with Merge Tool -works with all Tools & Brushes -exactly replicates states of point cloud & surface that wrap around at the extents of the sandbox. Let me know what you think as I can imagine this would be of a lot of use to artists creating Tiling textures for games/film. p.s. Just realised how 'Tomorrow's World' this request is. Maybe by 3DC V4 or V5