philnolan3d Posted November 30, 2009 Report Share Posted November 30, 2009 I was trying to learn the zbrush interface but it keeps giving me a headache, so whenever I got tired of fighting with it I came back to 3DC and worked on this. She's based on the title character from the Armitage III series of movies, though a little more realistic. Here's a Turn-around render on YouTube, slightly older than the still above: 1 Quote Link to comment Share on other sites More sharing options...
Member Yearoftheox Posted November 30, 2009 Member Report Share Posted November 30, 2009 wow, very clean sculpt. Is this done all in 3dc? what is your workflow if not? Quote Link to comment Share on other sites More sharing options...
philnolan3d Posted November 30, 2009 Author Report Share Posted November 30, 2009 Thanks, I have to admit I cheated a little, I started with a base nude female model from Make Human, but most of that is gone now, by the time I'm done even more will be gone (I'm replacing this head). Some of the details were made by using the Copy tool to copy a part to a high res layer, then scaling it and working on it in other ways. Some other parts were made by retopoing a part, adding extrusion, then just hitting Enter with the Cloth tool (no sim). I did that for the boots, but first exported the retopo to LightWave where I added the thicker heals, then brought it back in. I also started the jet-pack thing as a simple shape from LightWave, but I changed it a lot after importing it. The "pod" things were done it LightWave and they're pretty much the same, only changed them a little. Quote Link to comment Share on other sites More sharing options...
philnolan3d Posted November 30, 2009 Author Report Share Posted November 30, 2009 Here's a small little video showing all of the 14 layers she's currently made of. These will be merged together before the end. http://screencast.com/t/ZjhiZjljYTEt Quote Link to comment Share on other sites More sharing options...
Taros Posted November 30, 2009 Report Share Posted November 30, 2009 Thanks, I have to admit I cheated a little, I started with a base nude female model from Make Human, but most of that is gone now, by the time I'm done even more will be gone (I'm replacing this head). Some of the details were made by using the Copy tool to copy a part to a high res layer, then scaling it and working on it in other ways. Some other parts were made by retopoing a part, adding extrusion, then just hitting Enter with the Cloth tool (no sim). I did that for the boots, but first exported the retopo to LightWave where I added the thicker heals, then brought it back in. I also started the jet-pack thing as a simple shape from LightWave, but I changed it a lot after importing it. The "pod" things were done it LightWave and they're pretty much the same, only changed them a little. No Phil, that's not cheating. That is reality and professional thinking. There is no way to work and think on one application only, today. Very nice work. Keep on goin. Quote Link to comment Share on other sites More sharing options...
philnolan3d Posted November 30, 2009 Author Report Share Posted November 30, 2009 Yeah I know, I was just kidding. They used to tell us the same thing in school when they talked about touching up rendered frames in Photoshop. Quote Link to comment Share on other sites More sharing options...
Contributor 3d_sculptress Posted November 30, 2009 Contributor Report Share Posted November 30, 2009 hi, Phil...very articulate Quote Link to comment Share on other sites More sharing options...
philnolan3d Posted November 30, 2009 Author Report Share Posted November 30, 2009 Thanks, here's a small update, small, but challenging. Quote Link to comment Share on other sites More sharing options...
philnolan3d Posted December 3, 2009 Author Report Share Posted December 3, 2009 Here's an update: Quote Link to comment Share on other sites More sharing options...
Reputable Contributor digman Posted December 3, 2009 Reputable Contributor Report Share Posted December 3, 2009 The charactor is looking sharp with very clean lines. nice work... Quote Link to comment Share on other sites More sharing options...
philnolan3d Posted December 3, 2009 Author Report Share Posted December 3, 2009 Thanks, it's fun to work on. Quote Link to comment Share on other sites More sharing options...
Taros Posted December 3, 2009 Report Share Posted December 3, 2009 The armor and cloth is a little bit commingled. I especially don't like the knee pads, their style extremely don't fits to the rest. And you should check the wrinkles again. But you are going to be better from model to model. Quote Link to comment Share on other sites More sharing options...
philnolan3d Posted December 3, 2009 Author Report Share Posted December 3, 2009 Yeah I'm still cleaning some things up. As far as the knee pads, I didn't design the character. Quote Link to comment Share on other sites More sharing options...
philnolan3d Posted December 8, 2009 Author Report Share Posted December 8, 2009 More details and updates: Quote Link to comment Share on other sites More sharing options...
philnolan3d Posted December 8, 2009 Author Report Share Posted December 8, 2009 Reworking the wrinkles on the sleeves. Still rough and low-poly, but here's progress. Quote Link to comment Share on other sites More sharing options...
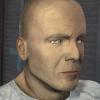
philnolan3d Posted December 12, 2009 Author Report Share Posted December 12, 2009 OK the intention all along was to replace the head with one I sculpted myself. I started doing one from a sphere and wasn't really happy with it so I eventually gave in and loaded up the polygonal head that was also used in the shots above and decided to try and use that as a base and adjust it to look like my reference head. I'm still not really happy. Here's my reference and the sculpture (still low detail) What's wrong with it? It looks "manly" to me. Is it just because it's still low res? Quote Link to comment Share on other sites More sharing options...
Contributor 3d_sculptress Posted December 12, 2009 Contributor Report Share Posted December 12, 2009 OK the intention all along was to replace the head with one I sculpted myself. I started doing one from a sphere and wasn't really happy with it so I eventually gave in and loaded up the polygonal head that was also used in the shots above and decided to try and use that as a base and adjust it to look like my reference head. I'm still not really happy. Here's my reference and the sculpture (still low detail) What's wrong with it? It looks "manly" to me. Is it just because it's still low res? hi, Phil..I'm sure it may have some to do with low res, but I went ahead n played with it just to compare....now these pics are a little fuzzy after I enlarged them, so it was kinda hard to tell what some areas really look like, , but did you notice that her left eyebrow is quite a bit higher than her right eyebrow ?..I didn't notice that til I put a line tool over both eyes,,but I went ahead n used the line tool to check some other points (nose, mouth, etc....when I put the ref pics directly ontop of the other pics, the ref face shapes lines up with all 3 of your 3d pics, but based on the line tool, some areas could be offset just a little...it seems like you have given her cheeks and the area under her eyes too much 'puff', so anyhows, I painted over the first ref pic, and raised her brow, n lowered her nose (see pic 3 n 4) I also widened the distance between her eyebrows, and 'v'ed the area more.......was just a rough paintjob, but was just trying to test it...based on the line tool, her nose may need to be lowered, and the nostrils appear to be too high, so you may want to try lowering them also...it might help to widen the bridge of her nose just a little, and the nostrils may need widening, too, but can't tell right now...the ears seem like they are too wide horizontally...........hope I'm not overdoing it here, just trying to help , you know that.... Quote Link to comment Share on other sites More sharing options...
philnolan3d Posted December 12, 2009 Author Report Share Posted December 12, 2009 Thank you, you know those are just thumbnails right? You can click them to get much bigger images. As for the eyebrow I didn't notice that but right now I'm working with symmetry on anyway. I figured I'd make some alterations after I was much further along to offset the symmetry. Quote Link to comment Share on other sites More sharing options...
Contributor 3d_sculptress Posted December 12, 2009 Contributor Report Share Posted December 12, 2009 Thank you, you know those are just thumbnails right? You can click them to get much bigger images. As for the eyebrow I didn't notice that but right now I'm working with symmetry on anyway. I figured I'd make some alterations after I was much further along to offset the symmetry. ha, nope, didn't realize they were just thumbnails.. .I clicked on the links that came in my inbox n those are the pics that popped up...so thanks for lettin me know..I'll come to the forum next time instead of clickin the links... Quote Link to comment Share on other sites More sharing options...
philnolan3d Posted December 12, 2009 Author Report Share Posted December 12, 2009 I think one thing that might be mixing me up is that in the reference photos the girl has a blank expression in the front shot but she's smiling in the other two, which increases that line on either side of her mouth (forget what it's called). Quote Link to comment Share on other sites More sharing options...
Contributor 3d_sculptress Posted December 12, 2009 Contributor Report Share Posted December 12, 2009 I think one thing that might be mixing me up is that in the reference photos the girl has a blank expression in the front shot but she's smiling in the other two, which increases that line on either side of her mouth (forget what it's called). yep, n her expressions may be why her eyebrow is higher on one side than the other, too, so guess you'll just need to find a happy medium and go with it, n hope for the best Quote Link to comment Share on other sites More sharing options...
philnolan3d Posted December 12, 2009 Author Report Share Posted December 12, 2009 BTW if interested she's from this photo set (NSFW). When 3D.sk was new and a lot cheaper I had a monthly membership and downloaded gigs and gigs of photos. Quote Link to comment Share on other sites More sharing options...
philnolan3d Posted December 13, 2009 Author Report Share Posted December 13, 2009 OK here we go. Looking better I think: Quote Link to comment Share on other sites More sharing options...
philnolan3d Posted December 13, 2009 Author Report Share Posted December 13, 2009 Latest update. New head attached, glove wrinkles, and redone laces. Here's a video of the lacing process: Quote Link to comment Share on other sites More sharing options...
Member Kevin De Smet Posted December 14, 2009 Member Report Share Posted December 14, 2009 Could you share how you go about modeling the wrinkled cloth? Quote Link to comment Share on other sites More sharing options...
Taros Posted December 14, 2009 Report Share Posted December 14, 2009 Nice. The Shorts don't needs much wrinkles. And some wrinkles are too strong and maybe at the wrong place. Look here for some examples: -> http://www.microkitten.com/images/prods/Kendra-S/shorts-821-s.jpg -> http://www.microkitten.com/images/prods/tasha-k/shorts-back.jpg Quote Link to comment Share on other sites More sharing options...
Member Kevin De Smet Posted December 14, 2009 Member Report Share Posted December 14, 2009 Ahh... research, someone's gotta do it, don't they? haha Quote Link to comment Share on other sites More sharing options...
Contributor 3d_sculptress Posted December 14, 2009 Contributor Report Share Posted December 14, 2009 hi, Phil..your mod's face is looking much better now (imo)...thanks for the tut, that was great...n I found several other tuts after I got to that link, found out some more helpful info about 3DC...will be posting a WIP asap. Quote Link to comment Share on other sites More sharing options...
philnolan3d Posted December 14, 2009 Author Report Share Posted December 14, 2009 Could you share how you go about modeling the wrinkled cloth? Well I don't know if this is the "right" way or anything, but it's what I've been doing. I use the Build tool for pretty much everything, including this. I usually make a couple of strokes to raise the initial bump up, then negative strokes on either side. That helps to emphasize the bump. Next the pointed brush with 100% falloff to add a little sharpness. Then I switch back to the other brush / 0% falloff and carve in a little on one side and add a little to the other side. This of course depends on the type of wrinkle. Sometimes a bit of Pinch helps too. Here's a really quick video: http://screencast.com/t/ODIyZGI0O I'm not quite a wrinkle expert, in fact I've only just begun, but I'm finding this book helpful: http://www.amazon.com/Dynamic-Wrinkles-Drapery-Solutions-Practical/dp/0823015874/ref=sr_1_4?ie=UTF8&s=books&qid=1260787972&sr=1-4 Nice. The Shorts don't needs much wrinkles. And some wrinkles are too strong and maybe at the wrong place. Look here for some examples: -> http://www.microkitten.com/images/prods/Kendra-S/shorts-821-s.jpg -> http://www.microkitten.com/images/prods/tasha-k/shorts-back.jpg They're not shorts really, it's full tight pants I guess. Here's a photo of my reference statue: http://www.spawn.com/toys/games/anime2/armitage/images/anime2_armitage_photo_02_dp.jpg There are no wrinkles in the statue's pants but I guess it would make sense to add some. Quote Link to comment Share on other sites More sharing options...
Taros Posted December 14, 2009 Report Share Posted December 14, 2009 No problem. You are the artist. Just do it like you want. The final result counts. Quote Link to comment Share on other sites More sharing options...

Recommended Posts
Join the conversation
You can post now and register later. If you have an account, sign in now to post with your account.
Note: Your post will require moderator approval before it will be visible.