


Forums
-
General
-

- 467
- posts
-

- 3.2k
- posts
-

- 49.8k
- posts
-
-
3DCoat
-

- 59.8k
- posts
-

- 3ds MAX NAVI
- By remark3d,
-
- 1.4k
- posts
-

- 627
- posts
-

- 7.3k
- posts
-
-
Community
-
International
-
- 275
- posts
-
- 76
- posts
-
- 1.3k
- posts
-
- 738
- posts
-
- 3.3k
- posts
-


-
Topics
-
hochauflösende Textur: Texturübertragung von High- Poly Modell auf Low- Poly Modell (3D Modelle)/ High-resolution texture: Texture transfer from high-poly model to low-poly model (3D models)
By ModderLS22, in Materials and Textures
- 1 reply
- 67 views
-
hochauflösende Textur: Texturübertragung von High- Poly Modell auf Low- Poly Modell (3D Modelle)
By ModderLS22, in Fragen und Antworten zu 3D Coat
- 0 replies
- 21 views
-
- 3 replies
- 2,742 views
-
making of How to create a LEGO animation without getting burned out?
By DenisWeber, in Finished Projects
- 3dmodeling
- animation
- (and 1 more)
- 2 replies
- 57 views
-
- 0 replies
- 39 views
-
-
Who's Online 0 Members, 0 Anonymous, 58 Guests (See full list)
- There are no registered users currently online
-
Posts
-

-

By ModderLS22 · Posted
Hallo, ich suche ein/e Tutorial/ Beschreibung in dem/ der gezeigt oder/ und beschrieben wird, wie man eine hochauflösende Textur eines High- Poly Modelles auf ein gleichartiges Low-Poly Modell überträgt. Es geht dabei darum die hoch auflösende Textur von dem High- Poly Modell auf ein Modell mit extrem (!) wenigen Polygonen/ Flächen zu übertragen. Ich denke mal dass ich das High- Poly Modell im Voxel- Raum erstellen muss und das Low- Poly Modell im Modelling Raum. Oder ? Ich benutze eine 3DCoat- Version aus Anfang 2023. Wichtig wäre auch wenn zu sehen oder/ und beschrieben ist, wie das von Anfang an gemacht wird. Also auch das Erstellen der beiden Modelle. Bei dem gewünschten Objekt handelt es sich um eine Ziegelmauer mit ungefähr 20 Ziegelsteine nebeneinander und ungefähr 30 Ziegelsteine (Reihen) übereinander. Davon dann 2 Mauern aneinander so, wie eine freistehende gemauerte Mauer. Das Low- Poly Modell habe ich im Modelling Raum erstellt, um nur ganz wenig Polygone/ Flächen zu haben. Ein Ziegel hat nur 6 Flächen, 8 Eckpunkte und 12 Kanten (wenn ich mich nicht verrechnet habe). Da soll die hochauflösende Textur drauf. Das ganze ist für den Farming Simulator 22 gedacht. Gibt es da was wo ich sehen/ lesen kann, wie so etwas gemacht wird ? Es gibt in 3DCoat zwar eine Routine die so etwas automatisch macht, aber das Ergebnis hat immer noch viel zu viele Polygone/ Flächen. Und wenn ich die Flächenzahl zu sehr reduziere, kommt nur unbrauchbares als Ergebnis heraus. Deswegen möchte ich die Übertragung der Textur gerne per Hand, also manuell machen. Freundliche Grüße, ModderLS22. -
-

By DenisWeber · Posted
I don't think they will mind fan art. -

By philnolan3d · Posted
If it's not done with permission watch out. Lego can be very protective and letigious with their brand. -
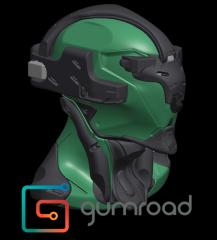
https://arcossculpt.gumroad.com/l/greenrobottutorial
-
By DenisWeber · Posted
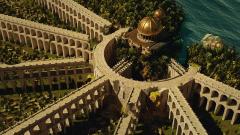
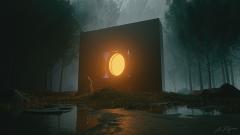
Hello everyone, this is Denis Weber. Today I’m going to talk about what happens if you combine LEGO and the iconic movie Terminator 2. I’ll show you how I created a real LEGO trailer and what came out of it. I like doing such large-scale projects and if you have any cool ideas, let me know in the comments. If you prefer the video format, you can watch it here. In 1984, the movie Terminator first was released and it blew up the movie industry. Then there was Terminator two which succeed on an even larger scale. Then there were other Terminators. I think you’ll agree with me if I say that Terminator 2 is the best movie of the entire franchise. An epic action, an exciting plot, unreal computer graphics and, of course, the rise of robots. It’s scary to imagine, this year the second Terminator is turning thirty-three years old. In those times, well, or 10 years later after release, I got LEGO myself and I loved it with all my heart. I wanted to combine two of my favorite things. Thank God, AI still cannot make such a video in one click. In this article I’ll tell you how I created the LEGO characters of the trailer and the large-scale locations of the film. The first thing I did I watched the trailer a hundred times. I cheated a little here and I already had a ready-made LEGO minifigure from one of my past projects. In the first frames of the trailer, the skeleton of the Terminator stands in the fire and looks angrily into the camera. I downloaded the photo and made a 3D model from it. Hair for models was a the hardest part. It was necessary to make sure that the Terminator evoked fear, not applause after performing the hit of the 80s. I spent some time modeling hairstyles, but I wanted to finish my project in time for the release of the next part of the Terminator, so I used free models from the MecaBricks website. MecaBricks has some cool detailed models, but that’s what makes it harder to work with. High detailed models adds thousands of polygons, and for animation it is better if there are fewer polygons, but not for Pixar. Therefore, I had to spend time optimizing the models. The naked terminator inside the capsule moves through time and space straight to the truckers’ parking lot. The Terminator’s trips from the future always involve uncanny lightnings and sparks, so in post-production I added lightnings, which I tried to make as similar to the original as possible. There are also the trucks and bar decorations. I bet the movie was shot the same way, with one wall facing the camera. OK, the trailer also has a scene inside the bar, so I had to build it as well. I even modeled a LEGO billiard table and tattooed the arm of a random Terminator victim. In the scene where T-800 is looking for John, the moviemakers show a picture of his eyes. I tried a few crazy ways to do the same before I got what I like. When Sarah Connor got the news that the evil guy from her worst memories is in the city, two cyborgs are already running after John. For this scene, I created a small hospital room without walls and floor. Sarah couldn’t even escape from there. She looks at the Terminator’s photo and says that her son is in trouble. And at the same moment, a huge truck with a killer cyborg falls off the highway straight onto John. Do you still need more suspense? Sarah fights with T-1000 to the bitter end and in many scenes she herself looks more like a Terminator than a sweet mother playing with her son on the playground. Many scenes show great work with light and smoke. It took a lot of effort to convey at least something similar to the original in my video. Some scenes are simply amazing in their epicness. For example, when, during a chase, the T-1000, at the pilot wheel of a helicopter, flies into a truck with the main characters at full speed. In this case LEGO parts should shoot out of it. This is the biggest scene of the entire trailer. It’s full of trees, particles, smoke and everything that makes it so memorable. And here is one of the longest scenes, the one in which T-1000 is chased by the car of the main characters. He jumps on the trunk, breaks the glass and, of course, at the last moment Arnold saves everyone. In general, a lot of police equipment is used in the film. Helicopter, police cars, vans and motorcycles. It’s good that all these models were freely available on the Internet. Otherwise, I would never have finished this project. I can’t even imagine how the creators made the effects for Terminator with the capabilities of computers and 3D modeling programs in 1991. In my project, T-1000 is literally created from T-800. They should be produced somewhere in the neighboring workshops, right? I don’t understand why T-1000 doesn’t turn into someone whom the main characters haven’t seen yet and calmly finish their business. The T-1000 continues to show us its abilities. You need to be a very self-confident cyborg to jump out of an office building at full speed on a motorcycle, straight towards a helicopter and then climb into it. I especially like this scene where the evil Terminator turns to the camera so that the spotlight beam is visible in the hole. It’s a small thing, but it looks epic. The trailer is so full of events and different scenes that sometimes I spent several hours just to set up a 3D scene, the animation of which did not take even two seconds. Anyway, if you watch the whole trailer, all the scenes look cool because they have a lot of details. The animation does not look like a collection of random objects and can be perceived as a whole film. For this scene, I needed to create something between the normal look of the evil Terminator and his liquid state. At first the model looked more like a Michelin mascot, but after a couple of hours everything started to look right. When I figured out all the models, scenes, light and animation, I had to work as a conductor and I created, so to speak, a similar musical theme for the trailer so that YouTube would not have questions for me. Oh, yes, also sound design, but I’ll tell about it the other time. I really spent a lot of time and effort creating the trailer. More than for any other project before. And I really wanted to tell you about all the little things, but the trailer turned out to be so big that I would not have had a couple of hours. The trailer is already on my channel, don’t forget to watch it too. Trailer Making of video I am glad that I completed the project to the end and I really like the result. Some time ago, I didn’t think anything would come of it at all. Thanks for reading. It’s going to be really cool something here soon. -
Go to Geometry menu > Visibility/Ghosting to assign a new hotkey.
-
By Oleg Shapov · Posted
I can't do anything. Try updating to the latest version. -

By ThomasBrissot · Posted
Ok, I created this model with sphere tool etc, activated symetry and selected lasso tool. As shown on the screenshot, both the lasso cursor and the "symetry cursor" (arrow) are showing but I can't cut anything. And the same thing happens with Pose tool. I noticed that the lasso (in cut-off or pose) just simply doesn't work but it's rare. I don't know how more specific I can get? Thanks! -
 How set custom hot key for isolate layer in view command ( Alt + click on eye icon )?
 -
-
 i heard it was 24 gddr7 and has a quad slot .
 -
source and source Nvidia could be doing something very different with the RTX 5090 Founders Edition compared to its previous flagship GPU, and the result might just be a thinner graphics card – which would definitely be a good thing, given how bulky high-end models have got these days. VideoCardz picked up on a couple of pieces of speculation here, the first of which is that the video memory configuration of the 5090 will be very different, as claimed by Panzerlied, a leaker on Chiphell (and we’d sprinkle plenty of seasoning on this).
-
By ModderLS22 · Posted
Hallo, ich suche ein/e Tutorial/ Beschreibung in dem/ der gezeigt oder/ und beschrieben wird, wie man eine hochauflösende Textur eines High- Poly Modelles auf ein gleichartiges Low-Poly Modell überträgt. Es geht dabei darum die hoch auflösende Textur von dem High- Poly Modell auf ein Modell mit extrem (!) wenigen Polygonen/ Flächen zu übertragen. Ich denke mal dass ich das High- Poly Modell im Voxel- Raum erstellen muss und das Low- Poly Modell im Modelling Raum. Oder ? Ich benutze eine 3DCoat- Version aus Anfang 2023. Wichtig wäre auch wenn zu sehen oder/ und beschrieben ist, wie das von Anfang an gemacht wird. Also auch das Erstellen der beiden Modelle. Bei dem gewünschten Objekt handelt es sich um eine Ziegelmauer mit ungefähr 20 Ziegelsteine nebeneinander und ungefähr 30 Ziegelsteine (Reihen) übereinander. Davon dann 2 Mauern aneinander so, wie eine freistehende gemauerte Mauer. Das Low- Poly Modell habe ich im Modelling Raum erstellt, um nur ganz wenig Polygone/ Flächen zu haben. Ein Ziegel hat nur 6 Flächen, 8 Eckpunkte und 12 Kanten (wenn ich mich nicht verrechnet habe). Da soll die hochauflösende Textur drauf. Das ganze ist für den Farming Simulator 22 gedacht. Gibt es da was wo ich sehen/ lesen kann, wie so etwas gemacht wird ? Es gibt in 3DCoat zwar eine Routine die so etwas automatisch macht, aber das Ergebnis hat immer noch viel zu viele Polygone/ Flächen. Und wenn ich die Flächenzahl zu sehr reduziere, kommt nur unbrauchbares als Ergebnis heraus. Deswegen möchte ich die Übertragung der Textur gerne per Hand, also manuell machen. Freundliche Grüße, ModderLS22. Hello, I am looking for a tutorial/description that shows or/and describes how to transfer a high-resolution texture of a high-poly model to a similar low-poly model. It is about transferring the high-resolution texture from the high-poly model to a model with extremely (!) few polygons/surfaces. I think that I have to create the high poly model in voxel space and the low poly model in modelling space. Or ? I am using a 3DCoat version from early 2023. It would also be important to see or/and describe how this is done from the beginning. This includes the creation of the two models. The desired object is a brick wall with about 20 bricks next to each other and about 30 bricks (rows) on top of each other. Then 2 walls next to each other, like a free-standing brick wall. I created the low-poly model in the modelling room in order to have very few polygons/surfaces. A brick only has 6 faces, 8 vertices and 12 edges (if I haven't miscalculated). This is where the high-resolution texture should be placed. The whole thing is intended for Farming Simulator 22. Is there something where I can see/read how something like this is done? There is a routine in 3DCoat that does this automatically, but the result still has far too many polygons/surfaces. And if I reduce the number of areas too much, the result is useless. That's why I would like to transfer the texture manually. Kind regards, ModderLS22. Translated with DeepL.com (free version) -
 So, i decieded to spend some time and get Spacenav working on non ubuntu based distro. Tried to adapt what i did on CL. This guide should work on other distros like Arch, Opensuse and Fedora. Before you start, ensure that you have the following dependencies installed: Development tools (GCC, Make), CMake, X11 development libraries, libspnav. For most distributions, you can install these dependencies using your package manager: Fedora: sudo dnf install gcc make cmake libX11-devel libspnav-devel Arch Linux: sudo pacman -S base-devel cmake libx11 libspnav OpenSuse: sudo zypper install gcc make cmake libX11-devel libspnav-devel 1. Clone the Spacenavd Repository git clone https://github.com/FreeSpacenav/spacenavd.git cd spacenavd 2. Run CMake to configure the build cmake. 3. Compile the source code make 4. Install spacenavd sudo make install 5. Set up and enable the spacenavd service sudo nano /etc/systemd/system/spacenavd.service Add the following content to the file: [Unit] Description=Spacenavd Service After=network.target [Service] ExecStart=/usr/local/bin/spacenavd -d Restart=always [Install] WantedBy=multi-user.target 6. Reload Systemd Deamn and start the service sudo systemctl daemon-reload sudo systemctl enable spacenavd sudo systemctl start spacenavd Ensure that spacenavd is running without errors: systemctl status spacenavd If you have any questions, feel free to ask.
 -
Keyboard: Turtle Beach Vulcan II TKL Pro RGB Gaming Keyboard - Christ Centered Gamer. Router: TP-Link BE9300 Archer BE550 Wi-Fi 7 Router - TweakTown. SSD: Lexar SL500 2TB Portable SSD Review - Lexar SL500 2TB Portable SSD - Neoseeker. Case: Crucial Pro Overclocking White DDR5-6000 2x16GB Review - APH Networks. Case: Lian Li O11 Dynamic EVO XL Review - TechPowerUp. CPU/GPU/AIO/SSD Cooler: Granzon GAI0.1 CPU Water Block Review - TechPowerUp. Keyboard: ENDORFY Omnis Pudding Blue Gaming Keyboard - Mad Shrimps. Laptop: Dell XPS 16 (9640) Laptop - TweakTown. Printer: QIDI Q1 Pro 3D Printer - Nikk Tech. Case: Chieftec Apex Q Review - TechPowerUp. Case: Lian Li X Dan Cases A3-mATX PC Case Review - OC3D. CPU/GPU/AIO/SSD Cooler: Review- DeepCool Mystique 360 - Guru3D. Game Controller: Razer Kishi Ultra Mobile Gaming Controller Review - IGN. Headset/Earbuds: PMG Audio Apx In-Ear Monitors Review - $6500 Flagship! - TechPowerUp. Laptop: HP Envy x360 2-in-1 16 review- Ryzen 7 8840HS beats Core Ultra 7 155U - NotebookCheck.net Reviews. SSD: Lexar NM790 with Heatsink Review - A -Cheap- 4TB M.2 SSD - ThePCEnthusiast. CPU/GPU/AIO/SSD Cooler: ID-Cooling FX360 Pro Review- Very good for $60 - Tom's Hardware. Keyboard: Wooting 60HE+ Review -- Is This The Greatest Gaming Keyboard Ever? - Wccftech. Mouse: CHERRY XTRFY M68 Pro Review - TechPowerUp. Mouse: Glorious Model D 2 gaming mouse review - PC Gamer. RAM: Crucial Pro Overclocking DDR5-6000 C36 2x16GB Review- A Return to Overclocking - Tom's Hardware. Tablet: Huion Kamvas Pro 24 (4K) Graphics Tablet - TechPowerUp.
-