Search the Community
Showing results for tags 'animation'.
Found 24 results
-
 Hello everyone, this is Denis Weber. Today I’m going to talk about what happens if you combine LEGO and the iconic movie Terminator 2. I’ll show you how I created a real LEGO trailer and what came out of it. I like doing such large-scale projects and if you have any cool ideas, let me know in the comments. If you prefer the video format, you can watch it here. In 1984, the movie Terminator first was released and it blew up the movie industry. Then there was Terminator two which succeed on an even larger scale. Then there were other Terminators. I think you’ll agree with me if I say that Terminator 2 is the best movie of the entire franchise. An epic action, an exciting plot, unreal computer graphics and, of course, the rise of robots. It’s scary to imagine, this year the second Terminator is turning thirty-three years old. In those times, well, or 10 years later after release, I got LEGO myself and I loved it with all my heart. I wanted to combine two of my favorite things. Thank God, AI still cannot make such a video in one click. In this article I’ll tell you how I created the LEGO characters of the trailer and the large-scale locations of the film. The first thing I did I watched the trailer a hundred times. I cheated a little here and I already had a ready-made LEGO minifigure from one of my past projects. In the first frames of the trailer, the skeleton of the Terminator stands in the fire and looks angrily into the camera. I downloaded the photo and made a 3D model from it. Hair for models was a the hardest part. It was necessary to make sure that the Terminator evoked fear, not applause after performing the hit of the 80s. I spent some time modeling hairstyles, but I wanted to finish my project in time for the release of the next part of the Terminator, so I used free models from the MecaBricks website. MecaBricks has some cool detailed models, but that’s what makes it harder to work with. High detailed models adds thousands of polygons, and for animation it is better if there are fewer polygons, but not for Pixar. Therefore, I had to spend time optimizing the models. The naked terminator inside the capsule moves through time and space straight to the truckers’ parking lot. The Terminator’s trips from the future always involve uncanny lightnings and sparks, so in post-production I added lightnings, which I tried to make as similar to the original as possible. There are also the trucks and bar decorations. I bet the movie was shot the same way, with one wall facing the camera. OK, the trailer also has a scene inside the bar, so I had to build it as well. I even modeled a LEGO billiard table and tattooed the arm of a random Terminator victim. In the scene where T-800 is looking for John, the moviemakers show a picture of his eyes. I tried a few crazy ways to do the same before I got what I like. When Sarah Connor got the news that the evil guy from her worst memories is in the city, two cyborgs are already running after John. For this scene, I created a small hospital room without walls and floor. Sarah couldn’t even escape from there. She looks at the Terminator’s photo and says that her son is in trouble. And at the same moment, a huge truck with a killer cyborg falls off the highway straight onto John. Do you still need more suspense? Sarah fights with T-1000 to the bitter end and in many scenes she herself looks more like a Terminator than a sweet mother playing with her son on the playground. Many scenes show great work with light and smoke. It took a lot of effort to convey at least something similar to the original in my video. Some scenes are simply amazing in their epicness. For example, when, during a chase, the T-1000, at the pilot wheel of a helicopter, flies into a truck with the main characters at full speed. In this case LEGO parts should shoot out of it. This is the biggest scene of the entire trailer. It’s full of trees, particles, smoke and everything that makes it so memorable. And here is one of the longest scenes, the one in which T-1000 is chased by the car of the main characters. He jumps on the trunk, breaks the glass and, of course, at the last moment Arnold saves everyone. In general, a lot of police equipment is used in the film. Helicopter, police cars, vans and motorcycles. It’s good that all these models were freely available on the Internet. Otherwise, I would never have finished this project. I can’t even imagine how the creators made the effects for Terminator with the capabilities of computers and 3D modeling programs in 1991. In my project, T-1000 is literally created from T-800. They should be produced somewhere in the neighboring workshops, right? I don’t understand why T-1000 doesn’t turn into someone whom the main characters haven’t seen yet and calmly finish their business. The T-1000 continues to show us its abilities. You need to be a very self-confident cyborg to jump out of an office building at full speed on a motorcycle, straight towards a helicopter and then climb into it. I especially like this scene where the evil Terminator turns to the camera so that the spotlight beam is visible in the hole. It’s a small thing, but it looks epic. The trailer is so full of events and different scenes that sometimes I spent several hours just to set up a 3D scene, the animation of which did not take even two seconds. Anyway, if you watch the whole trailer, all the scenes look cool because they have a lot of details. The animation does not look like a collection of random objects and can be perceived as a whole film. For this scene, I needed to create something between the normal look of the evil Terminator and his liquid state. At first the model looked more like a Michelin mascot, but after a couple of hours everything started to look right. When I figured out all the models, scenes, light and animation, I had to work as a conductor and I created, so to speak, a similar musical theme for the trailer so that YouTube would not have questions for me. Oh, yes, also sound design, but I’ll tell about it the other time. I really spent a lot of time and effort creating the trailer. More than for any other project before. And I really wanted to tell you about all the little things, but the trailer turned out to be so big that I would not have had a couple of hours. The trailer is already on my channel, don’t forget to watch it too. Trailer Making of video I am glad that I completed the project to the end and I really like the result. Some time ago, I didn’t think anything would come of it at all. Thanks for reading. It’s going to be really cool something here soon.
 -
Merry Christmas and Happy New Year
-
- 2
-

-

-
- lightwave3d2023
- 3dcoat
- (and 1 more)
-
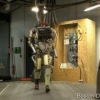
 Another short film from Physics4fun series. A new, VR, approach of learning, gamified, to make Physics more appealing to students and inspire them to explore its world. Watch the video and share us your thoughts. https://vimeo.com/282865318
 -
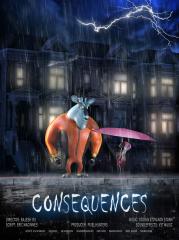 A short film by Pixelhunters. All that matters is to be good persons. Otherwise, there are Consequences. Watch the film here: https://vimeo.com/297760830
 -
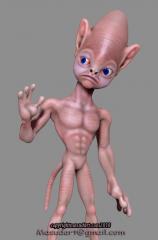
© masudart2018
-
Hello, I am working on a prop for an animation its a cartoony spaceship. The working process should be intuitive and artistic, so its a perfect job for 3D Coat. The astronaut already exists in Maya. Rendering will be done with Vray. I would like to start this thread to show my development, as to ask some questions coming up. Also artistic comments are welcome. Hope you enjoy Martin
-
 I thought it a bit time consuming that the smart materials didn't have an option that directly connects to the installed alpha, strips and stencil extensions in the "condition mask" or "edge scattering" and mask field as a quick selection perhaps be clicking a small arrow or next button to cycle through the possibilities rather than having to open and load a texture. A small icon showing the alpha, stencil or strips would help as you cycle through them. I also mentioned in this thread title, the possibility of selecting a common animation style. This could be plasma, pulsing/flashing, scrolling up, scrolling down, left/right etc and or combos of pulsing and scrolling and this could be assigned to a texture in the smart materials or perhaps just apply it to the whole smart material.. This is also related to my other post about animating material properties http://3dcoat.com/forum/index.php?/topic/21323-animated-materials-for-each-layer/#comment-147512
 -
I know how to render the jpegs required for an animation within 3DC. However I'm curious what application you use to create the animated gif or avi? I have Photoshop CC 2017 and it can create an animated gif. But with 360 jpegs rendered by 3DC it would be quire labor intensive to load each jpeg as a layer in Photoshop and then load each layer as a frame. I know Photoshop has a script to load many jpgs as a layer, so that really isn't the problem. I did search for a PS action to convert many layers but found nothing. Can anyone recommend a good, free app? Cheers
-
Here is the process of creating a Octopus Walking Cycle for the more curious ones!
-
Hi everyone, Here is a tutorial for those who are curious and want to start animating in Blender. You can find the other parts in my channel. Thanks!
-

An Octopus Rig - Part 02 (Eyes Shape Keys)
Gabriel Aguiar posted a topic in CG & Hardware Discussion
Hi everyone, Here is a tutorial for those who are curious and want to start animating in Blender. You can find the part 01 in my channel. Thanks! -
Hello everyone, Here is a tutorial for the more curious ones, that will help to get into animation with a nice Pirate-Chest! Thanks For Watching!
-
 We are happy to share a new short film called Once Kitten, Think Twice. This short film talks about cat, monster and balance in life. Share us your thoughts and watch the film here:
- 3 comments
-
- 4
-
-
- short film
- kittens
- (and 2 more)
-
Hi ! I'm learning 3dcoat & have a problem understanding how to retopo a hard surface humanoid model for exporting & animating in C4D. I'm confused because it seems I lose all the fine details that i've been able to sculpt in 3dc. All those sharp edges precisely. I'd like to export it to Obj for rigging & animating in C4D. So, i understand i should make a low poly export with uvs, normal map etc...but if my model lose sharpness, should i edit edges in C4D again ? (which would be kind of annoying). Or should i make a not-so-low-poly model and in this case what's a good poly count ? If anyone has suggestions or ideas, tutorials about this topic, thanks ! Here's an example of a model i'd like to rig :
-
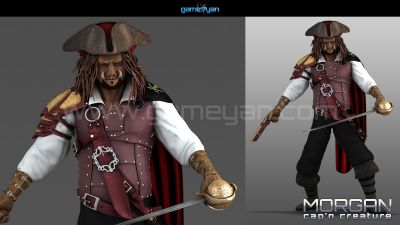
From the album: Character Animation & Modeling
Morgan Mascot Creature Character Modeling by GameYan Studio© GameYan Studio
-
Hi folks, I was up last last nice simply trying to make some turnable animations of some asteroids I'm messing around with for a game. Being a 2D game, I figured, I could voxel together some nice looking astroid objects, render out a quick 36-frame turnable animation and use it for testing in an a quick 2D scene. I created a 512x512 custom sized render area and centered the "rock" within the window. Thinking it would be easy, I set the view to orthographic, and shift-rotated the rock to the Front view. I save the scene as "Frame00". Next shift-rotated the scene for the Left, Back, and Right views again saving the associated scenes. I checked Render Frame Sequence, specified 36 for the number of frames clocked Render Animation. After selecting the first saved file, and specifying again 36 for the number of frames, the program begins rendering the turnable. Everything goes great up to the last set of 9-frames - instead of continuing on to the last (Front) view again, the model reversed and quickly rotates backwards to the starting frame again??? I've even tried creating Camera Shortcuts and also turned on "Closed Spline" hoping it would complete the "circle". I realize that it's the interpolation of the rotation that is causing it to what?, take the shortest path back to the first frame, but then how are others creating these turntables? I tried rotating using 45-degree angles, which is painful compared to just shift-rotating to get the correctly locked views. What the HECK am I doing wrong - why can't I create a simple turntable? Any suggestions are appreciated! -Will
-
will 3d coat ever have a camera path animation function. Similar to the turntable feature, but the camera can be moved, and zoomed in and out. That would be awesome! Just having the cam zoom in and out at a designated time during the turntable rendering would be would be Sooo good.
-
Здравствуйте жители форума, профессионалы и уважаемые творцы, представляю вашему вниманию мою новую работу, которая полностью оттекстурированa в "3D Coat", большая часть работы проделанa именной в 3д соат. ССЫЛКА НА ВИДЕО http://mybestworks.webs.com/apps/videos/videos/show/18594194-cbc-reinsurance-company-logo-animation DIFUCE - хочу отметить, что эта не текстура, которая взятa и налепленa просто нa модели, 90 % это рисованная текстура, с помощью 3Dcoat и VACOM intuos. в 3д соат есть уникальные возможности для этого. остальные 10 % скачанные из инета, например, кирпич и железные стойки. BUMP - да ,я нашел способ получить бумп из 3D соат, несмотря на то, что нет прямого экспорта, все-таки есть возможность получить BUMP, когда рисуешь на модели с включeнным нормал мап и создаются вмятины и выпуклости, рельеф, нужно экспортировать как нормал мап, a потом c помощью CrazyBump открыть нормал мап, но при открытии указать Open us Normal map. и отрегулировать spelulariti вкладку, как ни страно, нормал отлично конвертируется в Bump, и нa модели получаю именно то, что я рисовал в Coat с помощью включенным нормал. потом можно миксовать в фотошопе с дисплейсмент мап. (сейчас появится у вас вопрос а почему бы не создать бумп в фотошопе, а потому что когда ресуешь вместе c нормал при экспорте получаешь толкo цвет но не выпуклости ) SPECULAR | CAVITY | тоже получены из 3д соат, с помощью разных манипуляций. DISPLACEMENT - кстати, что-то дисплейсмент барахлит, когда выпускаю в фотошопе, открывается нeправильно черно-белые точки без градации. помогают следующие действия, открываю в паинт, нажимаю сохранить, а потом открываю в фотошопе и потом все правильно отображается. вообщем, судите строго ПС: от тех людей, которые (неадекватно) комментировали (совершенно не понятным мне причинам удалили) мой старый пост про 3Dcoat. LOGO комментарии от них не принимаю!!! мне они не интересны. просто обходите стороной. комментарии от адекватных людей внимательно прочитаю и приму все ваше замечания. спасибо зарание _____________________________________________________________________________________________________________________________ PS: those people who (inappropriately) commented (completely incomprehensible reasons and delete) my old post about 3d Coat LOGO. comments from them do not accept! to me they are not interesting.!!! so please do not comment here. Thanks.
-
Hey Everyone, I just wanted to share the announcement of a mobile game I just released. It's called Buzzle and right now it's iOS only, but will be coming to Android soon. It's a pretty cool game, with a unique concept. It's a free download, you can play the first world before you decide if you want to buy the rest. I would love to get your feedback. And spread the news! http://www.glowbuglabs.com I did the ingame art. Models, animation, and tiles. I used 3D Coat and Photoshop for doing the tiles and making sure they are seamless. I also used Blender and TVPaint. The game is done in Unity.
-
Just wondering about using models that are not retopoed to perfection! I used part auto-po for the mid section and hand retopoed the rest for my first character sculpt. http://3d-coat.com/forum/index.php?app=galleryℑ=421 I realized how bad the flow lines and loops are crossing weird ways from the auto-po, since I did not guide them very well with splines. Is this a major headache for animation/animators? Spend hours fixing it? It is all quads.....Maybe post and try and sell on Turbosuid for cheap stating they can clean up if wanted? I probably won't get into weight painting, bones and animation for some time myself , so I have no clue to possible flow line problems during animation...
-
Hello everyone, Iam selling my Messiah Studio 6 Pro License inclusive my Setuptab Account! This means the one that buys from me the MS 6Pro License also gets all the Tuts i have bought at Setuptab.I want to have 190,- US Dollar via paypal. Messiah Studio works pretty good togehter with 3D Coat!!! Iam also selling one of my Audio Tools called Reaper.Great Digital Workstation and as good as Cubase but much cheaper and from my experience more stable.I want to have 160,- US Dollar for the full commercial License. you can check the demo out first http://www.reaper.fm/ have all a great week Dominik
-
I purchased 3D coat last week after using the trial version. Here's a character I'm working. This is the "cartoon cute" version of the Ucides cordatus Painted in 3D coat <3 (diffuse and specular) [model made in 3ds max] the texture is still a wip, missing alot of details and better spec Here you can see the crab with some animations i'm doing (unity web player)
-
http://mybestworks.webs.com/ Creators Website Used Software. 3D max ----- Phisyx - PF Vray RT ----- Render Time- 4 Days/ Core Tu duo 3,2x2/ Nvidia 570GTX Phantom Nuke ---- Compositing + FX Photoshop CS6---- For Video Editing And Compression /H.264/.mp4 Adobe audition CS5.5 Sound Creation, Recording, Mix 40% Sound Loops Download From Free Sound Website. 60% Created Myself ___________________________________________________________ 609 Frames. 24 FPS Original File size 3,53 GB . 1920x1080 . on VIMEO.Com ...https://vimeo.com/75068720.. HD..will be downscaled to 720p by default (1280×720) because I am not premium member. ========================================================= NOTICE- You Can Download And us This intro as you wish It's free and non commercial..///// Can us as Intro For tutorials .... etc
- 6 replies
-
- 1
-
-
- 3D Coat Logo Animation
- Animation
- (and 3 more)
-
Hey everyone, we're Mixamo. We just put together a great tutorial on how to use Mixamo and 3D Coat for amazing results. It's now easier than ever before to get animation on your 3D Coat characters using our Auto-Rigging and Animation services! Let us know what you think. Cheers, -Mixamo