Advanced Member chris_solo Posted February 7, 2013 Advanced Member Share Posted February 7, 2013 great work ont this guy! ++Chris Quote Link to comment Share on other sites More sharing options...
Advanced Member Garagarape Posted February 7, 2013 Advanced Member Share Posted February 7, 2013 You improved a lot. This old man is really well done. I don't think the skin is that bad. But yes, it could be slightly more realistic. Yet, I dont think the wet feel is weird. It fits well with the southern hot country style of it. Yes probably more subtle thin wrinkles would be good. I don't know how to add them though. May be Photoshop + Nvidia Normal map filter could be enough to add details? He could have brown stains on his skin like old men have (my hands are starting to get some). Quote Link to comment Share on other sites More sharing options...
Reputable Contributor digman Posted February 12, 2013 Author Reputable Contributor Share Posted February 12, 2013 An other doodle, just taking a break... I posted another image but like this one better. 3DCoat---Blender---TwistedBrush... I’ve been forty years discovering that the queen of all colours is black”. – Auguste Renoir 1 Quote Link to comment Share on other sites More sharing options...
Advanced Member michalis Posted February 12, 2013 Advanced Member Share Posted February 12, 2013 I like it! (do you mean the twisted brush of blender? I still can't figure out how to deal with it) Is this a retopo/N_maps export? Quote Link to comment Share on other sites More sharing options...
Reputable Contributor digman Posted February 12, 2013 Author Reputable Contributor Share Posted February 12, 2013 Yes it is a normal map on a 4805 polygon mesh. TwistedBrush is my 2D paint program. Painted in 3DCoat and some mix layer work in TwistedBrush. Quote Link to comment Share on other sites More sharing options...
Reputable Contributor digman Posted February 24, 2013 Author Reputable Contributor Share Posted February 24, 2013 Just having fun learning Blender and out came a hippy dragon. The vertex color map was painted in 3DCoat so I am placing it here as I like the character and will work more sculpting on him in 3DC. Hippy Dragon was done in Blender by the new dynamic topo sculpting. (93000 tris). The bumps and cuts were added using box mapping in blender, no uvs that way. I also watch a couple of tutorials on the new hair particle system for blender cycles. Yes, the hair is my first. Some postwork in TB to enchance the image. 2 Quote Link to comment Share on other sites More sharing options...
Advanced Member michalis Posted February 24, 2013 Advanced Member Share Posted February 24, 2013 On hair, use the slow one, smoothed curves. Else, you have to add a lot of segments, avoiding straight lines. Smoothed curves will work though. render time x2 unfortunately lol Box blurred mapping is great but as long as cycles doesn't bake on UV maps... well. We have smoothed box mapping in 3coat and it will be baked (bumps too) on the UV map. I didi all the time, just constructing shaders. 93 k tris, hey. It's impressive how crisp they work under dyntopo but you could go for at least 200k. Or, just retopo it, UV unwrap it, bring it into blender on topo of the original, multires and shrinkwrap-project mode positive negative On You can add hi freq details this way, blender can sculpt and bake up to millions of faces. I think, this is the best way to use dyntopo. Something similar to the zbrush dynamesh-autopo-multires technique. A tip David You can add a second Vpaint set in blender and make it the active one (this camera icon, click it) Then, under Internal render engine, go to the bake section. Ask for baking AO, there's an option "bake on vertexpainting". No need of UVs, just an active Vpaint set. It will take a few mins and works surprisingly well. You can use it as a second attributes node to control mixes etc. Very nice dragon. A real hippy, indeed. Quote Link to comment Share on other sites More sharing options...
Advanced Member L'Ancien Regime Posted February 24, 2013 Advanced Member Share Posted February 24, 2013 You guys are sure making a good case for Cycles. Quote Link to comment Share on other sites More sharing options...
Reputable Contributor digman Posted March 7, 2013 Author Reputable Contributor Share Posted March 7, 2013 This sculpture started out in Blender. Now it is 3DCoat's turn. I have been fixing proportions and anatomy which I am still working on. It is non-symmetrical sculpting starting from a cube (Blender). The measure tool in 3DCoat is great for comparing postions of the anatomy. The sculpture in Bender was pretty rough though I did like the dynamic feel to the sculpture but there is lots to fix, like the interior of the ears. I had to cut off one ear off and move it down, rotate the mouth some, etc, plus I am starting add more basic structure. The eyes have been changed out as well. Non-symmetrical sculpting is challenging but imparts I think more of my soul into the work. You also spin the model around a lot when sculpting non-symmetrical. The stone statue image is the sculpture in Blender before porting to 3DCoat. Quote Link to comment Share on other sites More sharing options...
Advanced Member Garagarape Posted March 7, 2013 Advanced Member Share Posted March 7, 2013 Nice result on the last bust. Remembers me of my homeland (Brittany) old stone statues. You lost a little volume on your second shot, may be because of the change of material or because it's a different lighting. But the stone feel is great! Quote Link to comment Share on other sites More sharing options...
Advanced Member chris_solo Posted March 8, 2013 Advanced Member Share Posted March 8, 2013 Nice sculpt on this bust, the effect of stone is nice too! ++Chris Quote Link to comment Share on other sites More sharing options...
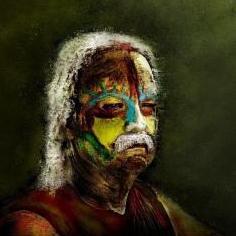
Reputable Contributor digman Posted April 6, 2013 Author Reputable Contributor Share Posted April 6, 2013 Blender Cycles got Sub Surface Scattering... I could not resist doing something... Here is it is with some post work in TwistedBrush... I like capturing emotion more than realism... 2 Quote Link to comment Share on other sites More sharing options...
Reputable Contributor AbnRanger Posted April 6, 2013 Reputable Contributor Share Posted April 6, 2013 Blender Cycles got Sub Surface Scattering... I could not resist doing something... Here is it is with some post work in TwistedBrush... I like capturing emotion more than realism... Great work on that sculpt, David. Seems like your skills are improving a great deal. Can you try to sculpt some eyebrows using very fine strands, using the Muscles tool (voxel mode...I hate the Surface mode version...very slow)? Maybe even use the freeform patch (Primitives tool) to shape a surface (kind of like the polys used for eyelashes w/alpha mattes) to sculpt some eyelashes onto (then hide the patch) with the Muscles tool, in the same way. Just curious how much better it might look after trying that approach. Quote Link to comment Share on other sites More sharing options...
Reputable Contributor digman Posted April 6, 2013 Author Reputable Contributor Share Posted April 6, 2013 He will receive his eyebrows, head hair and beard stubble using Blender's new Cycles hair... Quote Link to comment Share on other sites More sharing options...
Reputable Contributor AbnRanger Posted April 6, 2013 Reputable Contributor Share Posted April 6, 2013 He will receive his eyebrows, head hair and beard stubble using Blender's new Cycles hair... Cool. Looking forward to seeing that. So, how fast does Cycles render frames compared to the default render engine, in Blender? Quote Link to comment Share on other sites More sharing options...
Reputable Contributor digman Posted April 7, 2013 Author Reputable Contributor Share Posted April 7, 2013 Both SSS and Hair in Cycles are still CPU based so no GPU rendering for them as of yet but it is in the development plans. I have never used the Blender internal renderer as of yet so no way for me to compare rendering. I really like the real time previewing of your textures and light setup using Cycles so have not cracked open the door of Bl. When I upgrade to more cpus, I will test it out though. I had shied away from using Blender in it's old 2.4 days as the interface drove me nuts... Now the interface is much better, so this year I decided to learn Blender as best I can except for modelling part. Quote Link to comment Share on other sites More sharing options...
Advanced Member Garagarape Posted April 7, 2013 Advanced Member Share Posted April 7, 2013 Can I have some more hair too? ... please Nice sculpt and render Digman! Quote Link to comment Share on other sites More sharing options...
Reputable Contributor digman Posted April 10, 2013 Author Reputable Contributor Share Posted April 10, 2013 I am getting an idea for a scene now. I put bones in the head bust to pose him... Skin texture still very rough... Twistedbrush for the background and paint around the eyes. Egyptian priest did shave off most of their hair but I think he will get some stubble as an old priest who just does not groom as well as he use too. Quote Link to comment Share on other sites More sharing options...
Member Psionic Posted April 10, 2013 Member Share Posted April 10, 2013 Loving these cycles renders, gonna have to look into it in more depth, great sculpts too! Quote Link to comment Share on other sites More sharing options...
Advanced Member L'Ancien Regime Posted April 13, 2013 Advanced Member Share Posted April 13, 2013 He will receive his eyebrows, head hair and beard stubble using Blender's new Cycles hair... Yeah he deserves Cycles hair. Michaelis has show how good that is. Quote Link to comment Share on other sites More sharing options...
Advanced Member michalis Posted April 13, 2013 Advanced Member Share Posted April 13, 2013 Cycles hair. Michaelis has show... Did I? When? Just some experiments, nothing serious. Many new things to learn under blender. The new (wonderful) SSS implementation, already turns everything upside down. The way we carve for instance. As close to what really happens on traditional marble sculpting for instance. You can't transfer the measurements of a clay sculpt to marble. it results to something like melted ice cream. It's very well known that Michelangelo used to carve directly on marble. Oh my... Such ideas made me to prefer to sculpt in blender only, avoiding zbrush and 3dc as possible. I mean, I may use 3dc voxels etc for sculpting but after a few viewport interactive cycles renders, I will resculpt in blender. (dyntopology) You have to carve surprisingly deep on marble... Then, a visit on a good museum, and yes, yes, they were carving deeply. Such miracles may be irrelevant to a professional VG artist's needs but it's a technological gift, I call it education. Your egyptian comes great, David, I already commented it in blenderartists forum. Quote Link to comment Share on other sites More sharing options...
Advanced Member L'Ancien Regime Posted April 22, 2013 Advanced Member Share Posted April 22, 2013 I am getting an idea for a scene now. I put bones in the head bust to pose him... Skin texture still very rough... Twistedbrush for the background and paint around the eyes. Egyptian priest did shave off most of their hair but I think he will get some stubble as an old priest who just does not groom as well as he use too. http://www.techpower...X-TITAN-LE.html How're you doin? Quote Link to comment Share on other sites More sharing options...
Reputable Contributor digman Posted May 5, 2013 Author Reputable Contributor Share Posted May 5, 2013 Just some Wip primitive art... Rendered in 3DCoat, postwork in TB. Heroin's Dream... Thrust the spike in feeling like God Almighty in dream oceans of no pain. Deep chemical life flows though the veins, unwrapping my thoughts. Heroin's dream my brain sees but I am not asleep. 1 Quote Link to comment Share on other sites More sharing options...
Contributor Tony Nemo Posted May 5, 2013 Contributor Share Posted May 5, 2013 It has been suggested (accompanied with LSD) as a dying person's palliative. Interesting sculpt! Quote Link to comment Share on other sites More sharing options...
Reputable Contributor digman Posted May 10, 2013 Author Reputable Contributor Share Posted May 10, 2013 Another doodle. Image imported has a mesh. some sculpting, a little painting plus rendered in 3Dcoat. Post work in Twistedbrush. @ Tony, thanks on the heroin doodle... Titled: Girl with red lips... Quote Link to comment Share on other sites More sharing options...
Advanced Member michalis Posted May 10, 2013 Advanced Member Share Posted May 10, 2013 Please explain. I don't get it. looks like a photo, maybe some side view? It looks great! Please more information. Quote Link to comment Share on other sites More sharing options...
Reputable Contributor digman Posted May 10, 2013 Author Reputable Contributor Share Posted May 10, 2013 It is a photo but I got some relief created importing image as mesh. I did not want to created alot of depth but just some relief and then sculpted (pushed out )the finger nails bracelets and neck chain. I wanted the skin to be rougher, the relief created that, so it meet my needs. Lighting did the rest in the render and then postwork. You could add a lot of sculpting as well. Lots to explore here. It is also a good method for creating quick panels as well to be projected on a 1 polygon plane retopo mesh. Pictures shows the panels with and without the color image and the settings I used for importing the image. Shown in the render room before any retopoing. The image is not the highest quality so the panels are not the greatest. I have not checked out all the possible uses of Importing image as mesh. Stencils are available as well. 1 Quote Link to comment Share on other sites More sharing options...
Reputable Contributor AbnRanger Posted May 10, 2013 Reputable Contributor Share Posted May 10, 2013 I am getting an idea for a scene now. I put bones in the head bust to pose him... Skin texture still very rough... Twistedbrush for the background and paint around the eyes. Egyptian priest did shave off most of their hair but I think he will get some stubble as an old priest who just does not groom as well as he use too. Hey Digman...do you think you could you create a tutorial showing a typical workflow sending a model like this to Cycles (using the Applink for Blender), set up materials (including SSS) and render? Doesn't need to be elaborate...just enough for those, like me who don't yet know Blender too well, how it's done and how well Cycles works.I'd love to see that and I'm a lot of others here, would too. Quote Link to comment Share on other sites More sharing options...
Advanced Member Garagarape Posted May 10, 2013 Advanced Member Share Posted May 10, 2013 Oh! Interesting! Is it some kind of height map? I didn't know there were these kind of tools in 3dCoat. Quote Link to comment Share on other sites More sharing options...
Reputable Contributor digman Posted May 11, 2013 Author Reputable Contributor Share Posted May 11, 2013 Another experiment, a wip Spaceship with panels but not quality, just testing a method with no advanced planning. Tool Used: VoxExtrude under the objects panel in conjunction with a image as a mask. There some problem areas with using this method but some smart planning should take care of most of them. @ Garagarape... yep, 3DCoat creates a height relief from your image. @AbnRanger, I will see what I can do in the next couple of weeks. The blender applink at this time does not support the transfering of your textures when using Cycles but only for the Bender internal renderer. Quote Link to comment Share on other sites More sharing options...

Recommended Posts
Join the conversation
You can post now and register later. If you have an account, sign in now to post with your account.
Note: Your post will require moderator approval before it will be visible.