Reputable Contributor digman Posted October 19, 2013 Author Reputable Contributor Report Share Posted October 19, 2013 "I like the corset part; kind of SM though" LOL, Garagarape, yes, a little lipstick and some rouge. Then I got a alien cross-dresser... Quote Link to comment Share on other sites More sharing options...
Contributor Tony Nemo Posted October 19, 2013 Contributor Report Share Posted October 19, 2013 You were missed! Quote Link to comment Share on other sites More sharing options...
Reputable Contributor digman Posted October 20, 2013 Author Reputable Contributor Report Share Posted October 20, 2013 You were missed! thxs tony... I love 2d as well as 3d... took the textured 3DC model into TB for some fun... Quote Link to comment Share on other sites More sharing options...
Advanced Member Garagarape Posted October 20, 2013 Advanced Member Report Share Posted October 20, 2013 Nice painting. He looks like a sea creature now, with coral ornament. Quote Link to comment Share on other sites More sharing options...
Advanced Member wave of light Posted October 20, 2013 Advanced Member Report Share Posted October 20, 2013 He's got that 'Clash of the Titans' look about him. Welcome back David, hope you're well. Quote Link to comment Share on other sites More sharing options...
Reputable Contributor digman Posted October 25, 2013 Author Reputable Contributor Report Share Posted October 25, 2013 (edited) Start of a new work, (early stage). I got an idea for placing this character in a scene... He has a body but it's not proportion well right now... Edited October 25, 2013 by digman Quote Link to comment Share on other sites More sharing options...
Reputable Contributor digman Posted October 28, 2013 Author Reputable Contributor Report Share Posted October 28, 2013 (edited) An update, I got an idea for a chair plus a wip vase added from another scene. Attached the head to the body I am working on... Edited October 28, 2013 by digman Quote Link to comment Share on other sites More sharing options...
Contributor Tony Nemo Posted October 28, 2013 Contributor Report Share Posted October 28, 2013 The chair has a potentially sinister connotation. Beware the arms!. Quote Link to comment Share on other sites More sharing options...
Reputable Contributor digman Posted October 31, 2013 Author Reputable Contributor Report Share Posted October 31, 2013 With the new auto-retopo routine it is easy to create a base mesh from which you can start sculpting... I took an very early wip, ran the routine on it. Exported the final 4000 polygon base mesh and then voxelized it to start a new sculpt on. Quote Link to comment Share on other sites More sharing options...
Reputable Contributor digman Posted November 2, 2013 Author Reputable Contributor Report Share Posted November 2, 2013 An update on the man bust.... 1 Quote Link to comment Share on other sites More sharing options...
Reputable Contributor digman Posted November 5, 2013 Author Reputable Contributor Report Share Posted November 5, 2013 (edited) Here is another old man. He was started in Blender dyntopo up to 230,000 polygons then brought over to 3DC... I did not break symmetry on him in 3DC has I was working to push myself past being too timid in my brush strokes. Even if they are not quite right, just put strokes on the d^&%*n thing. Another copy of him I have broken symmetry... Been working over the face... Edited November 5, 2013 by digman 2 Quote Link to comment Share on other sites More sharing options...
Contributor BeatKitano Posted November 6, 2013 Contributor Report Share Posted November 6, 2013 It's a bit harsh in the rendering, but it's a pretty good structure, nice work. A major improvement over your precedent busts. Quote Link to comment Share on other sites More sharing options...
Reputable Contributor digman Posted November 8, 2013 Author Reputable Contributor Report Share Posted November 8, 2013 Thanks Beat... working at it... Here is a 2D work brought into 3DC as image as mesh, some sculpting and shader, then back to TB for some tweaking... Quote Link to comment Share on other sites More sharing options...
Reputable Contributor digman Posted November 9, 2013 Author Reputable Contributor Report Share Posted November 9, 2013 This is another older gentlemen from the same based sculpt I created in blender but taken in a different direction. I brought him into 3DCoat for a WIP vertex paint. 3DC is great for that, really helps to see your character for further work. A little TB postwork at well. Oh, yeah there is lots to fix up on him and areas not nearly finished. He will be painted in 3DC for sure and possible finishing up the sculpting as well. 1 Quote Link to comment Share on other sites More sharing options...
Advanced Member alvordr Posted November 9, 2013 Advanced Member Report Share Posted November 9, 2013 I really like this last one. Well done! Quote Link to comment Share on other sites More sharing options...
Contributor ajz3d Posted November 10, 2013 Contributor Report Share Posted November 10, 2013 Here is another old man. He was started in Blender dyntopo up to 230,000 polygons then brought over to 3DC... I did not break symmetry on him in 3DC has I was working to push myself past being too timid in my brush strokes. Even if they are not quite right, just put strokes on the d^&%*n thing. Another copy of him I have broken symmetry... Been working over the face... I like the surface of these two busts. And the character is very well defined too. Really good work! Quote Link to comment Share on other sites More sharing options...
Reputable Contributor digman Posted November 10, 2013 Author Reputable Contributor Report Share Posted November 10, 2013 Thanks ajz3d and alvordr. He is coming along but not there yet. Here is another take. This is the copy that I will sculpt more on in 3DC. I made him completely symmetrical as I want to animate the head... I now need to carve out the mouth cavity for some teeth and he needs real eyes plus fixing up things and more details... I ran some subsurface scattering on him in Blender, was not great but did some TB work on him and still not that good. (Not Blender's fault, mine.) This copy is also rendered with a normal mapped but on a higher polygon mesh (75,000) to help with those nasty termination issues with GI lighting under cycles. Quote Link to comment Share on other sites More sharing options...
Contributor Tony Nemo Posted November 10, 2013 Contributor Report Share Posted November 10, 2013 Resembles a neughbor of mine, I'm interested in how you'll go about creating a mouth cavity. Quote Link to comment Share on other sites More sharing options...
Reputable Contributor digman Posted November 11, 2013 Author Reputable Contributor Report Share Posted November 11, 2013 (edited) @Tony, Just today, I got some good scanned 3D reference teeth from a friend to help me carve out the cavity. They also will make a great reference for learning how to model teeth... Picture shows the reference teeth but I am going to make my own. I am in voxel mode... no problems with mesh intersections when digging... Hide half the model and position the reference teeth. Ghost the teeth then dig out the cavity. I have good anatomy books that show the mouth cavity very well. It does not have to be perfect... I made my first pass at digging, have not finished... Once done, unhide and run symm copy from the voxels menu... Also as you can see from the picture much is left to do on this sculpture. Edited November 11, 2013 by digman 1 Quote Link to comment Share on other sites More sharing options...
Advanced Member alvordr Posted November 11, 2013 Advanced Member Report Share Posted November 11, 2013 This is the first time I've heard a good use for the hide tool. I don't really ever use it, but now I may. Quote Link to comment Share on other sites More sharing options...
Contributor Tony Nemo Posted November 11, 2013 Contributor Report Share Posted November 11, 2013 The use of 'reference teeth' is a good idea as my attempts without have yielded cavities that are too big which can show up in animations. Quote Link to comment Share on other sites More sharing options...
Contributor ajz3d Posted November 12, 2013 Contributor Report Share Posted November 12, 2013 I'd be careful with the Hide tool. Several times I had unpleasant surprises after coming out of it. Always save before hiding stuff. Quote Link to comment Share on other sites More sharing options...
Reputable Contributor digman Posted November 12, 2013 Author Reputable Contributor Report Share Posted November 12, 2013 (edited) I'd be careful with the Hide tool. Several times I had unpleasant surprises after coming out of it. Always save before hiding stuff. Yep, I save before doing anything major or minor at times, long years of using software, the "OH S**ht" moments I try to have few and far between. The split tool is safer I would think, then you could merge the layer back but your mileage my vary... Last version to show in the wip section. Texture in 3DC, some SSS in Blender, painted the eyes and teeth in TB plus a little over painting and a filter. A combintion of 2D and 3D. I have not going for realism but a schism of his world... Edited November 12, 2013 by digman 1 Quote Link to comment Share on other sites More sharing options...
Advanced Member alvordr Posted November 13, 2013 Advanced Member Report Share Posted November 13, 2013 Haha! Very nice work! I love how it's coming along. Quote Link to comment Share on other sites More sharing options...
Reputable Contributor digman Posted November 16, 2013 Author Reputable Contributor Report Share Posted November 16, 2013 (edited) Michalis show the Blender community about a year or so ago how to sculpt using uvs... I recently thought I see if 3DCoat could do at least part of it... I unwrapped the model in Blender using follow active quads, then brought the model back into 3DC. Blender has more powerful features to work on this type sculpting but I do see some very interesting stuff you can do in 3DC. This will be quite interesting to explore more... The first image I used a material file provided by michalis for the uv sculpting. The second image I used my own plus just some experimenting... The models are from MV mode but exported as real polygons (appox1.6 million each) and merged as surface mode objects. Edited November 16, 2013 by digman Quote Link to comment Share on other sites More sharing options...
Advanced Member michalis Posted November 16, 2013 Advanced Member Report Share Posted November 16, 2013 he he I like the second one a little more. Now, having some more crazy ideas, Taking full advantages of 3dcoat. Quote Link to comment Share on other sites More sharing options...
Reputable Contributor digman Posted March 12, 2014 Author Reputable Contributor Report Share Posted March 12, 2014 (edited) It's been awhile. The start of a hand study... Blocking in shapes at this early stage. One hand is 150,000 voxels, started from the smallest voxel sphere. (14,000 voxels) Once I get the shapes corrected, then I will boost the resolution up and start defining the hand some more. I have res+ one time already after I got the basic form. I still enjoy blocking in with voxels as it is easy to adjust and you do not have to worry about unwanted intersections of the mesh... Edited March 12, 2014 by digman 1 Quote Link to comment Share on other sites More sharing options...
Advanced Member alvordr Posted March 13, 2014 Advanced Member Report Share Posted March 13, 2014 Nice job on the hands. I find it's necessary for me to take a difficult body part like that and just do as many as I can to get it right. Even if you have one completely done, and keep it in Voxel mode, then it's easy to just merge into another mesh you're working on and tweak. Quote Link to comment Share on other sites More sharing options...
Reputable Contributor digman Posted March 14, 2014 Author Reputable Contributor Report Share Posted March 14, 2014 (edited) Thanks alvordr. I am continuing on the study... Just having some Twistedbrush fun on the hands as I work on them. Blender Cycles render and TB postwork... Edited March 14, 2014 by digman Quote Link to comment Share on other sites More sharing options...
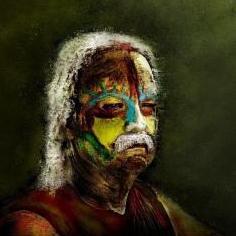
Reputable Contributor digman Posted May 16, 2014 Author Reputable Contributor Report Share Posted May 16, 2014 (edited) Image as mesh with some relief sculpting. TwistedBrush plus 3DCoat. A tortured soul... Edited May 16, 2014 by digman 1 Quote Link to comment Share on other sites More sharing options...

Recommended Posts
Join the conversation
You can post now and register later. If you have an account, sign in now to post with your account.
Note: Your post will require moderator approval before it will be visible.