Advanced Member benk Posted October 23, 2015 Advanced Member Report Share Posted October 23, 2015 Thanks for sharing your technique Digman. Looks to be a very similar approach to Zbrush clay build up tool...but with all the advantages of voxels. I have experimented some with the carve tool to do this sort of thing but haven't achieved nearly the level of refinement you have. I'll look into trying to see if I can set up some presets similar to the ones you have shown in the image attachment. Many thanks again for the technique explanation. bk Quote Link to comment Share on other sites More sharing options...
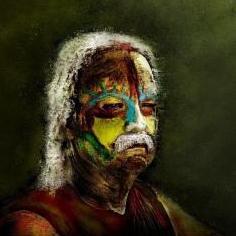
Reputable Contributor digman Posted November 1, 2015 Author Reputable Contributor Report Share Posted November 1, 2015 A fun little project. I took a recent 15 minute real pencil head study, took a photo of it. Adjusted the colors and then brought the image into 3DC as a mesh. Did a little sculpting on it... Pure fun and make the study a little more artisty... 4 Quote Link to comment Share on other sites More sharing options...
Contributor Tony Nemo Posted November 1, 2015 Contributor Report Share Posted November 1, 2015 "Artisty" indeed! The texture changes look great and the color tones show them off. Quote Link to comment Share on other sites More sharing options...
Advanced Member arumiat Posted November 6, 2015 Advanced Member Report Share Posted November 6, 2015 A fun little project. I took a recent 15 minute real pencil head study, took a photo of it. Adjusted the colors and then brought the image into 3DC as a mesh. Did a little sculpting on it... Pure fun and make the study a little more artisty... This is beautiful buddy =) Quote Link to comment Share on other sites More sharing options...
Reputable Contributor digman Posted November 9, 2015 Author Reputable Contributor Report Share Posted November 9, 2015 (edited) First Substance Painter to 3DC workflow test on a simple model. Model sculpted in 3DC and low polygon retopo mesh but used SP for the high to low polygon baking plus maps and then created the material base in SP. Exported out the needed maps from SP. In 3DC added more grunge dirt work, lettering and hand painted distress over the lettering. As discussed in my Substance Painter as a co-companion to 3DC thread, yes they do work well together. Sweet... ** The material idea is not mine... followed a tutorial but I added my own variations. Edited November 9, 2015 by digman 1 Quote Link to comment Share on other sites More sharing options...
Taros Posted November 9, 2015 Report Share Posted November 9, 2015 First Substance Painter to 3DC workflow test on a simple model. Model sculpted in 3DC and low polygon retopo mesh but used SP for the high to low polygon baking plus maps and then created the material base in SP. Exported out the needed maps from SP. In 3DC added more grunge dirt work, lettering and hand painted distress over the lettering. As discussed in my Substance Painter as a co-companion to 3DC thread, yes they do work well together. Sweet... ** The material idea is not mine... followed a tutorial but I added my own variations. Are you so kind and explain the advantages in this workflow for using SP here, please. It is really interesting me. I am always looking for better workflows.Thank you. Quote Link to comment Share on other sites More sharing options...
Reputable Contributor digman Posted November 11, 2015 Author Reputable Contributor Report Share Posted November 11, 2015 (edited) @Taros. let me use the software for a week or two then I will post some information here or in a pm... What I call a 3D photo manipulation... Found the 2D photo at a free texture site. Use BM2 to create albedo, normal, metallic maps etc.. 3DC for applying them to a flat plane for PPP work, then creating my own lighting and over painting... Edited November 11, 2015 by digman Quote Link to comment Share on other sites More sharing options...
Contributor Tony Nemo Posted November 11, 2015 Contributor Report Share Posted November 11, 2015 It would kill to print that with copper. Quote Link to comment Share on other sites More sharing options...
Reputable Contributor digman Posted November 15, 2015 Author Reputable Contributor Report Share Posted November 15, 2015 (edited) @Tony, Now that is a thought... A concept tree... banged out this 35 minute 3DC tree (Sculpting to paint room) and then painted a 30 minute 2D concept around it for possible later development into a render. 3DC my go to application for freedom in quickly exploring creative ideas... Twistedbrush for the 2D concept... Everything thing done in an hour... from the time the idea struck to the time I was done with the concept.... Edited November 15, 2015 by digman 1 Quote Link to comment Share on other sites More sharing options...
Reputable Contributor digman Posted November 20, 2015 Author Reputable Contributor Report Share Posted November 20, 2015 (edited) I am working on a Wip head sculpt for SSS, but after working for a while, it is break time... I have to do something with the model even in it's current state, well so here is is... First picture. The other two pictures are of Michael's skin smart materials as a base and I worked up up there. not done of course.. Slightly different skin color in each picture. Tested on the Wip that needs my attention to finish... Last picture... another I need a break image... Edited November 20, 2015 by digman 1 Quote Link to comment Share on other sites More sharing options...
Reputable Contributor digman Posted November 21, 2015 Author Reputable Contributor Report Share Posted November 21, 2015 (edited) L"Ancien Regime and Michaelgdrs have gotten me thinking and playing around with SSS... Michael with his excellent faux skin shaders for 3DC and L'Ancien Regime studying and experimenting with SSS. I have been in Blender working on a skin shader... Everything is just place holders as I was only concerned with the SSS itself... This in not the final textures or head sculpt. Things left to do in 3DC...Finish sculpting the head, finish clothing, maybe a uniform of some type (idea at the present), Create real skin alphas and then the texturing itself... Skin SSS Shader applied to an earlier version of the model... Eyes hand painted atm... Edited November 21, 2015 by digman 2 Quote Link to comment Share on other sites More sharing options...
Reputable Contributor digman Posted January 16, 2016 Author Reputable Contributor Report Share Posted January 16, 2016 (edited) I've been doing a lot of logical work... Ok, tonight I will do something different. A favorite past time is to take older 2d images into 3DC for some sculpting work and then back to TwistedBrush for some postpro... Edit: added another variation.. Edited January 16, 2016 by digman 3 Quote Link to comment Share on other sites More sharing options...
Contributor Tony Nemo Posted January 16, 2016 Contributor Report Share Posted January 16, 2016 Nice technique, David! Quote Link to comment Share on other sites More sharing options...
Reputable Contributor digman Posted February 6, 2016 Author Reputable Contributor Report Share Posted February 6, 2016 A fun little project from today. Free scanned mesh...retopoed---baked for a normal map. Applied a smart material I created. Rendered in the Render room with a little post pro... 2 Quote Link to comment Share on other sites More sharing options...
Contributor Tony Nemo Posted February 6, 2016 Contributor Report Share Posted February 6, 2016 "Free scanned mesh"? Is there a link and how did they scan him or is it a figurine? Quote Link to comment Share on other sites More sharing options...
Reputable Contributor digman Posted February 16, 2016 Author Reputable Contributor Report Share Posted February 16, 2016 (edited) Painted in TwistedBrush. Imported into 3DC image as mesh, rendered in 3DC. A little more post work in TwistedBrush. Titled 1968... Edited February 16, 2016 by digman 1 Quote Link to comment Share on other sites More sharing options...
Contributor Tony Nemo Posted February 16, 2016 Contributor Report Share Posted February 16, 2016 Media Art! Nice work David! Quote Link to comment Share on other sites More sharing options...
Reputable Contributor digman Posted February 28, 2016 Author Reputable Contributor Report Share Posted February 28, 2016 Thanks Tony... Here is another one... 2 Quote Link to comment Share on other sites More sharing options...
Contributor Tony Nemo Posted February 28, 2016 Contributor Report Share Posted February 28, 2016 Is that 3D? If so, you may have hit upon a new art form of 3D printed paintings. Quote Link to comment Share on other sites More sharing options...
Reputable Contributor digman Posted March 3, 2016 Author Reputable Contributor Report Share Posted March 3, 2016 (edited) @ Tony--- It is a 2D to 3D combo again... Printed on canvas or a laser print would be nice... ---------------------------------------------------------------------------------------------------------- The other anatomy study got me going again. I brought in a head from another model. Darn, I am forever cursed with jumper interest disease... Ya know me, need some scene to inspire further work... Edited March 3, 2016 by digman Quote Link to comment Share on other sites More sharing options...
Reputable Contributor digman Posted March 12, 2016 Author Reputable Contributor Report Share Posted March 12, 2016 (edited) I been dusting off my 2D digital brushes... This is an old 3D base sculpt that I shown a long time ago.. I zoomed in and cropped for composition. Now starting to re work the painting. Showing the wip here as it's base is 3D-Coat. More work to be done.. Enjoying my break.... Edited March 12, 2016 by digman 3 Quote Link to comment Share on other sites More sharing options...
Advanced Member Aleksey Posted March 12, 2016 Advanced Member Report Share Posted March 12, 2016 (edited) great looking paintings! sorry to ask here, but i remember someone here posted a french guys painting application, which ran on opengl and the paints mixed as you painted it had a very 90's looking beveled purple interface with lots of circles. [edit]: no worries, found it. called verve. cheers! Edited March 12, 2016 by Aleksey Quote Link to comment Share on other sites More sharing options...
Contributor Tony Nemo Posted March 12, 2016 Contributor Report Share Posted March 12, 2016 Good work, David! That's real impasto. Quote Link to comment Share on other sites More sharing options...
Reputable Contributor digman Posted August 11, 2016 Author Reputable Contributor Report Share Posted August 11, 2016 A combo wip work using 3DC and Polybrush... Voxel shader and Rendered in 3DC with a little postwork. 4 Quote Link to comment Share on other sites More sharing options...
Advanced Member do lo Posted October 5, 2016 Advanced Member Report Share Posted October 5, 2016 works seem to have very nice base. they just need to be finished up better. Quote Link to comment Share on other sites More sharing options...
Reputable Contributor digman Posted January 2, 2017 Author Reputable Contributor Report Share Posted January 2, 2017 (edited) Learning Photoscan for photogrammetry which I got a few days ago... I purchased a Sony A6000 \ 24 mega pixels for better photography and to use with Photoscan. Shot in Raw format, then converted to uncompressed Tiff for use in Photoscan... 68 meg per image... To increase the quality of the model will setup a light studio in my garage. Better even lighting you can reduce the small bumps you get with poor lighting The textures in the case make up for a ok scan. Workflow was: Shot 26 images. Just learning so I did not shoot the top or bottom. Use 3DC to close the holes. Abode camera raw to convert the raw images to Tiff. Photoscan to create the model and textures. 3DCoat for clean up. Mudbox for the auto-retopo. appox 8000 polys. 3DC to create the UV set and export. Photoscan to reproject the textures to the low-polygon model with new uv set. 3DC to bake the normal map Imported the texture map created by Photoscan into the paint room. Rendered in the Render room Done... Edited January 2, 2017 by digman 2 Quote Link to comment Share on other sites More sharing options...
Advanced Member Garagarape Posted January 2, 2017 Advanced Member Report Share Posted January 2, 2017 Oh! That's cool! If I had a good camera, I'd try to make environment maps with a mirror ball too. The shoe model is great. I wonder how many polygons you have on it (but I wouldn't dare bet on it). Quote Link to comment Share on other sites More sharing options...
Reputable Contributor digman Posted January 15, 2017 Author Reputable Contributor Report Share Posted January 15, 2017 (edited) A few more test using photogrammetry and 3DC. No normal map this time but straight to the paintroom. Rendered in 3DC. Edited January 15, 2017 by digman 2 Quote Link to comment Share on other sites More sharing options...
Advanced Member Garagarape Posted January 16, 2017 Advanced Member Report Share Posted January 16, 2017 Cool stuff David! Is that a pig skull? I can imagine you putting this on a tray for the camera shooting. I like modeling things by myself, but I must admit that photogrammetry results are amazing! Are the thin cracks on the skull captured while shooting or did you add them in the paint room? Quote Link to comment Share on other sites More sharing options...
Reputable Contributor digman Posted January 16, 2017 Author Reputable Contributor Report Share Posted January 16, 2017 (edited) 12 hours ago, Garagarape said: Cool stuff David! Is that a pig skull? I can imagine you putting this on a tray for the camera shooting. I like modeling things by myself, but I must admit that photogrammetry results are amazing! Are the thin cracks on the skull captured while shooting or did you add them in the paint room? The animal is a Warthog. Yes, models are placed on a turntable. The thin cracks are in the model. They would be more pronounced in the Warthog model but I ran the photoscan settings on medium quality and not high. The texture really brings them out. I also used the Warthog de-lighted albedo texture as a imported displacement map in PPP mode which is converted to normal map information. This helps too on bringing small details out. You can fine tune the amount of depth for the normal map upon import or adjusting the depth opacity in the layer. Your love for Modelling really shows up in all your work... My take on hand done modelling, I still love it. I like expanding my knowledge of 3D and photogrammetry has many uses. The Unreal 4 Kite demo landscape had lots of photogrammetry objects. I also like it for study. How does a real world object look in 3D using the model as a study guide for hand modeling and texture creation, like having a reference picture but in 3D. So in other words it is all art just as real world sculpture and photography though different share as a means of expression through the artist eyes... These test I do not consider art as there is no emotional content with them or composition. Edited January 16, 2017 by digman Quote Link to comment Share on other sites More sharing options...

Recommended Posts
Join the conversation
You can post now and register later. If you have an account, sign in now to post with your account.
Note: Your post will require moderator approval before it will be visible.