Search the Community
Showing results for tags 'Painting'.
-
 Finally had some time to get back into the Factures workflow. I've decided to make a walkthrough video of this feature, if anyone is interested in knowing more about it. I hope it continues to evolve, as it's a really cool idea. Cheers!
- 7 replies
-
- 2
-

-
- factures
- vertexures
- (and 2 more)
-
HI, I've had many people reach out to me on how to create a multi-layer volumetric object like a brick with an inner and outer layer, so I decided to create a video showing my approach for creating this. Hope this comes in useful for a few of you. Enjoy!
-
 This character was painted in 3D Coat using ptex. Then, I did the lookdev, layout and rendering in Lightwave 3D 2020. The post effects were done using Denis Pontonnier plugin for Lightwave, DPFilter.
© Slick3d.art
-
Read more Inkscape is a drawing and painting tool similar to Illustrator, CorelDraw, and Xara X, but with features, new tools, and interface style of its own. It emphasizes the W3C standard Scalable Vector Graphics (SVG) file format, but reads and writes a wealth of other formats including PDF, so it is an easy complement to your other graphics and desktop tools. Best of all, Inkscape is created *by* the community *for* the community: Inkscape is 100% Open Source and freely available to everyone in the world. Release Notes: http://wiki.inkscape.org/wiki/index.php/Release_notes/0.91 https://inkscape.org/en/release/0.92.2/
-
Hi All, This is just a sneak peek at how I've been approaching sculpting with Dynamic Materials. It feels like a natural way to sculpt. Not all models, but it's been great for naturalistic props with natural or organic materials. I plan to make a more Indepth video. -Alex
-
 Do you think it would be possible to add a function for increase the quality level used when editing in rapid projection (outside of 3Dcoat) just like BlackSmith 3D ? This mode is really usefull and work perfectly, but the quality loss is too large if the resolution of the projection remains in the screen resolution. Just to explain quickly if you don't known how work BlackSmith3D, you can choose from 100% to 1000% of the current screen resolution to work with the external projection mode, working in the 1000% mode if just perfect, because the projection has virtually no loss. I hope you understand, and sorry for my very bad English; i'm French
 -
 Hello, I thought I was crazy because I could swear this feature was in Textura at some point, and indeed it was, but for some reason it was removed. This is extremely helpful for painting textures across disconnected meshes in one stroke, lately I've been needing it a lot but it's very frustrating to not have it available anymore for no apparent reason. It forces me to paint somewhere else. This dropdown: I checked and this feature was removed on update 2022.19. 2022.18 still has it, luckily. Is it possible to bring it back, please? Thanks!
- 2 replies
-
- 1
-
-
- painting
- 3dcoattextura
- (and 1 more)
-
There is so much power working in this new way. I know it's still early, but it has changed how I think about building up a textured surface in voxels. The only drawback is if I want sharp details in my textures, I have to increase the voxel density quite a bit. I might be missing something, so if anyone has any suggestions to capturing high levels of detail in the texture, but not go too crazy on the voxel density, I would love to hear how I can achieve that. Anyway, here's an example where I constructed a simple board but put it together with voxel paint depth and started adding wear to it in a very, natural and non-destructive way. Thanks to the 3D Coat geniuses for adding this feature. can't wait to see where you take it next!
- 1 reply
-
- 1
-
-
- volumetric
- painting
- (and 1 more)
-
Hi All, Here's a short video of some interesting uses with the new Voxel or Volumetric Painting tools. Hope you like it.
-
Hi All, I've finally got around to playing with the volumetric painting feature. It's really incredible and can't wait to see this evolve. Anyway, I know there have been some videos already shared, but I thought I would share yet another video. Cheers! Also, I wanted to give a shout out to @Silas Merlin who has helped inspire me with his videos as well.
-
- 5
-

-
-
- voxels
- volumetric
- (and 1 more)
-
Hello, I scouted the forums but found nothing regarding this. The eraser, even at 100%, seems to not completely erase color. It leaves very subtle un-erasable paint behind, which looks pretty bad. I work with toony texturing and shading, 3DCoat is great for it. This bug however really ruins the look of things. It forces me to erase it outside 3DCoatTextura, and that's kind of a pain. A couple of contrast-boosted examples (its hard to see with gif compression and all) without boosted contrast on a simple sphere: Repro: - New Paint uv mapped mesh -> default sphere - Switch to flat shading for easy visibility - painting only color (preferable black) paint on empty layer layer1 - Erase with either ctrl or eraser itself. Notice it still leaves subtle unerasable color. I am using 3DCoatTextura. I tested multiple versions and found that it was on version 2022.14 where it started happening. I can't see the changelog so I don't know what was introduced then. Haven't tested on normal 3DCoat. Happens also on latest 2022.32. Doesn't seem to affect gloss or depth. Tried many settings to try to erase it but couldn't, except for Make Transparent, but that erases everything, or erasing it outside 3dcoat. Curiously, if you use the eraser tool while holding down ctrl, it brings the "erased" color back. On 2022.13 it erases it completely. I'll have to stick to that for now. Hoping this will get fixed soon. It's silly that an eraser isn't actually erasing
-
Hi, I'm working on my first project in 3dcoat and i'm struggling getting the paint room to work after i've done retopo and uv maps. Here is what i've done so far: 1. I sculpted in zbrush then I uploaded the model to 3d coat as an obj file as reference mesh. The model shows up in the paint room and the retopo room as a white model but it doesn't show up in the sculpt room, not sure if this matters. 2. I went to the retopo room and retopologized the model. I marked the UV seams then I unwrapped. 3. The UVs don't show up in the UV tab which from the videos i've watched, I don't think it's supposed to show up there anyway. So then I went to bake -> bake w/ normal map. I included a picture of the baking settings I chose in this link: https://imgur.com/a/7TnX2rb and to show that the outer shell is covering the model. The inner shell is on the inside of the model. 4. I then clicked ok and the next box pops up for "import object for per pixel painting" where the only box I have checked is the "treat materials as separate textures". Then I pressed ok and let it bake. 5. Then I went over to the paint room and it looks like there are two models. One gray one and one white one, and they overlap and look like the picture in this link: https://imgur.com/a/7TnX2rb I am able to paint on the gray model but I have the overlap of the white model. Did I do something wrong? Which model should I be painting on? If i'm supposed to be painting on the gray, I don't see a way of hiding the white model. I don't know if i'm at the right place or if I made a mistake somewhere along the way. From the videos I watched, I only see them having one model in the paint room. Let me know how I can paint correctly. Thank you for your time!
-
Hi I have used 3d Coat for years and periodically search for a tutorial on a feature that I assumed was so obvious that it must be present in 3d Coat. Each time I fail to find an answer and give up, but on this occasion, I thought I should ask if only to confirm my suspicion that it never existed. Why can I either flood fill or spray paint a texture while sculpting or painting using an alpha brush? Surely if I want to paint reptile skin I should not have to dab the brush over the surface making little islands of texture with blurry areas in between? Why can't I just sweep over the surface using pen pressure to vary the depth and size of the scales? I attach a picture illustrating the problem of painting with a static brush that I have taken from a tutorial by Learn3dsoftware.com.
-
Hi everyone! I've created a lot of pieces to be used in a large project, using a 3D software, and now I'm importing one by one, painting every piece and re-exporting. I guess there's no problems in this work flow, but I'm wondering if there is a way to automate some tasks. Let me explain: I have 4 types of doors, and each type would have 5 types of different materials, so if my math is not wrong I will do the same operations 20 times. No problems! But if I could save, let say a way to quickly apply the smart materials to the second, third and fourth types, after had applied to the first one. I'm think in a template, in the way, I import the mesh, bake or re-bake the ao and curvature maps (if need), then I select the template and all the job is done "semi-automatically" only clicking in one button. This way all the seconds, thirds and so on material options are the same, as expected, and no need for all the adjusts again! Ahh: I've already created all the smart-material needed for the projects. Now you have the general idea I may ask: is there a way to do it?
-
Hello! Tell me, please, why, when previewing, the clarity of the texture differs from applied to the model ???
-
Hi guys, Upgraded to the professional version a few hours ago and I'm trying to sketch on the Paint Tab. However, I'm unable to actually paint- as my cursor won't change into the brush and I keep getting "Please Choose an Option" down at the bottom. I'm basically just trying to do this. I'm not totally new to 3dcoat, but I'm having trouble figuring out why I can't paint! Any help would be greatly appreciated, thanks!
-
Hi everyone, I am under a year new to 3DCoat and I love it so far. I purchased it right away knowing what it was capable of and specifically it seemed like the only 3D painting program that can work with Displacement textures and see it in realtime! Anyway, there was no tutorial for me, I asked questions and saw bits of info that came from various places and was a bit of a nightmare after buying a new piece of software and not knowing how to use it the way you need. So recently I put together a couple tutorials, a short version and more of a complete version. This video -the long one, was not intended to show off my art skills, I'm just dabbing areas with various textures while explaining how to and trouble shooting etc. I'd still like to improve the ability to have displacement work faster and maybe display better while painting. Perhaps if the lower poly model can be subdivided once or twice and while you paint a a front facing & distance based tessellation shader is used to help bring out the details that way you could potentially have subdivision on its highest level and have the same performance and maybe memory conservation with 100% fidelity but with the speed as if you were working on a lower poly model. So here is the tutorial if any one here has mastered working with Displacement with 3DCoat please let me know how I can improve the workflow or let me know if I explained something incorrectly. I was working with 8K Photo Scanned textures from RDT
- 26 replies
-
- 1
-
-
- displacement
- painting
- (and 3 more)
-
When I draw by material from the camera my drawing texture shifts http://take.ms/Ro4p5 What is responsible for this offset?
-
Hello! The smart material Preview window show the material exactely as I want it. But when I actually draw onto the object, it looks weird. Can anybody tell me what goes wrong here and how to fix it? Thank you!
-
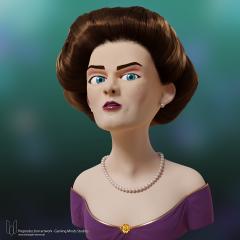
From the album: Artworks
For my collegues of Gaming Minds Studios I have created a 3D character prototype while the preproduction of their last hit Railway Empire. In the preproduction of Railway Empire we experimented with several types of Charakter styles. The Western Lady were sculpted in 3D-Coat., the textures and retopology were also done there. I transferred the model into Blender and set a very simple face rig, based on shape keys. The hair was created with Blenders hair system. The final is rendered with Blender Cycles. There was an arm rig too, but we rejected it. Even if the char went not into the final game, I like the Lady a lot and like to present it to you today. I have made some improvements in the hair style and used my CW Eye Material for her eyes. Drop me a line if you have any questions. -
Is there a way to apply layer blending within the smart material editor? I am trying to make a wasp skin texture which I am using a rust image for and apply a new layer of yellow on top, however lowing the opacity is not enough. If I apply the rust to a normal layer then the yellow on top I can use layer blending to get the desired effect. Is there a way of doing this in the smart material editor directly?
-
I was wondering if it's possible to paint with Vector Displacement maps in the normal channel area in PPP mode, has anyone tried this? I'm thinking that there might be some interesting results if a mushroom for example was painted on a top layer and regular grey mapped forest floor displacement material was painted on a lower layer. If no one has tried this, I'll give it a shot. I realize that the end texture export would also have to be Vector based.
-
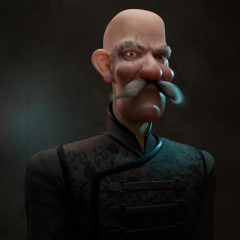
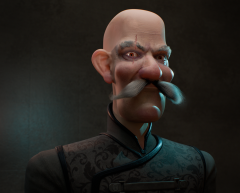
From the album: Characters
Hey, guys. Long time no see! I just want to share my latest project: The Black Squad Captain. I used Modo and 3D-Coat. I tried to paint the entire face and I'm satisfied with the final result. Hope you like it! :) Cheers, Dimitri -
I don't know if this not implemented yet or it's a bug. But looks like Steady Stroke option works only in viewport but not in the Texture (UV) Editor. 4.7.24 (and 4.7.37)
-
From the album: Characters
Hey, guys. Long time no see! I just want to share my latest project: The Black Squad Captain. I used Modo and 3D-Coat. I tried to paint the entire face and I'm satisfied with the final result. Hope you like it! :) Cheers, Dimitri