philnolan3d Posted October 26, 2009 Report Share Posted October 26, 2009 I was inspired to do a crossbow archer the other day so I started with an idea for a cool pose. I looked through my pose books until I found one that almost exactly matched what was in my head. Here's the results of my search. Originally I was thinking of one cross bow, but one in each hand like in the pictures could be even cooler. And here's what I've got with curves so far: 1 Quote Link to comment Share on other sites More sharing options...
philnolan3d Posted October 26, 2009 Author Report Share Posted October 26, 2009 Geometry created and smoothed a bit. Since the character will be fully clothed all but the hands and head / neck will be used as a collision object for the cloth, so it doesn't have to be really detailed. This is kind of an experiment since as far as I know nobody has sculpted like this before. 1 Quote Link to comment Share on other sites More sharing options...
philnolan3d Posted October 26, 2009 Author Report Share Posted October 26, 2009 Working out the basic muscle shapes. I might be getting carried away with the detail, but I want to be sure that the cloth sim will drape correctly along the muscles. 1 Quote Link to comment Share on other sites More sharing options...
Contributor 3d_sculptress Posted October 27, 2009 Contributor Report Share Posted October 27, 2009 Working out the basic muscle shapes. I might be getting carried away with the detail, but I want to be sure that the cloth sim will drape correctly along the muscles. wow and you did all this in 3DC ? (thought I was in another forum for a few second(Z) there... ) u will definitely need to do a tutorial on this, Phil ....I wanna do this Quote Link to comment Share on other sites More sharing options...
Advanced Member Oliver Thornton Posted October 27, 2009 Advanced Member Report Share Posted October 27, 2009 Looks great Phil! Quote Link to comment Share on other sites More sharing options...
Advanced Member Roger_K Posted October 27, 2009 Advanced Member Report Share Posted October 27, 2009 1 thing sticks out to me, the feet are quite unnaturally posed. your ankle simple cant bend that far. If you look at the girl in the photos she is placing her weight on her rear knee and toes. On the front the ankle is more relaxed and the foot is flat on the ground but resting on the side of her foot perpendicular to her shin. Bit of a crazy pose, it could be quite dynamic though if you tweak it Quote Link to comment Share on other sites More sharing options...
philnolan3d Posted October 27, 2009 Author Report Share Posted October 27, 2009 wow and you did all this in 3DC ? (thought I was in another forum for a few second(Z) there... ) u will definitely need to do a tutorial on this, Phil ....I wanna do this Thanks, I actually did a little video on the "curves character" a while back, but that was before Andrew added all the new curves functions. Now you can set up a base character and save it off to a file for later use, the new rotate options make it just like posing a rigged character with FK (forward kinimatics). It's not 100% intuitive, but pretty close. You can even build the character with symmetry, then "apply" the symmetry so that you can pose the left and right sides differently. Here's the old video for what it's worth: 1 thing sticks out to me, the feet are quite unnaturally posed. your ankle simple cant bend that far. If you look at the girl in the photos she is placing her weight on her rear knee and toes. On the front the ankle is more relaxed and the foot is flat on the ground but resting on the side of her foot perpendicular to her shin. Bit of a crazy pose, it could be quite dynamic though if you tweak it Thanks, I'm working on the ankles now actually. I really should redo the feet part of the rig, I'm sure I could come up with something that works much better. Being into martial arts myself (I studied Kenpo) I've been doing this pose myself and looking at how my limbs are positioned. Quote Link to comment Share on other sites More sharing options...
philnolan3d Posted October 27, 2009 Author Report Share Posted October 27, 2009 Here's a little update with tweaks to muscles, ankles, etc. This time with the grid turned on to show where the ground would be. Should be time to get started on cloth soon I think. BTW if anyone's interested in the pose books, I got this pose from this book and I have two other books like it. http://www.amazon.com/Combat-Action-Pose-Collection-Costume/dp/4906436994/ref=sr_1_2?ie=UTF8&s=books&qid=1256663738&sr=8-2 Quote Link to comment Share on other sites More sharing options...
philnolan3d Posted October 28, 2009 Author Report Share Posted October 28, 2009 I've started with the clothing. In fact I made a video. I started by making this "retopo shirt": Then I tweaked it a little in LightWave, then brought it back to 3DC and made this video: (YouTube HD)http://www.vimeo.com/7299362 (Vimeo SD) And finished with this: I actually made it twice, I think I might use the other one, I'm still deciding. Quote Link to comment Share on other sites More sharing options...
Contributor Tony Nemo Posted October 28, 2009 Contributor Report Share Posted October 28, 2009 I've started with the clothing. In fact I made a video. I started by making this "retopo shirt": Then I tweaked it a little in LightWave, then brought it back to 3DC and made this video: (YouTube HD)http://www.vimeo.com/7299362 (Vimeo SD) And finished with this: I actually made it twice, I think I might use the other one, I'm still deciding. Hi Phil, do you reckon your workflow could have done it all in 3DC without the side trip to LW? Quote Link to comment Share on other sites More sharing options...
philnolan3d Posted October 28, 2009 Author Report Share Posted October 28, 2009 Possibly. Most of what I did was using Bandsaw Pro which could have been done with 3DC's Split Rings tool. I also puffed out the sleeves a little in specific spots, which you can see at the start of the video. That might have been a little difficult since the whole point of retopo is to stick to the geometry and not pull away from it. Although, maybe it could have been done afterwords with the Move tool or something. There may be other things though that might be easier to do in a polygon modeling program like LightWave though that I haven't thought of yet. On a side note, if you can do it entirely in 3DC I would recommend trying to, it was a little tricky getting the shirt back into position when loading it back in. Not really too difficult, just one extra annoyance. Quote Link to comment Share on other sites More sharing options...
Contributor 3d_sculptress Posted October 28, 2009 Contributor Report Share Posted October 28, 2009 ok,,thanks for the vid links, Phil...watched both of them and will watch them several more times...also opened up 3DC and gave the curves a whirl,,will experiment more in a little while, but have another project I need to tend to for the moment....thanks again for the vids,,very helpful. Quote Link to comment Share on other sites More sharing options...
Contributor Tony Nemo Posted October 28, 2009 Contributor Report Share Posted October 28, 2009 Possibly. Most of what I did was using Bandsaw Pro which could have been done with 3DC's Split Rings tool. I also puffed out the sleeves a little in specific spots, which you can see at the start of the video. That might have been a little difficult since the whole point of retopo is to stick to the geometry and not pull away from it. Although, maybe it could have been done afterwords with the Move tool or something. There may be other things though that might be easier to do in a polygon modeling program like LightWave though that I haven't thought of yet. On a side note, if you can do it entirely in 3DC I would recommend trying to, it was a little tricky getting the shirt back into position when loading it back in. Not really too difficult, just one extra annoyance. Phil, I found that using the file menu's Import lets you specify importing with saved scale and location. I imported 3 object for one char and all 3 came in right on. Quote Link to comment Share on other sites More sharing options...
philnolan3d Posted October 28, 2009 Author Report Share Posted October 28, 2009 Yeah but you can't use the file menu for importing cloth as far as I know. Actually today I'm working on the bodice and this time it loaded into the correct place. Maybe I did something by accident last time. Quote Link to comment Share on other sites More sharing options...
philnolan3d Posted October 28, 2009 Author Report Share Posted October 28, 2009 Main bodice finished, The bust / upper back part is like a heavy suede while the lower part is a softer leather. Seams, laces, etc. to be added yet. 1 Quote Link to comment Share on other sites More sharing options...
philnolan3d Posted October 29, 2009 Author Report Share Posted October 29, 2009 Pants finished. I probably won't have to do much more to them, maybe a seam or something, since the top and bottom are both covered by other articles of clothing. 1 Quote Link to comment Share on other sites More sharing options...
philnolan3d Posted October 30, 2009 Author Report Share Posted October 30, 2009 Boots. These were a little bit more work as I had to retopo the foot and lower leg, then export the retopo mesh and load it in LightWave, then alter it to add the heal and folded over part at the top. I also adjusted the shape some to make it more "boot shaped". Then I could bring it back in to the cloth sim with no gravity and only wrinkle up the calf area. I still have to work on the right boot since the folded part needs to be tucked into where the leg meets behind the knee. That's all for the basic clothing parts. Time to start detailing. 1 Quote Link to comment Share on other sites More sharing options...
philnolan3d Posted November 1, 2009 Author Report Share Posted November 1, 2009 It may not look too different but I merged all of the meshes together so now we have just 3, the main body with clothes, the head, and the hands. The head and hands are separate so I can control their resolution independently. So this stage cut my triangle count from 12.5 million to just about 3 mil. It also made smoothing a lot easier so I was about to start smoothing out some of the unnecessary wrinkles. Quote Link to comment Share on other sites More sharing options...
Taros Posted November 1, 2009 Report Share Posted November 1, 2009 Phil, check this book out. It will help you understand wrinkles and drapery: Amazon Link. You have some bugs in your model... Quote Link to comment Share on other sites More sharing options...
philnolan3d Posted November 1, 2009 Author Report Share Posted November 1, 2009 Looks like a good book. I'm broke at the moment though. I was planning on finding a bunch of reference for when I start the wrinkles. I've barely started them. Quote Link to comment Share on other sites More sharing options...
philnolan3d Posted November 1, 2009 Author Report Share Posted November 1, 2009 Here you go, I did some wrinkle work. The voxel cloth was really just a foundation. Still more to do of course. Quote Link to comment Share on other sites More sharing options...
philnolan3d Posted November 2, 2009 Author Report Share Posted November 2, 2009 Quick turn-around render at this stage: Quote Link to comment Share on other sites More sharing options...
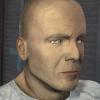
Member Bookman Posted November 3, 2009 Member Report Share Posted November 3, 2009 Quick turn-around render at this stage: your wrinkles are looking better, I think you still have some areas where they don't look physically accurate, but over all looks not to bad. I do worry that your proportions may be off, as it's hard to tell because of the pose. you neck may be too long, and your head shape is of, but I suspect you have not gotten that far yet. Quote Link to comment Share on other sites More sharing options...
philnolan3d Posted November 3, 2009 Author Report Share Posted November 3, 2009 Yeah I haven't even touched the head, I just quickly shaped the neck since I had a spare few minutes. Quote Link to comment Share on other sites More sharing options...
Reputable Contributor digman Posted November 4, 2009 Reputable Contributor Report Share Posted November 4, 2009 I like the dynamic pose that you started. This will be interesting to follow as you progress and develop your character more. Quote Link to comment Share on other sites More sharing options...

Recommended Posts
Join the conversation
You can post now and register later. If you have an account, sign in now to post with your account.
Note: Your post will require moderator approval before it will be visible.