Contributor Tony Nemo Posted January 14, 2013 Contributor Share Posted January 14, 2013 "better" than a bloodhound! Wow! That's impressive! But 'stinks' would have to evoke a pleasurable sensation much like a dog's. Quote Link to comment Share on other sites More sharing options...
Reputable Contributor digman Posted January 17, 2013 Author Reputable Contributor Share Posted January 17, 2013 Starting to work over the anatomy now... I made a mistake and saved the placeholder teeth. I will have to flatten them out and make a new layer just for the teeth... 1 Quote Link to comment Share on other sites More sharing options...
Advanced Member Garagarape Posted January 17, 2013 Advanced Member Share Posted January 17, 2013 Nice work on your last character Digman! You're pushing the limits. Remembers me a bit of Ree-Yees (hope you don't dislike Star Wars) Quote Link to comment Share on other sites More sharing options...
Reputable Contributor digman Posted January 19, 2013 Author Reputable Contributor Share Posted January 19, 2013 My next step before retopo is to finalize the anatomy, work the teeth and then start retopoing. I know the anatomy is not perfect but close enough for this sculpt. I can always return and fixed it up later. 1,800,000 polygons in surface mode for the body... Quote Link to comment Share on other sites More sharing options...
Advanced Member Garagarape Posted January 19, 2013 Advanced Member Share Posted January 19, 2013 Good progress! I like the tail a lot. Did you made it straight in order to put bones in it more easily? You did a great work on the hands! Will you refine the feet too? I bet it will look like goat legs in the end. Quote Link to comment Share on other sites More sharing options...
Reputable Contributor digman Posted January 19, 2013 Author Reputable Contributor Share Posted January 19, 2013 Garagarape, Thanks for comments... You are correct the tail is straight for adding bones plus the whole model is more or less in a relaxed position for adding a Blender rig. The hands under close inspection need work but I'm glad you like them. The feet, I was thinking more along the lines of horse or cow hooves... They do need more defining. I'm a doodler but do desire as I get more physical energy to bump the work up to the next level... Quote Link to comment Share on other sites More sharing options...
Contributor Tony Nemo Posted January 19, 2013 Contributor Share Posted January 19, 2013 IMO, a cloven hoof would fit the best. Quote Link to comment Share on other sites More sharing options...
Reputable Contributor digman Posted January 20, 2013 Author Reputable Contributor Share Posted January 20, 2013 Ok Tony, you won be over to cloven hooves, I will final out some anatomy fixes and the teeth, then off to retopo... Oh yeah, he needs a tongue, almost forgot... 2 Quote Link to comment Share on other sites More sharing options...
Reputable Contributor digman Posted January 22, 2013 Author Reputable Contributor Share Posted January 22, 2013 I went ahead and manually retopoed the body as there are no major changes left do that will effect the retopo mesh. Now I can think about painting the body... Teeth and eyes still do... Image is with a normal map created with no subdivision levels. 2850 polygons... 2 Quote Link to comment Share on other sites More sharing options...
Reputable Contributor digman Posted January 29, 2013 Author Reputable Contributor Share Posted January 29, 2013 I took a break from surface mode to rediscover voxel mode though I did switch to surface mode for a little vertex painting... A wip of an old man started from the default skull.. I got rid of the default nose and ears... This is an early wip, I just put in some temporary holder detail on him so I could bring the image into Twistedbrush for some overpainting and think about what kind of old man he will be. 1,000,000 voxels so far, not surface mode yet... Lots to do and fix and very symmetrical at the moment... Edit---- added a 30 minute overpaint to get an idea what kind of old man he can be... Quote Link to comment Share on other sites More sharing options...
Carlosan Posted January 29, 2013 Share Posted January 29, 2013 looks good ! ;D yeah, from my pov... voxel sculpt feeling when you sculpt is superior to surface mode... so bad there is few tools. note Happy BDay man ! Quote Link to comment Share on other sites More sharing options...
Contributor LJB Posted January 29, 2013 Contributor Share Posted January 29, 2013 Work those low level forms & wrinkles alot more first before to start to add the finer details. Looking good though Quote Link to comment Share on other sites More sharing options...
Reputable Contributor digman Posted January 29, 2013 Author Reputable Contributor Share Posted January 29, 2013 Thanks for the comments and the birthday wish... @LJB, those were just place holder forms and wrinkles so I could just do a quick overpaint concept of the character and will they will be redone completely when I'm done with his form... Quote Link to comment Share on other sites More sharing options...
Reputable Contributor digman Posted January 31, 2013 Author Reputable Contributor Share Posted January 31, 2013 Ok, my second what I call 3D concept. I just do it backwards. I create a basic model, then overpaint do some more sculpting, overpaint again as that helps me to build up the character as I sculpt. I load the image into the color picker and keep it open in the voxel room... All the wrinkes will be removed as they are low resolution and not very good at the moment. I think he is close enough now to finish the basic form to what kind of old man he will be, I will do some more sculpting, like tighten the lips, work over eyes, ears and other areas and then go back, increase resolution and make the final work... I'm not sure yet how wrinkly to make him.. Do you think he needs to be more wrinkly for the final work? He still has a old young look to him somewhat I think.. His older skin seems not to sag enough under the effect of gravity and lost of tightness... I show these type of concepts even with their crummy areas to show my workflow if you can call it that 1 Quote Link to comment Share on other sites More sharing options...
Advanced Member L'Ancien Regime Posted January 31, 2013 Advanced Member Share Posted January 31, 2013 Wow this is a good one Quote Link to comment Share on other sites More sharing options...
Reputable Contributor digman Posted February 2, 2013 Author Reputable Contributor Share Posted February 2, 2013 Ok, I got rid of the temporary wrinkles back to secondary form... The hair is temporary and just a place holder for Blender's Hair... I worked his ears over, did some more eye work, tighten the lips, general fixes. Now, I am trying to create that over all saggy skin look, Whew, a challenge... been working the neck and lower face but not above his lips yet, I'm still trying to find a good method... I might still throw it out and try again... 1,500,000 voxels at this stage... Quote Link to comment Share on other sites More sharing options...
Advanced Member Garagarape Posted February 2, 2013 Advanced Member Share Posted February 2, 2013 Nice sculpts Digman! I like the #104 one. Makes me think of an Egyptian priest. Quote Link to comment Share on other sites More sharing options...
Advanced Member wave of light Posted February 2, 2013 Advanced Member Share Posted February 2, 2013 Really good sculpts there Digman. Saggy skin look is hard to achieve, almost like his face is melting. Quote Link to comment Share on other sites More sharing options...
Advanced Member popwfx Posted February 2, 2013 Advanced Member Share Posted February 2, 2013 nice work! I like your aesthetic - you give a lot of emotion to the faces you do. Quote Link to comment Share on other sites More sharing options...
Contributor Tony Nemo Posted February 2, 2013 Contributor Share Posted February 2, 2013 It looks kinda like Ed Koch (recently deceased). Could it be quantum theory's "spooky action at a distance" that so annoyed Einstein? Quote Link to comment Share on other sites More sharing options...
Reputable Contributor digman Posted February 5, 2013 Author Reputable Contributor Share Posted February 5, 2013 Thanks all for your comments... I been working the secondary forms. The human face is hard being such a complication of forms and structure... A tough go it is... A quick vertex painting (temporary) and then rendered in Blender Cycles (background in TB) to check the secondary form so far... More secondary forms to complete before moving to details which is another mind bonker... I have switched to surface mode and is now 2,100,000 polygons for the head model... 1 Quote Link to comment Share on other sites More sharing options...
Advanced Member wave of light Posted February 5, 2013 Advanced Member Share Posted February 5, 2013 That's certainly coming along nicely Digman. The colours and tones are excellent. Quote Link to comment Share on other sites More sharing options...
Advanced Member chris_solo Posted February 5, 2013 Advanced Member Share Posted February 5, 2013 great work you have a good base to make a beautiful model in Blender, you just have to make a middle poly's model, then retopo, bake and export maps (normal maps, displace, colors / diffuse) to render with Cycles! ++Chris Quote Link to comment Share on other sites More sharing options...
Advanced Member michalis Posted February 5, 2013 Advanced Member Share Posted February 5, 2013 It looks great. How did you export to blender? I mean, decimation? What about vertxpainting? What format? Quote Link to comment Share on other sites More sharing options...
Reputable Contributor digman Posted February 5, 2013 Author Reputable Contributor Share Posted February 5, 2013 Yes, decimated the model to appox. 700,000 polygons. I export the model using the PLY format which stores the vertex color information even though you decimate the model as 3DCoat still applies the vertex color map but you lose some quality. It is good enough for me to give him some life and check for form under GI lighting. I got that idea of checking form under GI lighting as you work your sculpt from you, my friend... The vertex color in the image I uploaded is only temporary... Quote Link to comment Share on other sites More sharing options...
Advanced Member L'Ancien Regime Posted February 5, 2013 Advanced Member Share Posted February 5, 2013 Yes, decimated the model to appox. 700,000 polygons. I export the model using the PLY format which stores the vertex color information even though you decimate the model as 3DCoat still applies the vertex color map but you lose some quality. It is good enough for me to give him some life and check for form under GI lighting. I got that idea of checking form under GI lighting as you work your sculpt from you, my friend... The vertex color in the image I uploaded is only temporary... There are several very learned experts in the arcane ways of 3d Coat here, a fact that is all the more impressive as 3d Coat as yet does not posses a proper textbook, a comprehensive manual or set of tutorials. Often the full power and potential of tools escapes even the minds of the very people that created them, and I include Andrew in that number. Digman has plowed his way laboriously through the thorny paths of 3d Coat by trial and error and along the way he's discovered a lot about this program that very few users know. I'm really looking forward to an encyclopedic tutorial on vertex or microvertex painting and .ply rendering from digman. It's going to be an instant classic if his Egyptian priest texture job is any indication. Quote Link to comment Share on other sites More sharing options...
Contributor Tony Nemo Posted February 6, 2013 Contributor Share Posted February 6, 2013 Hear, hear! Quote Link to comment Share on other sites More sharing options...
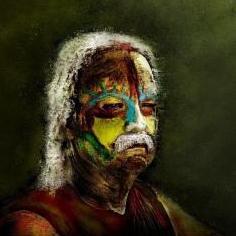
Reputable Contributor digman Posted February 7, 2013 Author Reputable Contributor Share Posted February 7, 2013 I starting to need a break from the old gentleman, so I took a 3DCoat render, then used Twistedbrush for some dramatic effects. He is textured in 3DCoat with vertex color. I duotone him out though in TB. I will return to him later... Well, here is the image such as it is... 1 Quote Link to comment Share on other sites More sharing options...
Contributor Tony Nemo Posted February 7, 2013 Contributor Share Posted February 7, 2013 Nice work, David! Quote Link to comment Share on other sites More sharing options...
Reputable Contributor digman Posted February 7, 2013 Author Reputable Contributor Share Posted February 7, 2013 Thanks Tony and all... Once I return to working on him, I going to get rid of the skin, He looks like someone first threw glue on his face then sand. He still needs small crinkle wrinkles around the eyes plus redo the eyes. I will have to check around on how to do a eye shader in Blender. Finally I hope to put him into Blender for a decent render... Quote Link to comment Share on other sites More sharing options...

Recommended Posts
Join the conversation
You can post now and register later. If you have an account, sign in now to post with your account.
Note: Your post will require moderator approval before it will be visible.