Search the Community
Showing results for tags 'paint'.
-
Hello, I recently purchased 3D Coat and started my first personal test project. I opened up the software and created a model in the sculpt room, then brought it into Paint Room and painted it. At this point, I tried to save out the object with all the aesthetic data and started to run into problems. 1) Tutorials show that when you go to Export objects and textures, it is supposed to give you a popup menu of the types of maps you want to save. This pop up doesn't appear. It only allows me to save the geometry as an obj, fbx, etc. 2) So, I go to Texture drop down and try to save everything manually one channel at a time. All the tga files come out black. Any insight to fixing this would be greatly appreciated. Thanks!
-
Hi people, I am a new old user (yes I had 3DCoat for a long time, but only now I am a real user) and my idea is to start paint things for DAZ Studio that is using NVidia Iray engine for render and support for PBR shaders. So anyone with tips to paint cloth, textures let me know.
-
Hey all, I've just changed up my version to the new 4.7 from 4.5.4 and I can't seem to setup my color picking in the paint room how it was in the previous version. I used to be able to paint onto a surface, then press 'V' and it would pick the color under the brush cursor (even if I didn't touch the screen with my stylus), but stay on the paint brush tool so I could continue painting. Now when I press 'V' it deselects the paint brush, selects the pick tool and I have to physically press on the screen where I want to pick the color, then press the brush key to go back to painting which is super annoying compared to the previous setup. Is there a setting I can change to have it work like my previous version?
-
 Hello everyone, I am trying to set up a pipeline using 3DCoat as my main painting program for Low Poly 3D Pixel art. I run into two issues. The first is the pixel padding settings when using the Ctrl-P shortcut are not respected. Steps to reproduce Problem 1: Import an .obj for painting in 3DCoat Go to Edit/Preferences/General tab Set padding to Never and padding Width to 0 Export your layers using the hotkey Ctrl-P Go to Photoshop and notice that the padding is still there. The second issue has to do with the corruption of multiple layer groups when a .Psd file is sent back and fort between 3DCoat and Photoshop. Steps to reproduce Problem 2: Import an .obj for painting in 3DCoat Create at least 3 layer groups and fill them with a random amount of layers. Export to Photoshop using either the Ctrl-P hotkey or go to Textures/Export/All Layer Color Go to Photoshop and notice the dialog box indicating: "Some Groups were found corrupted and repaired." Notice that some of the groups you have created are now turned into empty layers and that the layers contained within are placed below the new layer. Alternate steps to reproduce Problem 2: in Photoshop, Create a .psd with at least 3 layer groups filled with a random amount of layers. Save and Import them in 3DCoat. Notice that some of the layer groups are now nested inside of one of your Groups (usually the one placed highest in the list). Notice that if you export back to Photoshop, you may get the "Some Groups were found corrupted and repaired." dialog box. I am using Version 4.7.06 of 3DCoat and Photoshop CC 2014 on Windows 7. Related Mantis bug reports: Padding Problem: http://3dcoat.com/mantis/view.php?id=2144 Layer group problem: http://3dcoat.com/mantis/view.php?id=2145
 -
Hi everyone, I wanted to introduce myself to this very helpful community. I've been using 3D Coat for a while now, mostly to UV map hardbody models I've done in Cinema4D. My plan was to do low poly models, then use normals to add additional detail like grooves and panels. Initially I used Quixel's NDO for this, but it runs at a snail's pace on my machine and I simply can't work like that. Yesterday I had a closer look at 3DC's Paint Room and it seems to have a lot of the functionality that NDO and Photoshop would offer. However, for the life of me, I can't seem to get a brush stroke to follow a square or a closed spline path. All I get is a fill in the shape of the spline/rectangle. Mind you, I know about the Spline Paint Tool, but that doesn't offer the flexibility in terms of creating shapes (rounded rectangles, loading EPS files and the like) that the 'E' menu offers. There must be a way to do this. Can you help me find it? That'd be great. Thanks a lot in advance.
-
 Hey Guys, We are having a $7 Video Summer Madness Sale at Learn3DSoftware.com. All 3D Video Tutorials are $7 Each Until 500 videos are sold. http://www.learn3dsoftware.com/ 3D Coat Tutorial Catalog ------------------------------------------------------------------ 3D Coat Version 4.5 Tutorials ---------------------------------------------------------- 3D Coat V4.5-Vol.#18-Smart Materials I- $7 3D Coat V4.5-Vol.#19-Smart Materials II- $7 3D Coat V4.5-Vol.#20-Smart Materials III- $7 3D Coat V4.5-Vol.#21-Hard Surface UV Mapping- $7 ------------------------------------------------------------------ 3D Coat Version 4 Tutorials ---------------------------------------------------------- 3D Coat V4-Volume #1-Getting Started - $7 3D Coat V4-Volume #2-Getting Started II- $7 3D Coat V4-Volume #3-UV Mapping I- $7 3D Coat V4-Volume #4-UV Mapping II- $7 3D Coat V4-Volume #5-Retopology I- $7 3D Coat V4-Volume #6-Retopology II- $7 3D Coat V4-Volume #7- Voxels I- $7 3D Coat V4-Volume #8- Voxels VI- $7 3D Coat V4-Volume #9- Voxels III- $7 3D Coat V4-Volume #10- Voxels IV- $7 3D Coat V4-Volume #11- Voxels V- $7 3D Coat V4-Volume #12- Voxels VI- $7 3D Coat V4-Volume #13-Dino Detailing I- $7 3D Coat V4-Volume #14-Auto-Retopology Secrets- $7 3D Coat V4-Volume #15- Photo Painting & Masking Tools- $7 3D Coat V4-Volume #16- Texture Baking I- $7 3D Coat V4-Volume #17- Texture Baking II- $7 --------------------------------------------------------------------------------------------- 3D Coat Version 3 Tutorials ------------------------------------------------ 3D Coat 3.5-Auto-Retopology - $7 3D Coat 3.5-Retopology- $7 3D Coat 3.5-Retopology II-Project Suchomimus- $7 3D Coat 3.5-UV Mapping- $7 3D Coat 3.5-Normal & Displacement Maps- $7 3D Coat 3.5-Painting Color- $7 3D Coat 3.5-Voxel Sculpting-Project Dragon- $7 3D Coat 3.5-Photo Painting I-Project Elephant- $7 3D Coat 3.5-Photo Painting II-Project Human- $7 3D Coat 3.7-Painting Tools & Alpha Brushes Vol.#1- $7 3D Coat 3.7-Painting Tools & Alpha Brushes Vol.#2- $7 3D Coat 3.7-Starfighter UV Mapping-Quick Method- $7 3D Coat 3.7-Starfighter Detailing-Normal Maps- $7 3D Coat- 2D Sci-Fi Alpha Brush Collection Vol.#1- $7
 -
 Hello friends! Someone is having problems with the Edit Projections in Ext Editor ??? I'm using the latest beta version 4.5.39. (Windows 7 64 bit) When I use the option to Edit Projections in Ext. Editor and selecting any kind of scale or not (image 01_Capture_coat.jpeg), and send to my external editor program like Krita or photoshop, so this file is opened automatically, you can see the captured image, that generated psd file appears quite strange, with problems, it seems corrupted (image 02_Capture_krita.JPG). The face sent is cut in the middle of the screen, not allowing any type of paint or applying textures on the transparent part checkered psd file (image 03_Capture_krita_painted.JPG), ie, the projection is only accepted half up the face when returned to 3d coat (image 04_Capture_3dCoat_projection_failed.JPG). What to do to fix this problem? I've updated my video card driver (nvidia frame 600), and current updates windows 7. I appreciate the attention and await a solution.
 -
I have run into a new problem that perhaps the experts on the forum can solve. Upon exporting a gloss map painted in the paint room I get a bizarre textured result (see attached, map should be solid black and white as seen in texture editor). The map in the texture editor looks fine and the export is corrupted regardless of whether .tga or .png. Any suggestions greatly appreciated. bk
-
Have searched online, in this forum, with no luck, so I'll jsut shoot question here. Is there a way to make frozen selection invisible? I mean not the selected part, but to make that pattern dissappier. I know that that place is froze, but when I am painting texture, I want to see how frozen texture looks like, not somekind flashy effect. And yes I tried toggling effect (the closest to what I want is the one that makes texture whitish..). Show/Hide Freeze (CTRL+F by default) only works in UV map window, not viewport. At least for me... Thanks for help!
-
Hi guys, Does anyone know why 3d-coat is giving me the wrong layers inside the Paint room? I exported my Obj and then imported it into the Paint room. I've tried restarting the program and selecting other meshes but nothing seems to solve this issue. It's very frustrating not being able to handle my material layers I hope someone knows the answer
-
I have this weird UV island anomaly that I'm unable to paint on top of. What's that all about?
-
 I started painting my model, and noticed that sometimes I get a transparent checkered area as I paint depth. Am I painting too much depth? The depth amount is set low, like 5% or so. See the attached picture which shows the issue better. Thanks!
 -
From the album: FanArt
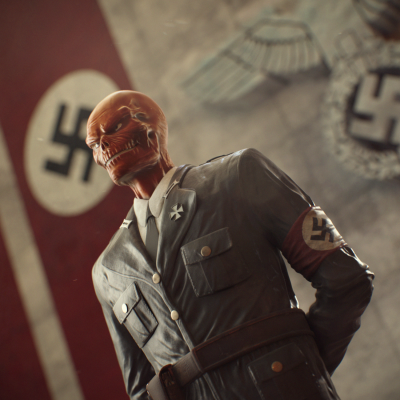
After reading Red Skull: Incarnate I decided to create a illustration. 3D Coat + Modo. Hope you liked it! -
Hey guys, This is the latest 3D Coat training bundle that I created. A great way for beginner 3D artists to get started learning 3D Coat. The bundle includes: 1) 21 Volumes of 3D Coat Training 2) Sci-Fi Alpha Brush Collection- Volume #1 (100 Alpha Brushes) 3) Sci-Fi Alpha Brush Collection- Volume #2 (50 Alpha Brushes) 4) Creature Eye Pack 5) Dinosaur Mega-Pack (40 Dinosaur Models) You can get it at Liberty3d.com for 25% Off the regular price until April 3rd. Coupon Code: L3DST2016 http://www.liberty3d.com/
-

Bug: Retopo to Paint from Script resets 3D-Coat Preferences to defaults
Guest posted a topic in General 3DCoat
Version: 4.5.19(DX64) Windows7 Home These operations, running from own Script: Bake w/ Normal Map (Per-Pixel), Retopo->per pixel (no baking), and maybe other Retopo->Paint operations (not checked), reset 3D-Coat Preferences (Edit->Preferences) to default, and used it, not actual: Normal Map Software Preset Normals Calculation Method Normal Maps Export Triangulation Method Tangent Space Standard and maybe other fields (not checked). -
Ty Frenchy Pilou for this info.
-
Hello, I'm hurry, so sorry if I'm bothering you with these newbie questions. I'm using 3DCoat to paint textures on low poly mesh as you can see from the picture. I started my painting with Blender, then I had some projection problem so I switched to 3DCoat. BUT! What I want to know is: a. why cannot I paint over the UV Island in the Texture Editor? Because I find very useful to work the area around the island in order to prevent bleeding effect, or simply I put some colors in no important part of images in order to have a palette (ok, I know I can create a layer in 3DCoat for that, but I'd like to have that colors in image too) b. Blender has an option to do edge padding during paiting: has 3DCoat something similar? c. after importing the obj mesh and the initial texture, I noticed there was a bleeding between all islands: does 3DCoat automatically create edge padding while importing? In fact I'm correcting with less success the bleeding of blue pants over shoes and the brown color of shoes over blue pants. And that brought me to point a. d. I just noticed 3DCoat make an edge padding in automatic between islands: how can I disable it? Thank you very much for any suggestion. Michele
-
Hey guys, have you been messing around with the new PBR Smart Materials in version 4.5, but you don't feel like you really know what you are doing, or if you are doing it correctly? Well don't worry, because I found this really great tutorial about how to paint with the new PBR Smart Materials in 3D-Coat! It is made by an Italian guy who goes by the name of DoctorDanko on Youtube. His Italian accent is only mild, so his English is still very easy to understand. (Big thanks to DoctorDanko for making the video!) In the video you get a good explanation of what the new PBR Smart Materials do, how to paint with them, and also how to build your own. Enjoy! https://www.youtube.com/watch?v=7hyz8OrzBtA
-
Hey Guys, Were having a Super Halloween Special at LEARN3DSOFTWARE.com. -Lifetime Memberships are 50% Off -Only $249 US (Reg.$499) Until October 31st!! -Training for 3D Coat, Lightwave, ZBrush, Modo, Substance Painter, and DDO training. -One Time Fee and you get Access to All New and Older Tutorial Releases!! -Over 157 Video Titles and More Being Added Every Month!! http://www.learn3dsoftware.com/membership_lifetime.htm
-
win 8.1 3dc 4.5.03 cuda dx64 in PPP room can not paint on a few small faces . The object was a spline curve in blender converted to mesh all normals are facing out and tried all brushes and paint bucket options etc. The uvs look fine . Then on the TEXT also from blender (not converted to mesh) the paint on all of the text are hit and miss . The text has a bevel on it and it is there that I cant paint on those spots Normal and uv look fine. One thing that did happen was I saved that file in 3cd closed up shop then reopened that file and on the Text 1/2 of the non-painted spots on the Text where painted. Also what does the * mean up top at the end of the file name? All other regular objects paint up fine and using color swatches no smart materials . I did not unwrap UV in blender I let 3dc do it in ppp. Thank you for your time.
-
I want to create characters that look like they are created from globs of paint, almost like the surface of a painting. heres a 2d example: Heres 3d examples Is there any way I can create a stamp with the shape of a pallet knife stroke, and at the same time assign it a color that is slightly random? or something like that Thanks!
-
does it keep track (show you) what colors you have used on your model? meaning if I use say 8 different colors on say 3 different layers and save it then reopen it later ill still be able to see my colors that I used or have a history layer. also can you copy all paint used on a layer or object and paste /apply it on a different part of your model. it drives me crazy and waste time trying to find what colors I used on models. I use blender and when I create a new color/material it stays there and I can name it also when I use the color picker it gets chosen but I use it mostly for modeling thanks.
-
Hey Guys, Just letting you know we are having a $7 Video Tutorial Summer Sale http://www.learn3dsoftware.com/3dcoatvideos_menu.htm -All 3D Coat titles are all $7 each!! -All Other Software Tutorials (Lightwave, Zbrush, Modo, Substance Painter, DDO) are $7 each!! ------------------------------------------------------------------------------------------------------ 3D Coat Tutorial Catalog ------------------------------------------------------------------ 3D Coat Version 4.5 Tutorials ---------------------------------------------------------- 3D Coat V4.5-Vol.#18-Smart Materials I-$7 3D Coat V4.5-Vol.#19-Smart Materials II-$7 3D Coat V4.5-Vol.#20-Smart Materials III-$7 ------------------------------------------------------------------ 3D Coat Version 4 Tutorials ---------------------------------------------------------- 3D Coat V4-Volume #1-Getting Started -$7 3D Coat V4-Volume #2-Getting Started II-$7 3D Coat V4-Volume #3-UV Mapping I-$7 3D Coat V4-Volume #4-UV Mapping II-$7 3D Coat V4-Volume #5-Retopology I-$7 3D Coat V4-Volume #6-Retopology II-$7 3D Coat V4-Volume #7- Voxels I-$7 3D Coat V4-Volume #8- Voxels VI-$7 3D Coat V4-Volume #9- Voxels III-$7 3D Coat V4-Volume #10- Voxels IV-$7 3D Coat V4-Volume #11- Voxels V-$7 3D Coat V4-Volume #12- Voxels VI-$7 3D Coat V4-Volume #13-Dino Detailing I-$7 3D Coat V4-Volume #14-Auto-Retopology Secrets-$7 3D Coat V4-Volume #15- Photo Painting & Masking Tools-$7 3D Coat V4-Volume #16- Texture Baking I-$7 3D Coat V4-Volume #17- Texture Baking II-$7 --------------------------------------------------------------------------------------------- 3D Coat Version 3 Tutorials ------------------------------------------------ 3D Coat 3.5-Auto-Retopology -$7 3D Coat 3.5-Retopology-$7 3D Coat 3.5-Retopology II-Project Suchomimus-$7 3D Coat 3.5-UV Mapping-$7 3D Coat 3.5-Normal & Displacement Maps-$7 3D Coat 3.5-Painting Color-$7 3D Coat 3.5-Voxel Sculpting-Project Dragon-$7 3D Coat 3.5-Photo Painting I-Project Elephant-$7 3D Coat 3.5-Photo Painting II-Project Human-$7 3D Coat 3.7-Painting Tools & Alpha Brushes Vol.#1-$7 3D Coat 3.7-Painting Tools & Alpha Brushes Vol.#2-$7 3D Coat 3.7-Starfighter UV Mapping-Quick Method-$7 3D Coat 3.7-Starfighter Detailing-Normal Maps-$7 3D Coat- 2D Sci-Fi Alpha Brush Collection Vol.#1-$7
- 3 replies
-
- 1
-

-
- tutorials
- smart materials
- (and 5 more)
-
Hello, I am a relatively new user to 3DCoat, but I am having difficulties with version 4.5. In version 4, I can easily paint depth with the paintbrush tool. For example, I could select a texture/stencil, adjust my depth, and build normal maps. However, in version 4.5, I can no longer seem to paint depth at all. At any depth setting, no depth appears whatsoever. I'm not sure if I am just not pressing the right buttons or what, but I was unable to find help for this topic on the forum. This is a very frustrating issue, and I really appreciate any help to solve this problem! Thank you! - Cory
-
I have a model I've painted, and I can't seem to export the texture; choosing 'Textures' -> 'Export' -> 'All Layers Color' produces transparent (empty) layers in the Photoshop file. It's also 256x256 which leads to my second question: choosing 'Edit' -> 'Mesh & Texture Resolution' doesn't do anything-- is this where you'd set the size of the exported texture images? EDIT: one more question-- when I export 'object and textures', I'm only getting the files for the object (obj file) and the material (mtl file) but not the actual image file that goes along with the material. Thanks! Bryan